

Hi Ecigssa members, In this review I take a look at the Aegis (Solo 2) S100 Kit With Z Subohm 2021 Tank from Geekvape. The S100 Kit was supplied for the purpose of this review by Allison from Geekvape.
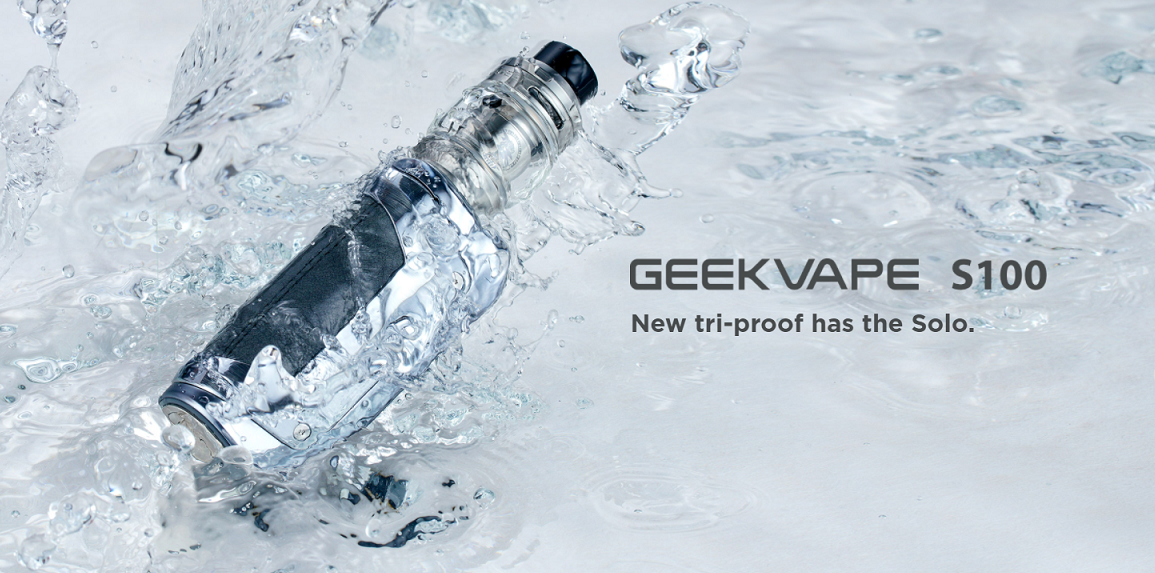
Geekvape S100
Introduction
Geekvape have been very busy of late both bringing us the new Obelisk Range but also updating and rebranding their previous Aegis devices and Zeus atomisers.
The S100 is essentially an upgraded or if you like a V2 of the Aegis Solo. The upgrades are pretty much the same on all the new Aegis devices. The devices have the added A-lock switch, improved position and seal of the USB port which is now Type C and an improved waterproof, dustproof rating of IP68 as well as a less busy slicker look!
The 100w max output device boasts Power, Bypass, VPC (curves) and full TC suite, let's take a closer look!
_________________________________________________________________________
In The Box
Contents:
Aesthetics and Ergonomics
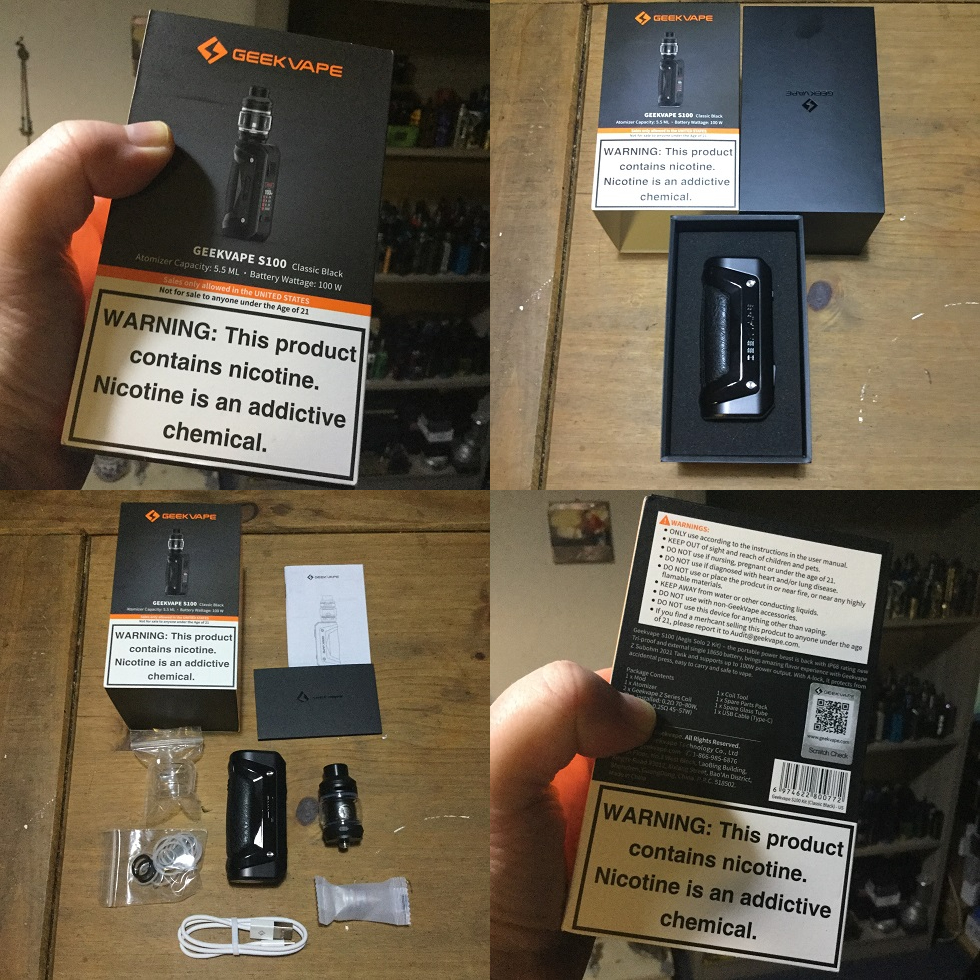
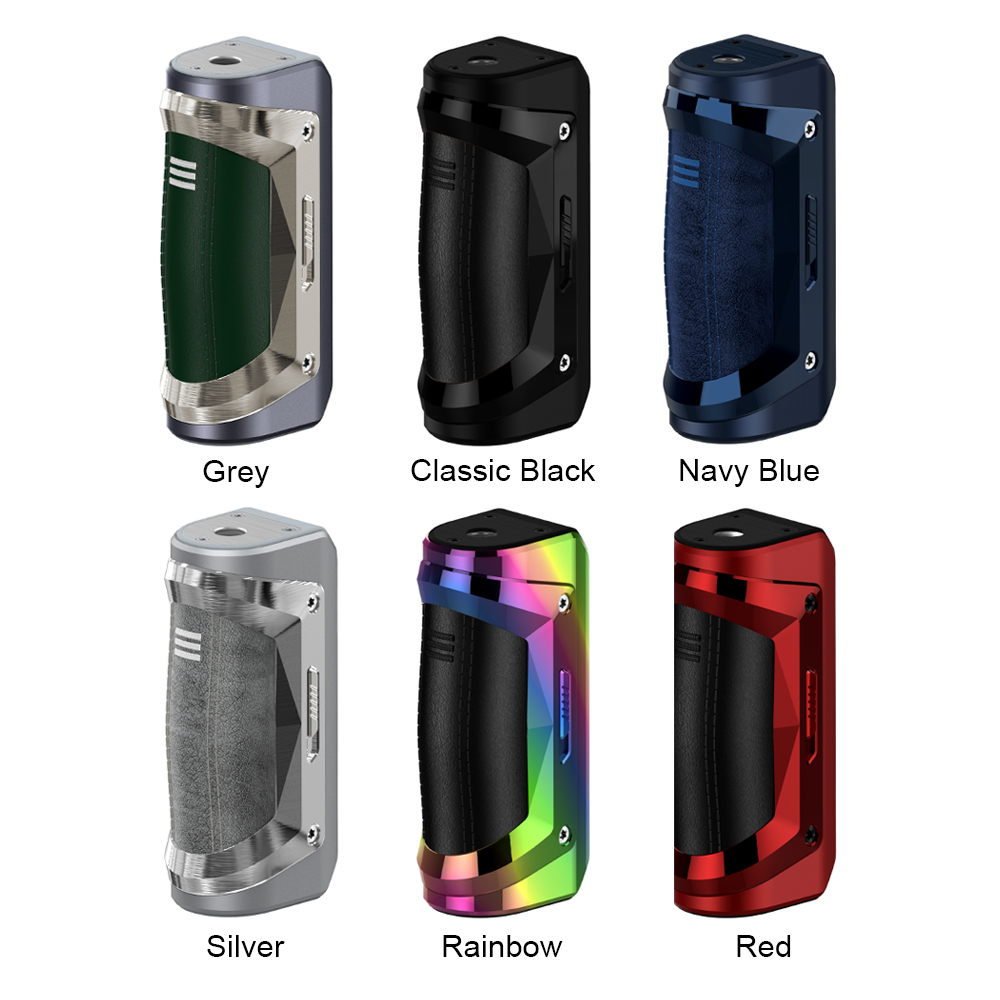
The S100 Kit came in the usual cardboard box packaging with outer cardboard sleeve which had a picture of the mod with installed atomiser in the chosen colour on the front and contents etc on the reverse. On opening I found the S100 proudly on display in the top layer with the Z subohm tank and other accessories below. I received the Classic Black version which was paired with a Black atomiser, the options are Grey, Classic Black, Navy Blue, Silver, Rainbow or Red!
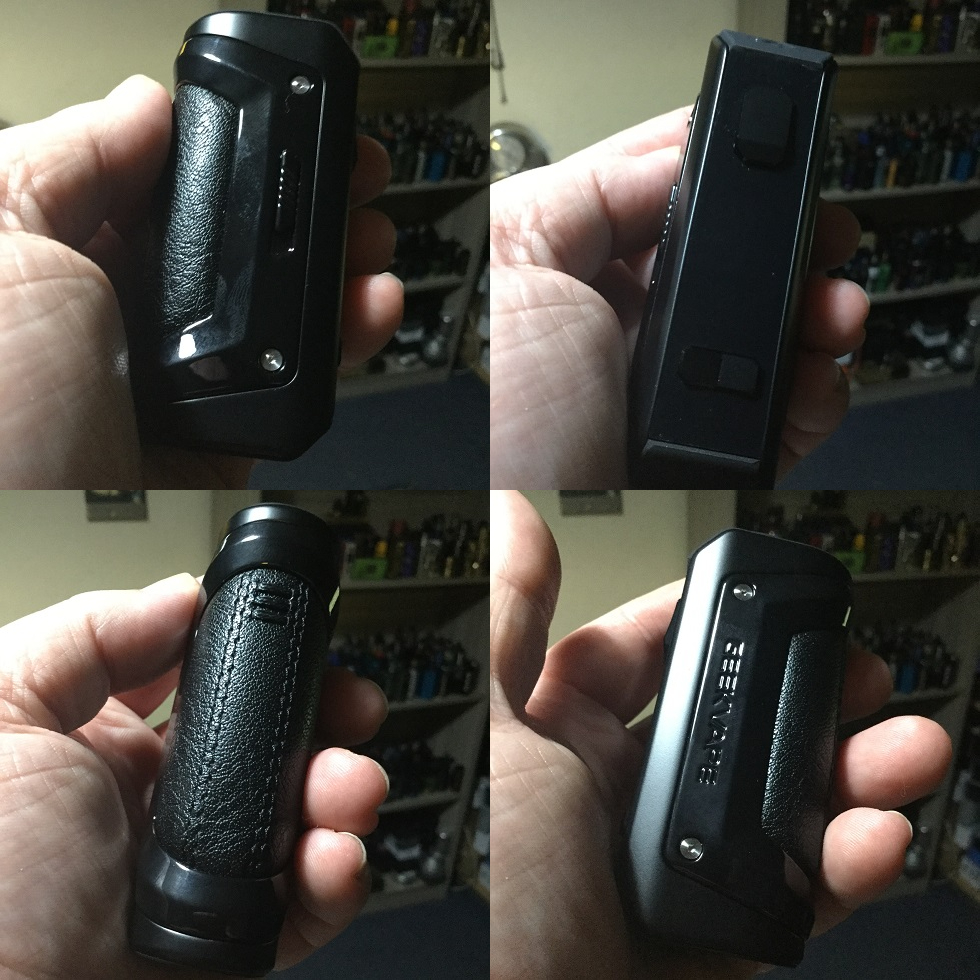
The S100 has a Zinc Alloy main chassis which has a matte finish in contrast to the Gloss finish of the metal bracket. So the sides consists of the Zinc Alloy main frame, the metal bracket (I think it's also Zinc Alloy) which sweeps both sides and on one side of the bracket we have "GEEKVAPE" embossed into the metal, on the opposite side we have the A-lock sliding catch. The spine has a heavily padded leather section then moving to the tinted front plastic panel we have a light switch style fire button top and horizontally position double switch rocker bottom, between the fire and navigational buttons is the screen. The front also has rubber cut corner sections top and bottom with the top one being the seal for the Type C USB port.
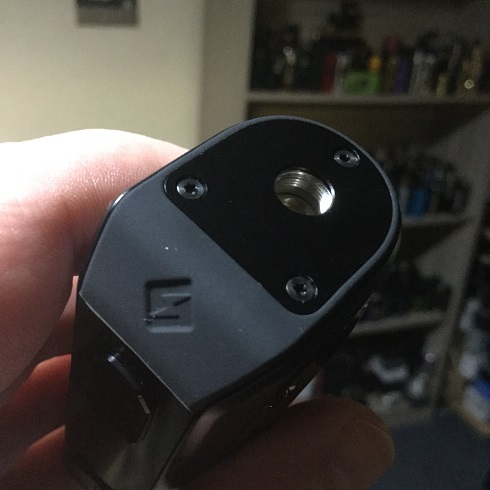
Moving to the top and like on the Obelisk and L200 instead of having a 510 plate we have the whole top surface brushed Stainless Steel with the threading directly drilled into the Stainless Steel top, the 510 is Gold plated and spring loaded, it has a stiff but above average throw, very nice!
Moving to the bottom we have the screw in battery plate with sturdy central lever, the S100 like the L200 is less busy and looks slicker than the original Solo which this undoubtedly is a version 2 of making it more aesthetically pleasing in my opinion! Like the original Solo the S100 is quite light compared to some Aegis devices and is a nice portable size that fits great in the hand!
_________________________________________________________________________
Z Subohm Tank Specs and Features:
Size: 26 x 42.5mm (Not including Drip tip) (24mm at base)
Capacity: 5.5ml (2ml TPD)
Drip tip type: 810 Drip Tip
Filling Method: Top Fill
Mesh Z dual coil 0.25ohm (45-57W)
Mesh Z single coil 0.2ohm (70-80W)(pre-installed)
Innovative quick change prebuilt coil system
Direct Top Airflow & Top-to-Bottom Airflow with leak-proof function
Fill port design for liquid spillage resistance
Updated larger airflow slots
Thread: 510
Colours: Stainless Steel, Gunmetal, Black, Blue, Gold, Rainbow, Red (Colour to suit colour of device in regards to this kit)
_________________________________________________________________________
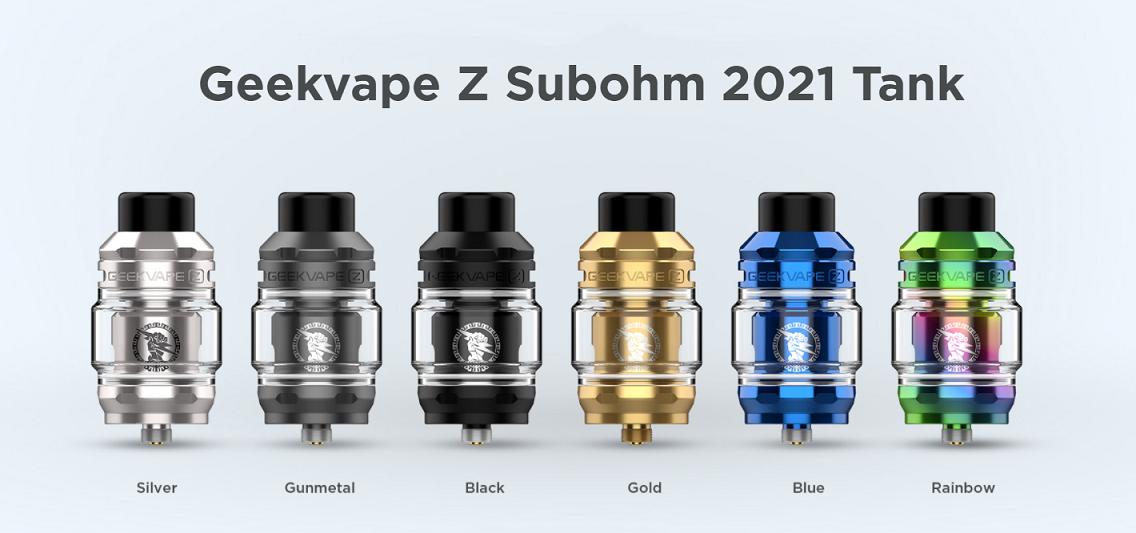
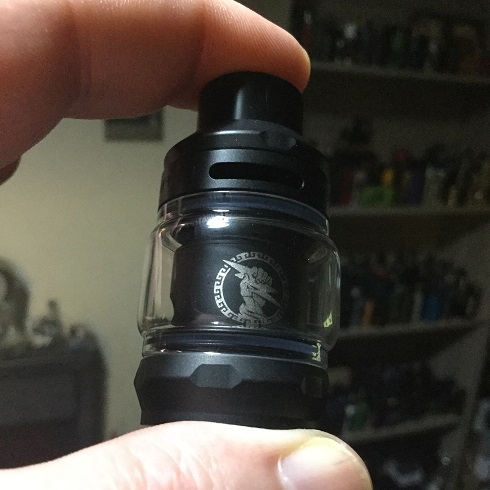
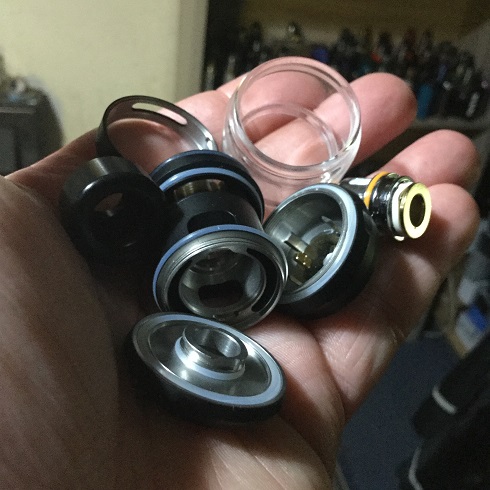
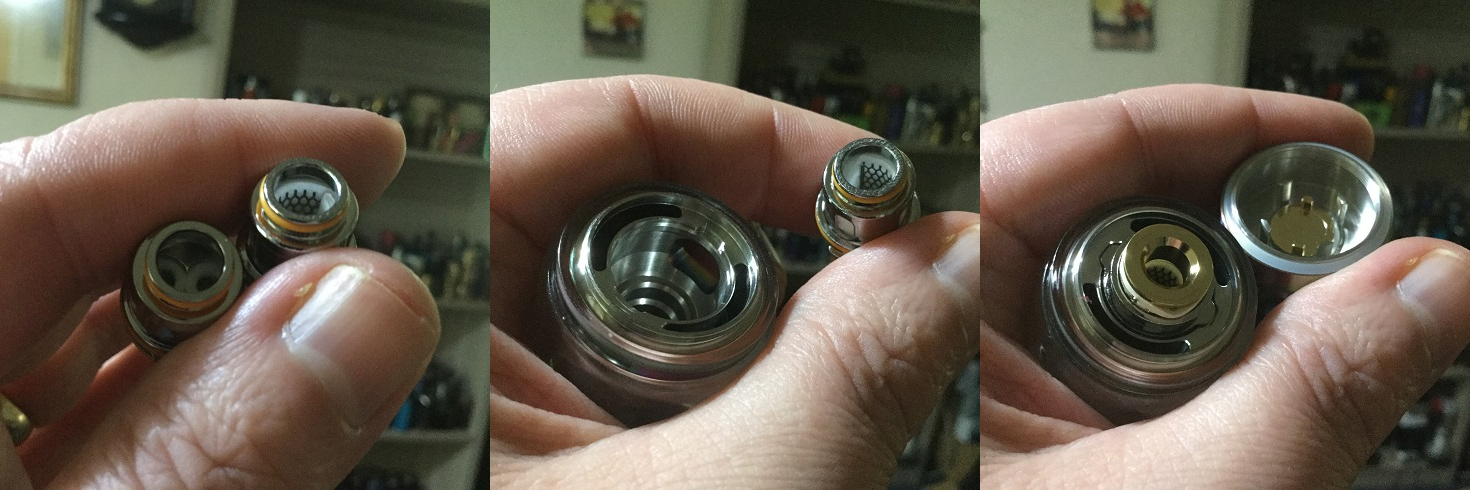
Z Subohm Tank Various Parts
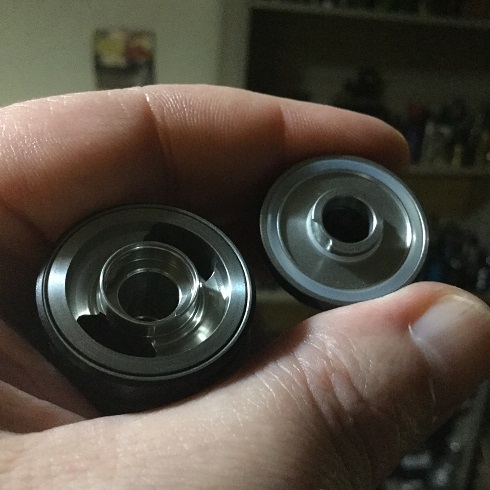
Starting at the top we have a wide bore goon fit Delrin 810 drip tip which can be swapped for one of your own if you prefer. The top-cap is the usual bayonet design so just a slight turn needed and it's off, the base section also screws off. The glass can be wiggled free as it's secured top and bottom with O-rings, you receive a spare bubble glass with the standard version and straight 2ml glass with the TPD version. The airflow control ring can also be easily removed (in fact too easily) which leaves the juice port and airflow intake section with attached double walled chamber. The coils get press fitted into the chamber and the base section has a positive plate for the bottom of the coil to make contact with. We get all the usual spare O-rings and also a coil removal tool which is a nice touch but personally I didn't find any need for it.
_________________________________________________________________________
The Airflow
The Z Sub-ohm Tank has a top to bottom airflow system with large dual airflow slots that are fully adjustable, this is the only performance upgrade I can see from the Zeus Subohm tank which has slightly smaller airflow slots. You also have a double walled chamber so the air comes in through the slots, down the cavity between the two chamber walls and into the base section. Now we have the air in the base section just as you would if the tank had bottom airflow slots and this air enters the coil head from underneath in the usual manner giving bottom airflow, it's just taking the top to bottom airflow concept of the Zeus RTA's and implementing it in the least complicated way. I don't like to say leakproof but the system gives the Z Sub-ohm tank the same leak resistance that we have seen with past Zeus tanks.
_________________________________________________________________________
The Coils and Fitting Them
The Z Subohm tank has 2 included coils which are both kanthal mesh. Pre-installed we have the 0.2ohm Mesh single coil head which is rated between 70-80W. The other included coil is the 0.25 dual coil head which has a rating between 45-57W, the specs are etched onto the coil head shells.
The mesh is more of a Netting style giving plenty of surface area with large gaps between so wicking will be no issue, the coils also have 4 very large wicking ports.
The coil head simply gets press fitted into the chamber and pulled out to remove, if you have any problems pulling the coil head out you do receive a tool to help but I have had no issues. Looking on the chamber we can see 2 large wicking ports to allow e-liquid to surround the coil head as the chambers main purpose was to deliver airflow from the top to the bottom and having plug in coils is cleverly taking advantage of having the chamber present. We also have 2 protruding tabs on the coil heads and little indents on the side of the chamber, these tabs need to be lined up for the coil to be properly fitted!
_________________________________________________________________________
Filling The Tank
Just like with the Zeus Subohm tank which really this is with just larger airflow slots the airflow control ring is too loose which seems a petty con but it is annoying because i both like some resistance (there is none) and it also sometimes pops off when removing the top-cap for filling, although it's loose at least we do have stoppers!
The top-cap is less than half a turn and it's off, it's the same bayonet design Geekvape have used on previously Zeus atomisers. Once off the 2 kidney shaped fill ports are revealed which are quite narrow so large nozzles and glass droppers won't fit but most standard nozzles will be fine. Luckily there is quite a deep channel between the edge of the tank and air pipe section so it won't be messy if using larger nozzles as any juice will gather in the channel and find it's way into the ports. Once filled just position the bayonet tabs in place push down and give it a slight turn.
_________________________________________________________________________
S100 (Solo 2) Specs and Features:
Dimensions: 84.3 x 36.5 x 29
Main Construction: Zinc Alloy
Weight: 127g
Output voltage: 8.5V(Maximum)
Support Resistance Range: 0.1ohm - 3ohm
Charging Specification: 5V /2.0A
Low Voltage Warning: 3.3V±0.1V
PCBA Temperature Alarm: 85℃
Longest Vaping Time: 10S
working Temperature: -10~40°℃
Stand-by Current: <10uA
Storage Temperature: -20°℃~60℃
Relative Humidity: 10%RH- 70%RH
Powered by a single 18650 battery
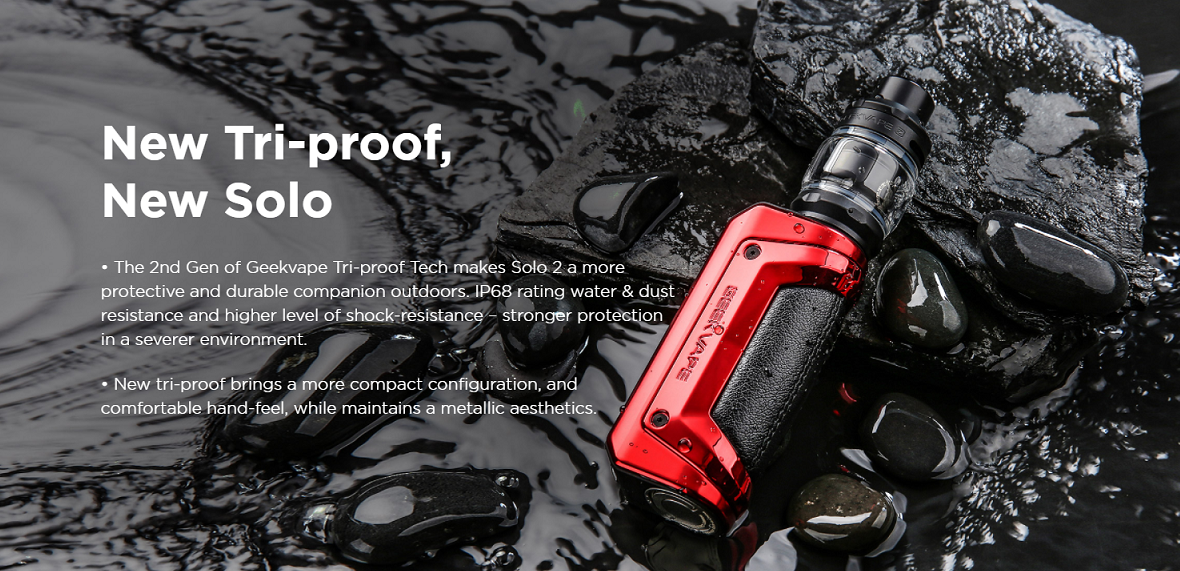
lP68 rating water & dust resistance
Ground-breaking shock-resistance
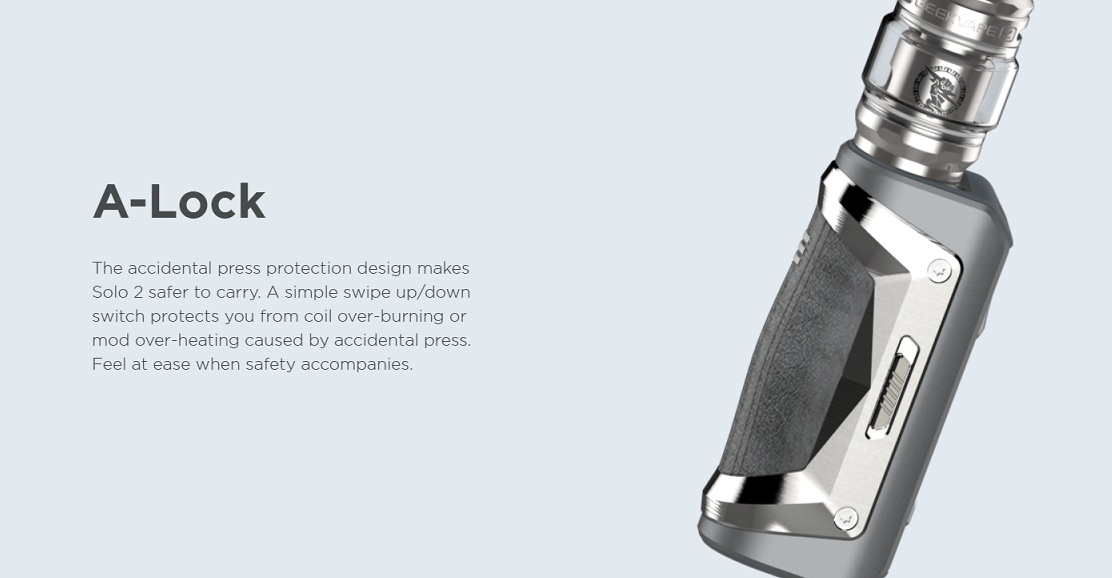
A-Lock-Accidental Press Protection
Small Size & Light weight
Stable Output Buck-boost Tech
1.08'' Full Screen with new UI
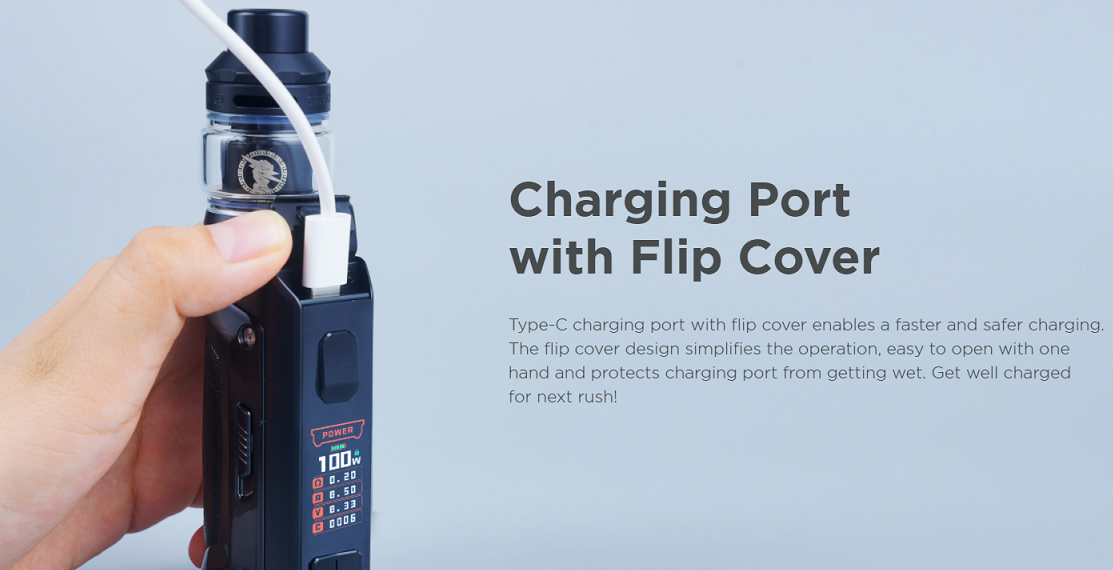
2A Type-C fast charging
Colours: Grey, Classic Black, Navy Blue, Silver, Rainbow, Red
_________________________________________________________________________
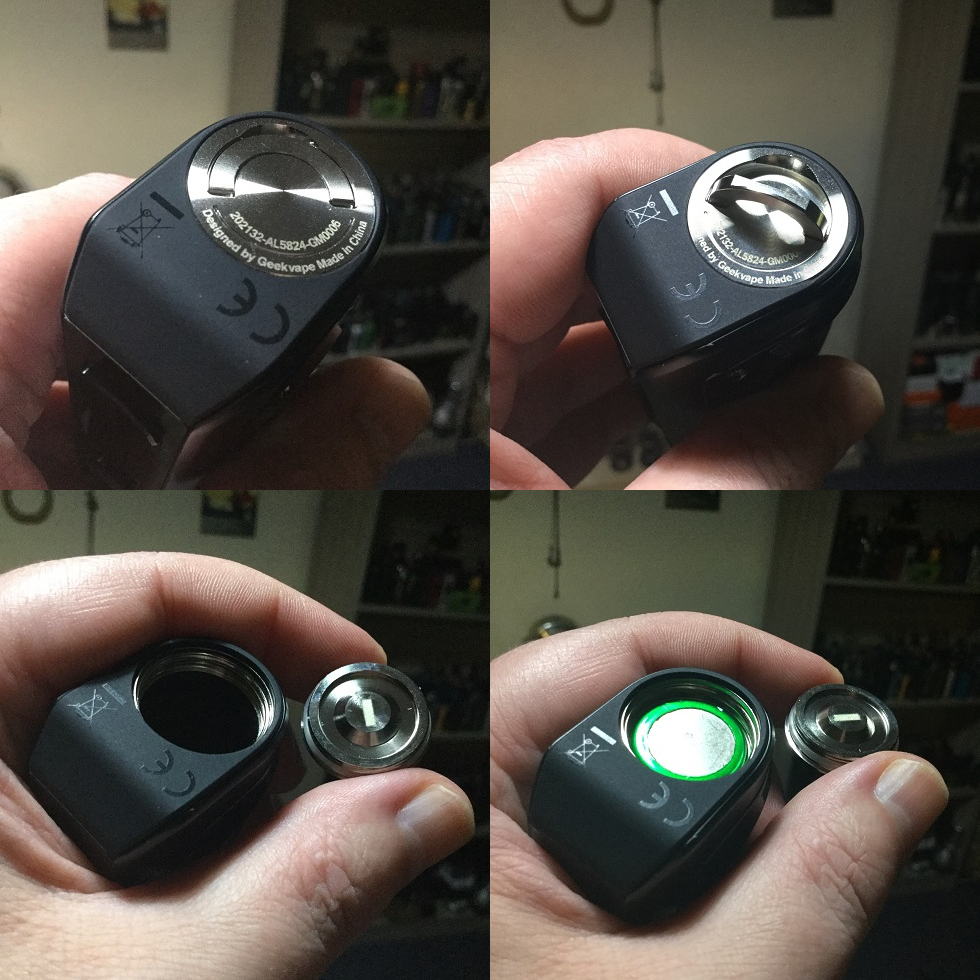
Fitting The Battery
The battery gets fitted via the bottom of the device which has a removable plate with lift up central lever like we have seen before on other single battery Aegis devices. Unscrewing the plate and screwing back on does take a bit of time and it is quite stiff (correction, too stiff really and can even make the fingers sore) but I like this method of fitting a battery as it's very secure and no risk of damaging your battery wrap. The plate has a fitted O-ring to complete the watertight seal, battery orientation is clearly marked both inside the battery tube and on the underside of the screw plate so a really good job all round!
_________________________________________________________________________
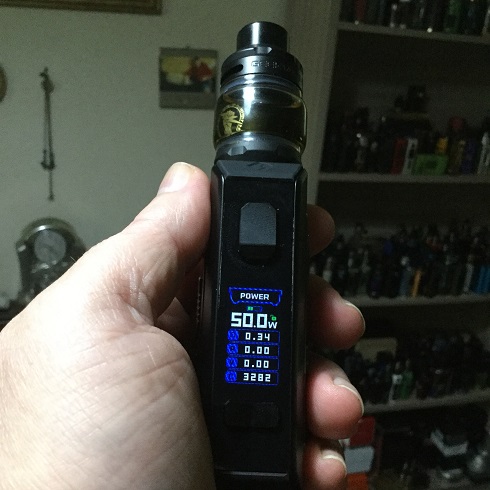
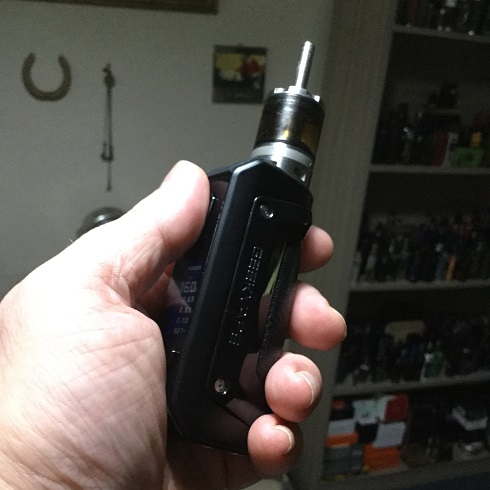
Display
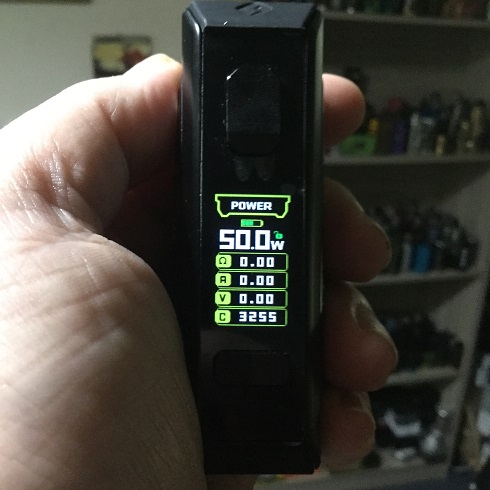
The display is very bright and sharp as well as being very familiar if you have other Aegis devices that tend to use the same display and menu system. Everything is lined up vertically so up top we have the mode, then underneath the battery status bar followed by either wattage, temp or voltage depending which mode you are in.
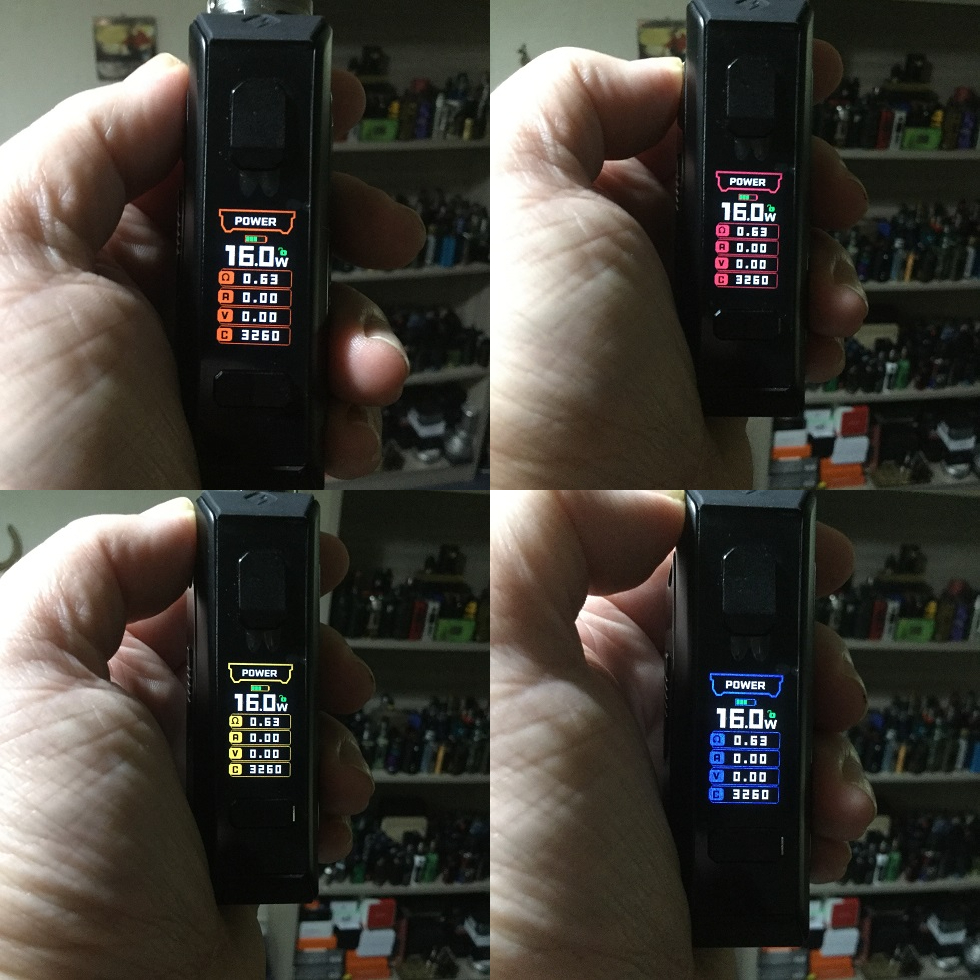
In the lower section we first have resistance followed by amps, then voltage and finally the puff count which shows vape duration while firing! The Puff counter is labelled "C" for count rather than the usual "P" for puff.
_________________________________________________________________________
Operating The Device
The S100 is the usual 5 clicks of the fire button to turn on and 5 clicks to turn off, but once on holding both + and - sides of the rocker at the same time does not lock the navigational rocker like on the Obelisk instead we have what's called the A-Lock which is a catch on the side of the device which you slide one way to lock the device and the other to unlock. I do really like the A-lock but it locks the whole device including firing so I still want a way to lock just the navigational rocker! The brightness percentage of the display can also be adjusted by either pressing fire and left together to decrease or fire and right to increase!
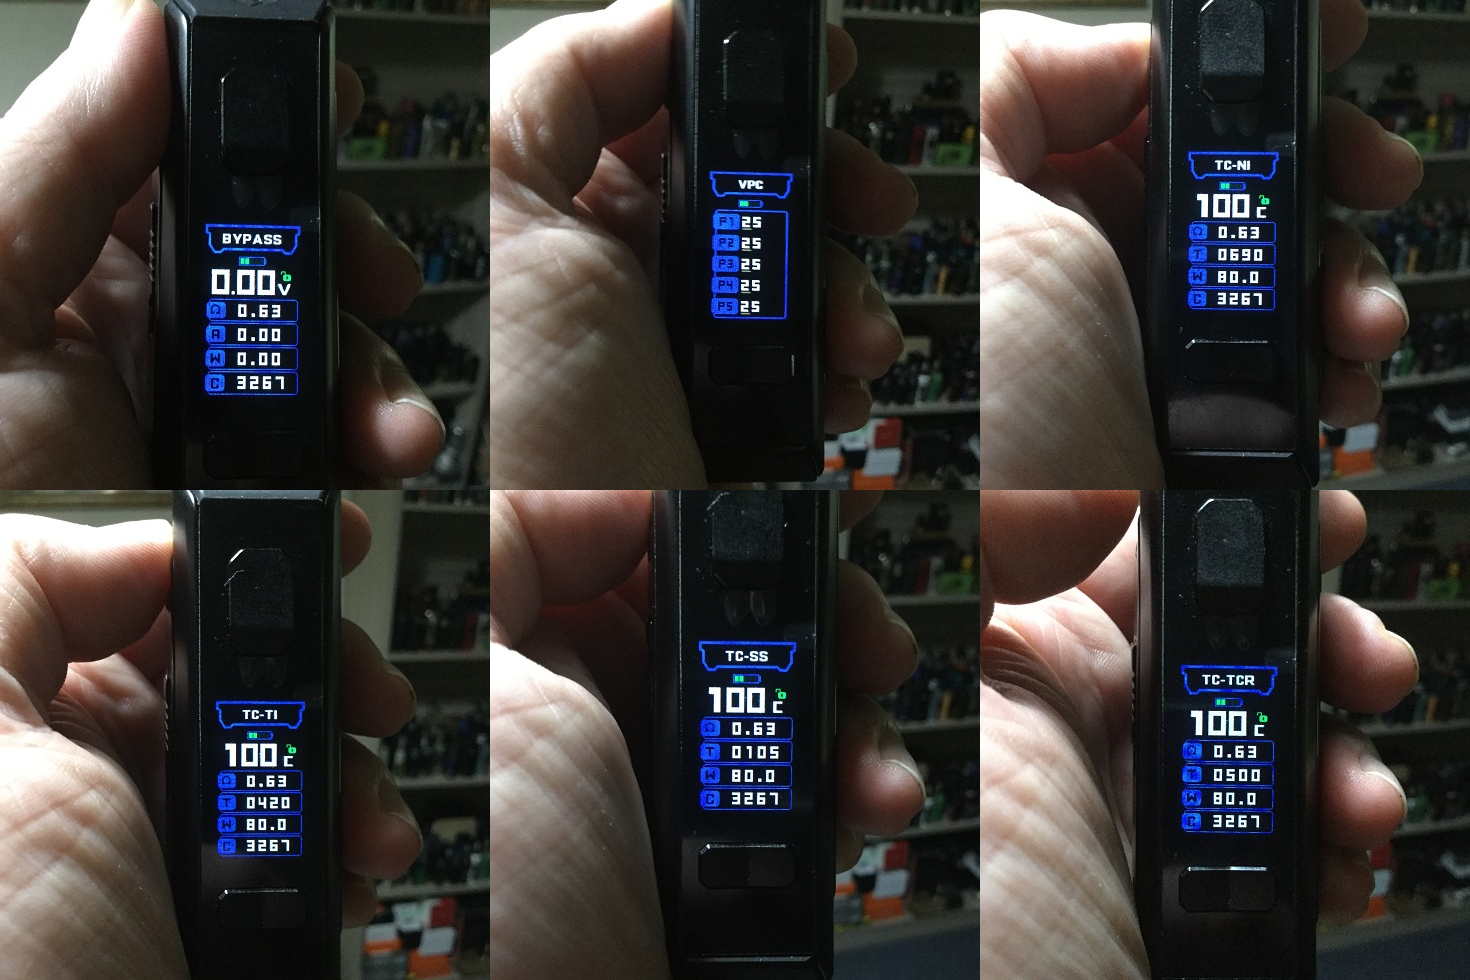
3 clicks of the fire button highlights the mode which can then be changed by using the navigational rocker, the modes are Power, TC-Ni, TC-Ti, TC-SS, TC-TCR, VPC (power curve) and Bypass.
When the mode can be changed via the navigational rocker a press of the fire button will take you to any item on the screen which can be altered in turn so for example when the screen is on power but still highlighted then a press of the fire button will highlight Puffs and pressing - will reset them, when TC-SS is highlighted for example it works the same way and you have options to resample / lock resistance and set wattage. Also when a mode is highlighted pressing both sides of the navigational rocker changes the colour of the accents on the display, each press changes them to a new colour, the options are Orange, Yellow, Blue, Light Green and Purple!
When VPC (power curve) is highlighted each press of the fire button allows the next section of the curve to be altered using the navigational buttons and when finished holding fire for 2 seconds sets the curve!
On the normal working screens the wattage can be adjusted from 5w to 100w in 0.5w increments with single presses or 1w increments with an adjustment button held down, it scrolls quickly and round robins. Again in TC the temp round robins between Celsius and Fahrenheit with Celsius adjusting in 1 degree increments while Fahrenheit adjusts in 5 degree increments. Finally holding both sides of the navigational rocker at the same time as pressing fire for 2 seconds is stealth mode so the device will operate with no display, repeating the process brings the device out of stealth mode, stealth mode is also a way of nothing being able to be adjusted while still allowing the device to fire!
_________________________________________________________________________
IP68 Rating
Like the other Aegis devices the S100 is Waterproof, Dustproof and Shockproof although the Shockproof is actually separate to the IP rating which covers Dust ingress protection and Waterproofing, The new updated Aegis devices including the S100 have an improved rating of IP68 rather than the previous IP67.
Devices backed by an international standard rating of IP68 are deemed fit enough to withstand dust, dirt and sand , and are resistant to submersion up to a maximum depth of 1.5m underwater for up to thirty minutes. *Based on test conditions for submersion in up to 1.5 meters of freshwater for up to 30 minutes.
_________________________________________________________________________
Charging
As ever I always advise to charge externally but if you do need to charge in the device we have a Type C connection and 2A charge rate. The device also supports updates and pass-through vaping!
The Type C USB port is found underneath the top Silicone cut corner section on the front of the device, being an IP68 device the port is sealed and hidden from view so you need to lift up the silicone section which reveals the port, when putting the Silicone flap back in place make sure you press down firmly to properly seal the port so the waterproof seal isn't compromised!
_________________________________________________________________________
My Thoughts!
First I will start with the Z subohm tank which is an updated version of the Zeus subohm tank with the only permeance change being the larger airflow slots. Both supplied coils i have used before and the 0.2ohm single mesh which gives a very open draw is good for flavour but liking more restriction I much preferred the dual 0.25ohm coil at 50w with airflow just a third open for a quite loose RDL draw, almost a semi restrictive draw, the flavour with this coil I also found to be above average and superior to the single coil which I found best with half airflow and at 70w but just not the way I like to vape, just too open and shutting the airflow down further doesn't suit the coil head!
It's a very decent subohm tank with decent capacity and that leak resistant top to bottom airflow which many love the Zeus range for, the only real con is the very loose AFC. The AFC moved even when in use and found it not to be in the set position after being in my pocket etc, it's just too loose with no resistance to movement. It also popped off several times when removing the top-cap to fill!
The star of the show for me is the Solo 2 or should I say the S100, I just love the upgrades and less busy look yet not only does it have the same piece of mind IP rating but has an increased level of IP68!
The buttons are nice and clicky, it's very comfortable to hold and we have a much sharper display, yes it has a tinted screen but I found the brightness fine and didn't need it turned to max! Another feature I really like is the A-lock which is much quicker and more convenient than shutting down and then booting up but I still want to be able to lock just the navigational buttons but still be able to fire, this however can be achieved by going into Stealth mode.
The device fires insanely quickly and hits set wattage instantly, you also have the curves feature to get the exact vape you are after in regard hard up front, a more even vape or even increasing the power during your vape! I didn't test the TC so if you are a TC user I would do your own research but I have heard from a reliable source the TC works really well, during my testing in power modes the device performed like a trooper with no issues apart from they really should of made this a 80w device because after that I didn't get any increase in power!
I like the style of battery plate but it's really stiff to tighten up to the point the lever does press into the fingers quite hard, I can imagine loosening and tightening a few times in a row would even make the fingers sore! I like how they have the Silicone flap on the top front cut corner section which makes lifting free and resealing much easier than with other designs, also having a Type C USB with 2A charge rate is another improvement although I personally would still encourage to charge externally, the device also supports upgrades and pass-through vaping! Finally it has the very familiar display and user friendly menu system as seen on many previous Aegis devices! I tried the original single coil Zeus which is 25mm in diameter and it looked great on top but was about the limit before any overhang but up to 25mm covers the vast majority of atomisers people would use with a single battery device!
_________________________________________________________________________
Likes
Well made, good looking device
IP68
6 Colour options
Small ergonomic device
A-lock, neat feature
Stealth mode
Familiar display, sharper!
Familiar user friendly menu system
USB Type C, sealed with Silicone bung
2A charge rate, upgrades and supports pass-through
Clicky, responsive buttons
Performed excellently
Fires without delay hitting set wattage instantly
TC (not tested but have been told works very well)
Wattage, Curves and Bypass modes
Bayonet top-cap fitting
Top to bottom leak resistant airflow
Large capacity
Good flavour
Larger airflow slots (Doesn't actually suit my style of vaping but will suit DL vapers)
Cons
Can't just lock navigational buttons unless going into stealth mode
Battery plate very stiff
80w realistic limit
AFC on Z tank far too loose
AFC jumped off many times when removing top-cap
I would once again like to thank Allison from Geekvape for supplying the S100 Kit for the purpose of this review, thanks for reading and stay safe!
Geekvape S100
_________________________________________________________________________
Geekvape S100
Introduction
Geekvape have been very busy of late both bringing us the new Obelisk Range but also updating and rebranding their previous Aegis devices and Zeus atomisers.
The S100 is essentially an upgraded or if you like a V2 of the Aegis Solo. The upgrades are pretty much the same on all the new Aegis devices. The devices have the added A-lock switch, improved position and seal of the USB port which is now Type C and an improved waterproof, dustproof rating of IP68 as well as a less busy slicker look!
The 100w max output device boasts Power, Bypass, VPC (curves) and full TC suite, let's take a closer look!
_________________________________________________________________________
In The Box
Contents:
- 1 x S100 (Solo 2) Mod
- 1 x Z Subohm Atomizer (5.5ml)
- 2 x Geekvape Z Series Coil(Pre-installed: 0.2ohm 70-80W, Spare coil: 0.25ohm 45-57W)
- 1 x Coil Tool
- 1 x Spare Parts Pack
- 1 x Spare Glass Tube (5.5ml)
- 1 x USB Cable (Type-C)
- Paperwork
Aesthetics and Ergonomics
The S100 Kit came in the usual cardboard box packaging with outer cardboard sleeve which had a picture of the mod with installed atomiser in the chosen colour on the front and contents etc on the reverse. On opening I found the S100 proudly on display in the top layer with the Z subohm tank and other accessories below. I received the Classic Black version which was paired with a Black atomiser, the options are Grey, Classic Black, Navy Blue, Silver, Rainbow or Red!
The S100 has a Zinc Alloy main chassis which has a matte finish in contrast to the Gloss finish of the metal bracket. So the sides consists of the Zinc Alloy main frame, the metal bracket (I think it's also Zinc Alloy) which sweeps both sides and on one side of the bracket we have "GEEKVAPE" embossed into the metal, on the opposite side we have the A-lock sliding catch. The spine has a heavily padded leather section then moving to the tinted front plastic panel we have a light switch style fire button top and horizontally position double switch rocker bottom, between the fire and navigational buttons is the screen. The front also has rubber cut corner sections top and bottom with the top one being the seal for the Type C USB port.
Moving to the top and like on the Obelisk and L200 instead of having a 510 plate we have the whole top surface brushed Stainless Steel with the threading directly drilled into the Stainless Steel top, the 510 is Gold plated and spring loaded, it has a stiff but above average throw, very nice!
Moving to the bottom we have the screw in battery plate with sturdy central lever, the S100 like the L200 is less busy and looks slicker than the original Solo which this undoubtedly is a version 2 of making it more aesthetically pleasing in my opinion! Like the original Solo the S100 is quite light compared to some Aegis devices and is a nice portable size that fits great in the hand!
_________________________________________________________________________
Z Subohm Tank Specs and Features:
Size: 26 x 42.5mm (Not including Drip tip) (24mm at base)
Capacity: 5.5ml (2ml TPD)
Drip tip type: 810 Drip Tip
Filling Method: Top Fill
Mesh Z dual coil 0.25ohm (45-57W)
Mesh Z single coil 0.2ohm (70-80W)(pre-installed)
Innovative quick change prebuilt coil system
Direct Top Airflow & Top-to-Bottom Airflow with leak-proof function
Fill port design for liquid spillage resistance
Updated larger airflow slots
Thread: 510
Colours: Stainless Steel, Gunmetal, Black, Blue, Gold, Rainbow, Red (Colour to suit colour of device in regards to this kit)
_________________________________________________________________________
Z Subohm Tank Various Parts
Starting at the top we have a wide bore goon fit Delrin 810 drip tip which can be swapped for one of your own if you prefer. The top-cap is the usual bayonet design so just a slight turn needed and it's off, the base section also screws off. The glass can be wiggled free as it's secured top and bottom with O-rings, you receive a spare bubble glass with the standard version and straight 2ml glass with the TPD version. The airflow control ring can also be easily removed (in fact too easily) which leaves the juice port and airflow intake section with attached double walled chamber. The coils get press fitted into the chamber and the base section has a positive plate for the bottom of the coil to make contact with. We get all the usual spare O-rings and also a coil removal tool which is a nice touch but personally I didn't find any need for it.
_________________________________________________________________________
The Airflow
The Z Sub-ohm Tank has a top to bottom airflow system with large dual airflow slots that are fully adjustable, this is the only performance upgrade I can see from the Zeus Subohm tank which has slightly smaller airflow slots. You also have a double walled chamber so the air comes in through the slots, down the cavity between the two chamber walls and into the base section. Now we have the air in the base section just as you would if the tank had bottom airflow slots and this air enters the coil head from underneath in the usual manner giving bottom airflow, it's just taking the top to bottom airflow concept of the Zeus RTA's and implementing it in the least complicated way. I don't like to say leakproof but the system gives the Z Sub-ohm tank the same leak resistance that we have seen with past Zeus tanks.
_________________________________________________________________________
The Coils and Fitting Them
The Z Subohm tank has 2 included coils which are both kanthal mesh. Pre-installed we have the 0.2ohm Mesh single coil head which is rated between 70-80W. The other included coil is the 0.25 dual coil head which has a rating between 45-57W, the specs are etched onto the coil head shells.
The mesh is more of a Netting style giving plenty of surface area with large gaps between so wicking will be no issue, the coils also have 4 very large wicking ports.
The coil head simply gets press fitted into the chamber and pulled out to remove, if you have any problems pulling the coil head out you do receive a tool to help but I have had no issues. Looking on the chamber we can see 2 large wicking ports to allow e-liquid to surround the coil head as the chambers main purpose was to deliver airflow from the top to the bottom and having plug in coils is cleverly taking advantage of having the chamber present. We also have 2 protruding tabs on the coil heads and little indents on the side of the chamber, these tabs need to be lined up for the coil to be properly fitted!
_________________________________________________________________________
Filling The Tank
Just like with the Zeus Subohm tank which really this is with just larger airflow slots the airflow control ring is too loose which seems a petty con but it is annoying because i both like some resistance (there is none) and it also sometimes pops off when removing the top-cap for filling, although it's loose at least we do have stoppers!
The top-cap is less than half a turn and it's off, it's the same bayonet design Geekvape have used on previously Zeus atomisers. Once off the 2 kidney shaped fill ports are revealed which are quite narrow so large nozzles and glass droppers won't fit but most standard nozzles will be fine. Luckily there is quite a deep channel between the edge of the tank and air pipe section so it won't be messy if using larger nozzles as any juice will gather in the channel and find it's way into the ports. Once filled just position the bayonet tabs in place push down and give it a slight turn.
_________________________________________________________________________
S100 (Solo 2) Specs and Features:
Dimensions: 84.3 x 36.5 x 29
Main Construction: Zinc Alloy
Weight: 127g
Output voltage: 8.5V(Maximum)
Support Resistance Range: 0.1ohm - 3ohm
Charging Specification: 5V /2.0A
Low Voltage Warning: 3.3V±0.1V
PCBA Temperature Alarm: 85℃
Longest Vaping Time: 10S
working Temperature: -10~40°℃
Stand-by Current: <10uA
Storage Temperature: -20°℃~60℃
Relative Humidity: 10%RH- 70%RH
Powered by a single 18650 battery
lP68 rating water & dust resistance
Ground-breaking shock-resistance
A-Lock-Accidental Press Protection
Small Size & Light weight
Stable Output Buck-boost Tech
1.08'' Full Screen with new UI
2A Type-C fast charging
Colours: Grey, Classic Black, Navy Blue, Silver, Rainbow, Red
_________________________________________________________________________
Fitting The Battery
The battery gets fitted via the bottom of the device which has a removable plate with lift up central lever like we have seen before on other single battery Aegis devices. Unscrewing the plate and screwing back on does take a bit of time and it is quite stiff (correction, too stiff really and can even make the fingers sore) but I like this method of fitting a battery as it's very secure and no risk of damaging your battery wrap. The plate has a fitted O-ring to complete the watertight seal, battery orientation is clearly marked both inside the battery tube and on the underside of the screw plate so a really good job all round!
_________________________________________________________________________
Display
The display is very bright and sharp as well as being very familiar if you have other Aegis devices that tend to use the same display and menu system. Everything is lined up vertically so up top we have the mode, then underneath the battery status bar followed by either wattage, temp or voltage depending which mode you are in.
In the lower section we first have resistance followed by amps, then voltage and finally the puff count which shows vape duration while firing! The Puff counter is labelled "C" for count rather than the usual "P" for puff.
_________________________________________________________________________
Operating The Device
The S100 is the usual 5 clicks of the fire button to turn on and 5 clicks to turn off, but once on holding both + and - sides of the rocker at the same time does not lock the navigational rocker like on the Obelisk instead we have what's called the A-Lock which is a catch on the side of the device which you slide one way to lock the device and the other to unlock. I do really like the A-lock but it locks the whole device including firing so I still want a way to lock just the navigational rocker! The brightness percentage of the display can also be adjusted by either pressing fire and left together to decrease or fire and right to increase!
3 clicks of the fire button highlights the mode which can then be changed by using the navigational rocker, the modes are Power, TC-Ni, TC-Ti, TC-SS, TC-TCR, VPC (power curve) and Bypass.
When the mode can be changed via the navigational rocker a press of the fire button will take you to any item on the screen which can be altered in turn so for example when the screen is on power but still highlighted then a press of the fire button will highlight Puffs and pressing - will reset them, when TC-SS is highlighted for example it works the same way and you have options to resample / lock resistance and set wattage. Also when a mode is highlighted pressing both sides of the navigational rocker changes the colour of the accents on the display, each press changes them to a new colour, the options are Orange, Yellow, Blue, Light Green and Purple!
When VPC (power curve) is highlighted each press of the fire button allows the next section of the curve to be altered using the navigational buttons and when finished holding fire for 2 seconds sets the curve!
On the normal working screens the wattage can be adjusted from 5w to 100w in 0.5w increments with single presses or 1w increments with an adjustment button held down, it scrolls quickly and round robins. Again in TC the temp round robins between Celsius and Fahrenheit with Celsius adjusting in 1 degree increments while Fahrenheit adjusts in 5 degree increments. Finally holding both sides of the navigational rocker at the same time as pressing fire for 2 seconds is stealth mode so the device will operate with no display, repeating the process brings the device out of stealth mode, stealth mode is also a way of nothing being able to be adjusted while still allowing the device to fire!
_________________________________________________________________________
IP68 Rating
Like the other Aegis devices the S100 is Waterproof, Dustproof and Shockproof although the Shockproof is actually separate to the IP rating which covers Dust ingress protection and Waterproofing, The new updated Aegis devices including the S100 have an improved rating of IP68 rather than the previous IP67.
Devices backed by an international standard rating of IP68 are deemed fit enough to withstand dust, dirt and sand , and are resistant to submersion up to a maximum depth of 1.5m underwater for up to thirty minutes. *Based on test conditions for submersion in up to 1.5 meters of freshwater for up to 30 minutes.
_________________________________________________________________________
Charging
As ever I always advise to charge externally but if you do need to charge in the device we have a Type C connection and 2A charge rate. The device also supports updates and pass-through vaping!
The Type C USB port is found underneath the top Silicone cut corner section on the front of the device, being an IP68 device the port is sealed and hidden from view so you need to lift up the silicone section which reveals the port, when putting the Silicone flap back in place make sure you press down firmly to properly seal the port so the waterproof seal isn't compromised!
_________________________________________________________________________
My Thoughts!
First I will start with the Z subohm tank which is an updated version of the Zeus subohm tank with the only permeance change being the larger airflow slots. Both supplied coils i have used before and the 0.2ohm single mesh which gives a very open draw is good for flavour but liking more restriction I much preferred the dual 0.25ohm coil at 50w with airflow just a third open for a quite loose RDL draw, almost a semi restrictive draw, the flavour with this coil I also found to be above average and superior to the single coil which I found best with half airflow and at 70w but just not the way I like to vape, just too open and shutting the airflow down further doesn't suit the coil head!
It's a very decent subohm tank with decent capacity and that leak resistant top to bottom airflow which many love the Zeus range for, the only real con is the very loose AFC. The AFC moved even when in use and found it not to be in the set position after being in my pocket etc, it's just too loose with no resistance to movement. It also popped off several times when removing the top-cap to fill!
The star of the show for me is the Solo 2 or should I say the S100, I just love the upgrades and less busy look yet not only does it have the same piece of mind IP rating but has an increased level of IP68!
The buttons are nice and clicky, it's very comfortable to hold and we have a much sharper display, yes it has a tinted screen but I found the brightness fine and didn't need it turned to max! Another feature I really like is the A-lock which is much quicker and more convenient than shutting down and then booting up but I still want to be able to lock just the navigational buttons but still be able to fire, this however can be achieved by going into Stealth mode.
The device fires insanely quickly and hits set wattage instantly, you also have the curves feature to get the exact vape you are after in regard hard up front, a more even vape or even increasing the power during your vape! I didn't test the TC so if you are a TC user I would do your own research but I have heard from a reliable source the TC works really well, during my testing in power modes the device performed like a trooper with no issues apart from they really should of made this a 80w device because after that I didn't get any increase in power!
I like the style of battery plate but it's really stiff to tighten up to the point the lever does press into the fingers quite hard, I can imagine loosening and tightening a few times in a row would even make the fingers sore! I like how they have the Silicone flap on the top front cut corner section which makes lifting free and resealing much easier than with other designs, also having a Type C USB with 2A charge rate is another improvement although I personally would still encourage to charge externally, the device also supports upgrades and pass-through vaping! Finally it has the very familiar display and user friendly menu system as seen on many previous Aegis devices! I tried the original single coil Zeus which is 25mm in diameter and it looked great on top but was about the limit before any overhang but up to 25mm covers the vast majority of atomisers people would use with a single battery device!
_________________________________________________________________________
Likes
Well made, good looking device
IP68
6 Colour options
Small ergonomic device
A-lock, neat feature
Stealth mode
Familiar display, sharper!
Familiar user friendly menu system
USB Type C, sealed with Silicone bung
2A charge rate, upgrades and supports pass-through
Clicky, responsive buttons
Performed excellently
Fires without delay hitting set wattage instantly
TC (not tested but have been told works very well)
Wattage, Curves and Bypass modes
Bayonet top-cap fitting
Top to bottom leak resistant airflow
Large capacity
Good flavour
Larger airflow slots (Doesn't actually suit my style of vaping but will suit DL vapers)
Cons
Can't just lock navigational buttons unless going into stealth mode
Battery plate very stiff
80w realistic limit
AFC on Z tank far too loose
AFC jumped off many times when removing top-cap
I would once again like to thank Allison from Geekvape for supplying the S100 Kit for the purpose of this review, thanks for reading and stay safe!
Geekvape S100
_________________________________________________________________________

