

Howdy!
DISCLAIMER: There's a lot of nerdy crap about to follow this line. Don't say I didn't warn you")
I happened upon a video of the Daedalus in action a while back and was flabbergasted at how people were able to automate complex builds like aliens while sitting back and drinking coffee (that's what I would be doing anyway ) and while the motor section is pretty cool, that role could typically be played by any drill worth it's salt. It's the rest of the jig that's the real hero in this scenario. So being a bit of a DIY nut I had a closer look at the rig and how and why it worked so well. I threw some junk together to make a prototype of the rig for the sake of testing the concept...
Exhibit A

As is the nature of first prototypes, it didn't exactly work as planned, BUT I did learn some valuable lessons regarding the principles that make the real deal work so well, and herewith my MS Paint version of that:
Exhibit B
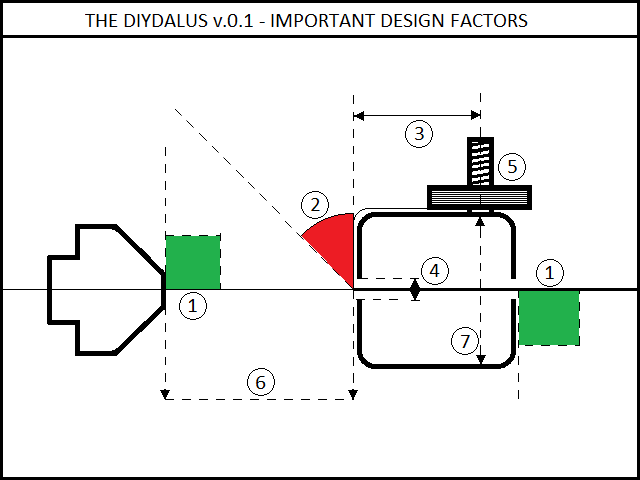
1. The wire should run completely straight through the entire rig, from the chuck of the drill to the spinner on the stock end. To this end, if a handheld drill is used, it should be positioned on a desk in the spot where you intend on using it and the height of the centre from the surface marked to be used in the making of the spooling jig.
2. The contact angle of the wrapping wire should be perpendicular to the core wire and never be able to exceed this angle. If the angle is off (into the red section), the wire will wrap onto itself at some point. This is achieved by ensuring that the wrap wire runs over the edge of the jig at the exact same level as the core enters the jig.
3. The deck of the jig should be large enough to ensure that there is ample space for the wrap wire to unwind without being forced to follow any freaky angles. Seeing as the weight of the crawling jig is a VERY important factor to the automation part, this can be achieved by moving the mounting point to the back of the jig rather than increasing it's overall size.
4. The entry hole at the front of the jig should be as small as possible to avoid the diameter of a wrapped wire from easily entering it, as this would jeopardise the wrapping angle mentioned in point 2.
5. Tension on the spool is very important, however just using a washer is not enough to keep the turning spool from either tightening or loosening the nut that holds it. On the Daedalus, this is achieved by a square bolt and snug fitting springs, thus preventing it from turning. On a DIY jig, this could by achieved by using a nylon bolt or similar.
6. The drill, crawling jig and stock end should all be resting on the same surface to avoid the wire angle potentially changing thoughout the wrapping process, i.e. don't attempt to hold the drill "steady by hand".
7. The Daedalus comes with little fittings that will hold wires parallel whilst doing multi-core coils. A suitable replacement for a DIY rig would be a key ring which would be placed over the wires INSIDE the crawling jig and rest against the inside wall, moved along as the wire wraps. With this in mind, there should be adequate space inside the crawling jig to allow for this.
With these lessons learnt, I'm confident that version 0.2 of the DIYdalus will work much better The goal here remains making the entire thing from easy to find "junk". V.0.1 was made from a bolt I had laying around and the cap of a spray can
DISCLAIMER: There's a lot of nerdy crap about to follow this line. Don't say I didn't warn you
I happened upon a video of the Daedalus in action a while back and was flabbergasted at how people were able to automate complex builds like aliens while sitting back and drinking coffee (that's what I would be doing anyway
) and while the motor section is pretty cool, that role could typically be played by any drill worth it's salt. It's the rest of the jig that's the real hero in this scenario. So being a bit of a DIY nut I had a closer look at the rig and how and why it worked so well. I threw some junk together to make a prototype of the rig for the sake of testing the concept...Exhibit A
As is the nature of first prototypes, it didn't exactly work as planned, BUT I did learn some valuable lessons regarding the principles that make the real deal work so well, and herewith my MS Paint version of that:
Exhibit B
1. The wire should run completely straight through the entire rig, from the chuck of the drill to the spinner on the stock end. To this end, if a handheld drill is used, it should be positioned on a desk in the spot where you intend on using it and the height of the centre from the surface marked to be used in the making of the spooling jig.
2. The contact angle of the wrapping wire should be perpendicular to the core wire and never be able to exceed this angle. If the angle is off (into the red section), the wire will wrap onto itself at some point. This is achieved by ensuring that the wrap wire runs over the edge of the jig at the exact same level as the core enters the jig.
3. The deck of the jig should be large enough to ensure that there is ample space for the wrap wire to unwind without being forced to follow any freaky angles. Seeing as the weight of the crawling jig is a VERY important factor to the automation part, this can be achieved by moving the mounting point to the back of the jig rather than increasing it's overall size.
4. The entry hole at the front of the jig should be as small as possible to avoid the diameter of a wrapped wire from easily entering it, as this would jeopardise the wrapping angle mentioned in point 2.
5. Tension on the spool is very important, however just using a washer is not enough to keep the turning spool from either tightening or loosening the nut that holds it. On the Daedalus, this is achieved by a square bolt and snug fitting springs, thus preventing it from turning. On a DIY jig, this could by achieved by using a nylon bolt or similar.
6. The drill, crawling jig and stock end should all be resting on the same surface to avoid the wire angle potentially changing thoughout the wrapping process, i.e. don't attempt to hold the drill "steady by hand".
7. The Daedalus comes with little fittings that will hold wires parallel whilst doing multi-core coils. A suitable replacement for a DIY rig would be a key ring which would be placed over the wires INSIDE the crawling jig and rest against the inside wall, moved along as the wire wraps. With this in mind, there should be adequate space inside the crawling jig to allow for this.
With these lessons learnt, I'm confident that version 0.2 of the DIYdalus will work much better
The goal here remains making the entire thing from easy to find "junk". V.0.1 was made from a bolt I had laying around and the cap of a spray can 
