I think I'm posting this in the wrong forum and I'm sorry for that, but can somebody please help me. I want to know if it's possible for me to rebuild the micro coils for the aspire k1 bvc and if it's possible how?
Navigation
Install the app
How to install the app on iOS
Follow along with the video below to see how to install our site as a web app on your home screen.

Note: This feature currently requires accessing the site using the built-in Safari browser.
More options
You are using an out of date browser. It may not display this or other websites correctly.
You should upgrade or use an alternative browser.
You should upgrade or use an alternative browser.
Aspire k1 coil rebuild
- Thread starter Barelylegalvaper
- Start date
-
- Tags
- aspire coils rebuild coil

Hey, Do you have any Kanthal 30AWG Wire or cotton? I rebuilt mine about 2 weeks ago, it is easier to build a horizontal coil in it than a vertical.I think I'm posting this in the wrong forum and I'm sorry for that, but can somebody please help me. I want to know if it's possible for me to rebuild the micro coils for the aspire k1 bvc and if it's possible how?
I have 26 and 28 awg kanthal wire and Japanese cotton unbleached . I have some experience in rebuilding coils. I just don't know how to rebuild this one. Some instructions and steps from how you did it would be nice .
Thanks
Thanks
I have 26 and 28 awg kanthal wire and Japanese cotton unbleached . I have some experience in rebuilding coils. I just don't know how to rebuild this one. Some instructions and steps from how you did it would be nice .
Thanks
Thanks
I have 26 and 28 awg kanthal wire and Japanese cotton unbleached . I have some experience in rebuilding coils. I just don't know how to rebuild this one. Some instructions and steps from how you did it would be nice .
Thanks
Okay, Firstly please post a pic of the coil, just want to make sure that it is exactly the same one I had, basically some coils have big juice holes, others have small ones.
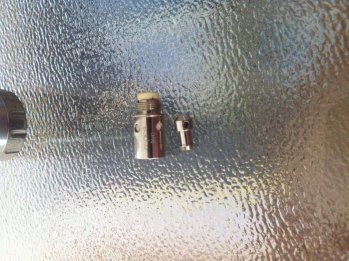
That seems close to the Nautilus BVC coil head. Here is a tutorial on a rebuild: http://www.ecigssa.co.za/show-us-yo...otanks-nautilus-etc.t1613/page-14#post-167997Sure. Here you go
Thanks Andre
Yeah. they are pretty close. Going to check the tutorial now
Yeah. they are pretty close. Going to check the tutorial now
Thats the one. Okay first you need two pliers, grip the ridge just above the thread in one, then firmly but carefully wiggle the metal tube with juice holes off, you should now see the exposed coil and yucky wick. Remove the gromet from the bottom and push the coil out from below. I suggest a good wash and rinse of the unit. Make sure your hands are clean throughout the building process. Mine wasn't with my first attempt it was horrible. Anyway, now build your coil with less wraps and larger inside diameter, if you know what I mean. 5 wraps 28awg around a kebab skewer gave me 1ohm. Remember we are doing vertical coil. Wick as scotish roll method, do not trim yet. Slide the coil and wick assembly back into the housing making sure the cotton goes through the slits on the side. Replace grommet at the bottom and the contact pin. Now cut the "legs"of your coil off. Test for shorts. Now leave about 0.5cm or slightly less cotton outside the chamber. Using a sharp scissor, cut the cotton in half from top to bottom. Use a bit of juice or VG to wet the coil slightly, you should have 4 pieces of cotton sticking out, gently "paint" them around the metal housing, untill the whole tube is covered. The top cap will have a piece of material in it throw that away, you just replicated that function. Carefully allign two of the holes with the slits where your cotton comes through. Patiently use a pin to tuck the cotton under the top cap as you slide it down. Take pliers for the last half a mm to secure it in place. Test again. Then vape. Sorry about grammer, sent using cellphone, will try to paste pictures tonight from the pc. I actually meant to post this a week ago, didn't think anyone would need it though.Sure. Here you go
Hey Andre, close but a bit easier on Aspires coil in my opinion.That seems close to the Nautilus BVC coil head. Here is a tutorial on a rebuild: http://www.ecigssa.co.za/show-us-yo...otanks-nautilus-etc.t1613/page-14#post-167997
That's exactly what I wanted to know . Thanks for the help. The photos will be appreciated")
Pics as promised from step one to finish, I used 28AWG kenthal and dove cotton to not waste my jap cotton supply, got 1.1ohm, you can easily do 5 wraps 26AWG, should come in at 0.6-0.8ohms. Vaped on Istick 30w and Vapeafrika Vostro 3 tank, Not the same coils that came with the Atty, but they work.


Thank you!!!
I really appreciate it . Will be trying it tomorrow . Hope it works")
I really appreciate it . Will be trying it tomorrow . Hope it works
I'm sure it will, this was my third one, just re-wick weekly, BTW, you might try a different way of tuning the cotton around the tube, my way is a bit time consuming but you get the cotton wet from 4 sides, you might like to try and thin it out a bit first and just wrap it in a spiral as per the Nautilus rebuild that Andre referred to. Best of luck buddy. If you don't mind me asking what device are you using?Thank you!!!
I really appreciate it . Will be trying it tomorrow . Hope it works
O yes, I almost forgot, if you don't saturate the wicks properly then at first you will get a woody cotton taste over 15w, it does go away after about 15mins. I vape this puppy between 14 and 20w, much better than the stock coil, slightly more restricted draw at first.
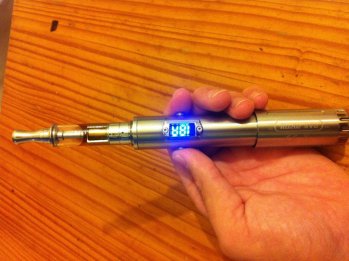
Schweet, The K1 Subohm you mean....Not at all. I'm using the itaste svd . I usually use my aspire nautilus mini's, but I have a few aspire k1's that I never use because coils for all of them just work out too expensive . Now I can use them once again , thanks to you

I've never bought another K1 coil head once I learned to rebuild them w/ help of Youtube videos.There's a slew of them,you can do it surely.I have at least a box of replacements that I'd love to send you if only shipping to S.A. was not so costly.Probably cost more than they're worth.I have 26 and 28 awg kanthal wire and Japanese cotton unbleached . I have some experience in rebuilding coils. I just don't know how to rebuild this one. Some instructions and steps from how you did it would be nice .
Thanks
It's the thought that counts
I think I'm posting this in the wrong forum and I'm sorry for that, but can somebody please help me. I want to know if it's possible for me to rebuild the micro coils for the aspire k1 bvc and if it's possible how?
I have a Titan Pro tank from Vapemob and the coil looks exactly the same (aspire bvc 1.6 ohm ) R40.
I havent yet opened mine but almost certainly will, it seems like the cotton is wound around the outside of the coil, leaving a nice big 2mm dia air channel in the middle.
I guess R40 every week can get annoying.


Similar threads
