@DarrynThomas as promised this is for you bud.

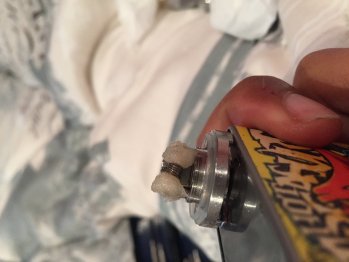
As you can see my coils have been dry burned and is ready to be wicked. Note the position of the top of the coil. It almost reaches the top of the centre post.

Next cut a piece of cotton. My preference in a tank is Jap cotton.

Next I lightly roll the cotton to be round. It's not tightly wound. Just enough to shape it.

Next you roll the point of the cotton nice and tight. This point will be used to feed into the coil.

Now feed the cotton into you coil. Allow for some excess on either end. Pull it through until you can feel the cotton being restricted by the coil. Basically you shouldn't have free and easy movement of the wick between the coil.

Now unwind the end if the cotton you used to feed into the coil. Move the cotton from side to side to ensure that there is still restriction when moving the cotton better the coil. Note that if there is no restriction it will likely result in gurgling, ducking up juice and cotton collapsing and getting on gell of a nasty dry hit.

As best as you can cut the one end of the cotton. I usually try to cut it to line up with the end of the base. If while cutting your wick the wick slips or moves inside the coil then you have used to little cotton. If your wick does not align nicely to sit on the top of the base where the juice channel is then simply either feed more cotton toward it or pull back on the other end to make it shorter.

This site what my cotton looks like once I have done trimming it. Sits just on the top of the juice channel.

Proceed to do the other end. Trim the edges of the wick until they both sit right above the juice channels. The wick must be long enough to touch the base where the juice channels are but short enough not to reach into the juice channels.
Ensure that the space between the coil and the air hole is clear and free from any wick.


Next screw the bottom section of the chimney on. Using a small precision screwdriver or toothpick gently guide the wick toward the juice channels. Do not press down hard. Pressing hard will block the juice channels.

Next wet the wick with some juice. Be generous when doing this. Last thing you want is to get a dry hit.

Give a quick 2 second fire. This will suck the juice into the wick. At this point you once again gently guide the wick toward the juice channels.

Now assemble the rest of the tank. Fill her up with juice and you are ready to vape.
One last thing.. When filling and refilling juice. Blow through the drip tip into the tank. Not a harsh blow just a 3 - 4 second firm blow into the tank. Tip her upside down and check if any Juice seeped out at the base of the tank. Continue this process until nothing comes out.
Hope this helps bud!
As you can see my coils have been dry burned and is ready to be wicked. Note the position of the top of the coil. It almost reaches the top of the centre post.
Next cut a piece of cotton. My preference in a tank is Jap cotton.
Next I lightly roll the cotton to be round. It's not tightly wound. Just enough to shape it.
Next you roll the point of the cotton nice and tight. This point will be used to feed into the coil.
Now feed the cotton into you coil. Allow for some excess on either end. Pull it through until you can feel the cotton being restricted by the coil. Basically you shouldn't have free and easy movement of the wick between the coil.
Now unwind the end if the cotton you used to feed into the coil. Move the cotton from side to side to ensure that there is still restriction when moving the cotton better the coil. Note that if there is no restriction it will likely result in gurgling, ducking up juice and cotton collapsing and getting on gell of a nasty dry hit.
As best as you can cut the one end of the cotton. I usually try to cut it to line up with the end of the base. If while cutting your wick the wick slips or moves inside the coil then you have used to little cotton. If your wick does not align nicely to sit on the top of the base where the juice channel is then simply either feed more cotton toward it or pull back on the other end to make it shorter.
This site what my cotton looks like once I have done trimming it. Sits just on the top of the juice channel.
Proceed to do the other end. Trim the edges of the wick until they both sit right above the juice channels. The wick must be long enough to touch the base where the juice channels are but short enough not to reach into the juice channels.
Ensure that the space between the coil and the air hole is clear and free from any wick.
Next screw the bottom section of the chimney on. Using a small precision screwdriver or toothpick gently guide the wick toward the juice channels. Do not press down hard. Pressing hard will block the juice channels.
Next wet the wick with some juice. Be generous when doing this. Last thing you want is to get a dry hit.
Give a quick 2 second fire. This will suck the juice into the wick. At this point you once again gently guide the wick toward the juice channels.
Now assemble the rest of the tank. Fill her up with juice and you are ready to vape.
One last thing.. When filling and refilling juice. Blow through the drip tip into the tank. Not a harsh blow just a 3 - 4 second firm blow into the tank. Tip her upside down and check if any Juice seeped out at the base of the tank. Continue this process until nothing comes out.
Hope this helps bud!