Navigation
Install the app
How to install the app on iOS
Follow along with the video below to see how to install our site as a web app on your home screen.

Note: This feature currently requires accessing the site using the built-in Safari browser.
More options
You are using an out of date browser. It may not display this or other websites correctly.
You should upgrade or use an alternative browser.
You should upgrade or use an alternative browser.
Kayfun Lite Plus
- Thread starter Rob Fisher
- Start date

Yes, or the Russian 91 %. I have a Kayfun 3.1 clone and a Russian 91 % clone. The quality of the latter is much better than that of the former. The Russian is a Tobeco clone. The Kayfun 3.1 clone is from Fasttech, so do not know who the manufacturer was. See Vapemob now has Kayfun nano kits in stock at R199.00 - http://vapemob.co.za/product/kayfun-nano-body-kit/.Thanks @Matthee. So Kayfun Lite plus would be the preferred purchase
As I have it in my head:
- Kayfun 3.1 - Large bottom part. Filling port on the side of the bottom part. Difficult to fill via the filling port. Can be filled from the top with a certain technique. Has air flow control. Tallest and heaviest of the lot.
- Kayfun Lite - Much shorter bottom part. No airflow control. Filling port on the side of bottom part. Quite a bit shorter than the 3.1.
- Kayfun Lite Plus - As the Lite in size, but now has airflow control and a filling screw on the underside of the bottom part. Much easier to fill.
The new Kayfun Lite Plus from Vapeking also has 4 vent holes as opposed to two.
Here are the pictures.
The first one is of "my special 0.95 ohm coil". Nothing actually special about it other than that it was my first 1 ohm coil and that it came out exactly where I wanted it to on the first try. 6 wraps, 28g Kanthal, approx 1.5mm ID. I wrapped the coil legs around the screw. Worked again. This time without much frustration
View attachment 2351
All wicked, lubed and ready for Kayfun assembly. This is actually mounted on the SVD, not the Nemesis. While putting each part on, I test fire - and I thought its better to have the SVD since it's protected in the case of a short.
Interestingly, the SVD did fire at 0.95 ohms. I had it set to 13 Watts.
Here is the Kayfun mounted on the Nemesis mech mod.
View attachment 2352
A delightful Silver combination. Except for the black plastic tip
The vape on it is good. Very good
Bowdens Mate tastes amazing.
But this thing is a major juice hog. I put in about 2.5 ml and I haven't really vaped much on it - I think its nearly empty now.
Next up....
IGO-L versus Kayfun shootout.
Brilliant stuff @Silver! I'm glad you've rediscovered the Kayfun and Nemi! That 1 ohm coil is gorgeous, and the pictures are top notch too!
Thanks @Reinvanhardt. I appreciate it. Sometimes difficult to take photos indoors handheld. So I didn't have my tripod out for that one I think so I used some light from my headlamp ")
Thanks @Reinvanhardt. I appreciate it. Sometimes difficult to take photos indoors handheld. So I didn't have my tripod out for that one I think so I used some light from my headlamp
Very nicely done. I was sure you had a tripod setup for that coil shot.
I picked up my KFL+ clone from VapeKing today and got my first coil up and running. It's nowhere near a work of art, but my time was severely limited. I only got one good picture, the rest came out very dark. Similarly to previous posters I battled getting the wire to stay under those screws. Coil came out at 2.1Ohms, 9 wrap 28g Kanthal with an ID of about 2.5mm. I am using cotton for the wick. I am going to give it another bash tomorrow night with a smaller ID and hopefully get it a lot neater. I must say I am starting to see the light. Flavour, throat hit and vapour production are all way above and beyond what I have experienced thus far.

Good work Rex!
if I can suggest tomorrow night that you turn the cool upside down when you mount it. If you turn it upside down then the legs will be level with the screws. At the moment your legs go under the screws and then have to stretch out to the top of your coil.
If you keep the legs at the same level as the screw there is one less axis of force that the screw and leg needs to deal with - which should make it easier.
Well done though and I am so happy with the latest batch of coilers we have on the forum
Great stuff @Rex_Bael! What devdev said about the coil will help you a lot. So when next you wrap your coil put attention to starting and finishing the wraps on the same side facing away from each other at the bottom of the coil. Also, in between pinching the coil you can replace your id and gently shape the coil again with some tweezers. That helps me remove the kinks and get it nice and tidy.
Brilliant first attempt, I'm very glad you've started. Post any questions on your wick setup too, that can also be tricky.
Brilliant first attempt, I'm very glad you've started. Post any questions on your wick setup too, that can also be tricky.
Thank you for the encouragement and advice guys 
I realized once the coil was in that it was basically upside down, but at that point I was just happy to finally have it sitting nice and tight and not popping out from under the screws evry time I looked at it.
The upside down aspect also made it much harder to pinch the coil since the legs end up being in the way.
I was actually very impressed with myself when it came to the wick, unfortunately the pics came out much too dark. First wick I made sat perfectly The upside down coil did come into play again though, forcing the wick to go over that wayward leg.
Mission for tonight: Build a smaller ID coil the right way round
I realized once the coil was in that it was basically upside down, but at that point I was just happy to finally have it sitting nice and tight and not popping out from under the screws evry time I looked at it.
The upside down aspect also made it much harder to pinch the coil since the legs end up being in the way.
I was actually very impressed with myself when it came to the wick, unfortunately the pics came out much too dark. First wick I made sat perfectly
The upside down coil did come into play again though, forcing the wick to go over that wayward leg.Mission for tonight: Build a smaller ID coil the right way round
Well done. And I see you are covered for the next one. Maybe also try for around 1.4 ish ohms for the next one - 9 wraps on a 1.5 mm mandrel should see your around there.I picked up my KFL+ clone from VapeKing today and got my first coil up and running. It's nowhere near a work of art, but my time was severely limited. I only got one good picture, the rest came out very dark. Similarly to previous posters I battled getting the wire to stay under those screws. Coil came out at 2.1Ohms, 9 wrap 28g Kanthal with an ID of about 2.5mm. I am using cotton for the wick. I am going to give it another bash tomorrow night with a smaller ID and hopefully get it a lot neater. I must say I am starting to see the light. Flavour, throat hit and vapour production are all way above and beyond what I have experienced thus far.
View attachment 2477
That's definitely the direction I am moving in. Mission for lunch time: Find 1.5 mm mandrel
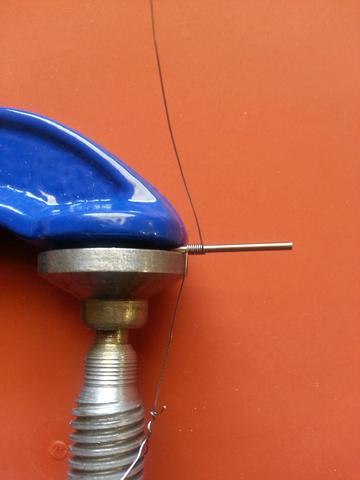
A 1.5 mm drill bit clamped in a C-clamp works well. The C-clamp does not have to be as big as the one in the picture - all I had at the time.That's definitely the direction I am moving in. Mission for lunch time: Find 1.5 mm mandrel
Other than 1.5mm, which are the most commonly used sizes?
Vast majority of vapers use 1.5 mm for micro coils. Above that is not really a micro coil per definition, but I have seen some vapers use 2 mm. Anything between 1 and 2 mm will do you.Other than 1.5mm, which are the most commonly used sizes?

Other than 1.5mm, which are the most commonly used sizes?
Common drill bit sizes: 1mm, 1,2mm 1,5mm & 2mm
Other than 1.5mm, which are the most commonly used sizes?
I've been very satisfied (to put it lightly) with 2mm.
Vast majority of vapers use 1.5 mm for micro coils. Above that is not really a micro coil per definition, but I have seen some vapers use 2 mm. Anything between 1 and 2 mm will do you.
I wasn't aware of this, good to know.
Ps. @Rex_Bael I see in the picture your fitted coil looks unmarked and new. A good tip is to torch the kanthal before you wrap it. It makes the wire more malleable and thus the wrapping process much easier.
Edit: a blowtorch is ideal however a normal lighter will also work.
I picked up a 1.5mm drillbit, so mission 1 complete. I will look at getting a few other sizes later on. I will definitely try a 2mm one soon.
@Matthee I know I saw that table before, but could not for the life of me find it again. Thank you.
@Reinvanhardt I did torch the coil with a regular lighter before starting. I held it in the flame untill it shone red and then moved slowly along the wire.
@Matthee I know I saw that table before, but could not for the life of me find it again. Thank you.
@Reinvanhardt I did torch the coil with a regular lighter before starting. I held it in the flame untill it shone red and then moved slowly along the wire.
I picked up a 1.5mm drillbit, so mission 1 complete. I will look at getting a few other sizes later on. I will definitely try a 2mm one soon.
@Matthee I know I saw that table before, but could not for the life of me find it again. Thank you.
@Reinvanhardt I did torch the coil with a regular lighter before starting. I held it in the flame untill it shone red and then moved slowly along the wire.
Ok great! (My wire goes from silver to light charcoal colour when torched)
Good luck Rex!
Mission 2 complete! It was a bit touch and go, but I am supremely happy with the results.
28g Kanthal, 9 wraps, ID 1.5mm, 1.2Ohm

Coil before squeezing

Coil after squeezing and tidying

Wicked and ready to go??
This setup seriously kicks ass! Thank you to every single one of you for your advice and guidance.
Notes:
I used the KFL+ clone the entire day, during which it was on it's side regularly and fell out of my car's cup-holder once. I did not experience a single sign of leaking. It did not gurgle once and I had zero dry hits. Once assembled it is solid as a rock.
Issues:
There seemed to be a faint metallic/Q20 taste coming through during the day. I completely disassembled and scrubbed it again tonight before making this new coil. The culprits seem to have been the drip tip and the narrow part of the chimney. With a little bit of man-handling, I could squeeze a cotton bud through the chimney and into the drip tip to scrub them.
The centre post not being adjustable is a definite gripe. It does not sit well on the MVP until you use the beauty ring to hold it up. Without the ring stabilizing and holding it up, I am almost certain it will cause no end of trouble.
The threading is very edgy and seems to have rough spots that catch onto cloth or cotton. It feels as though it needs a little bit of finishing to smooth out those sharp edges.
The screws on the posts are painful, they taper ever so slightly from the body to the head of the screw. This causes the coil to slip out very easily while tightening it. I found wrapping the coil legs clockwise around the screw to mitigate this to some extent.
Take into account that I have not experienced the real McCoy, so I do not know whether these are unique to the clone.
Now if you'll excuse me I am going to go pull a Silver
28g Kanthal, 9 wraps, ID 1.5mm, 1.2Ohm
Coil before squeezing
Coil after squeezing and tidying
Wicked and ready to go
??This setup seriously kicks ass! Thank you to every single one of you for your advice and guidance.
Notes:
I used the KFL+ clone the entire day, during which it was on it's side regularly and fell out of my car's cup-holder once. I did not experience a single sign of leaking. It did not gurgle once and I had zero dry hits. Once assembled it is solid as a rock.
Issues:
There seemed to be a faint metallic/Q20 taste coming through during the day. I completely disassembled and scrubbed it again tonight before making this new coil. The culprits seem to have been the drip tip and the narrow part of the chimney. With a little bit of man-handling, I could squeeze a cotton bud through the chimney and into the drip tip to scrub them.
The centre post not being adjustable is a definite gripe. It does not sit well on the MVP until you use the beauty ring to hold it up. Without the ring stabilizing and holding it up, I am almost certain it will cause no end of trouble.
The threading is very edgy and seems to have rough spots that catch onto cloth or cotton. It feels as though it needs a little bit of finishing to smooth out those sharp edges.
The screws on the posts are painful, they taper ever so slightly from the body to the head of the screw. This causes the coil to slip out very easily while tightening it. I found wrapping the coil legs clockwise around the screw to mitigate this to some extent.
Take into account that I have not experienced the real McCoy, so I do not know whether these are unique to the clone.
Now if you'll excuse me I am going to go pull a Silver
Second coil and you are already a pro! That is a beaut, well done. From now on your coil pics to go here: http://www.ecigssa.co.za/threads/show-us-your-working-wick-and-coil-setup.246/. That closing sentence had me laughing out loud!

Similar threads
- Replies
- 3
- Views
- 355
- Replies
- 1
- Views
- 331
- Replies
- 2
- Views
- 660
