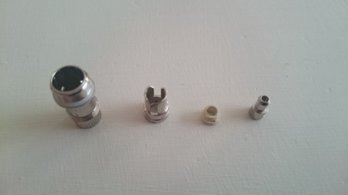
Has anyone tried recoiling Aspire BVC 1.8ohm Coils?

Guunie

Experienced Vaper
LV
12
 
Joined
14/1/15
Posts
177
Awards
12
Age
34
Location
Centurion
Good day Family!!!

I need Help :banghead:

I can't find anyone close to me who has stock of the Aspire 1.8ohm BVC coils and will be trying to recoil them.

I have found many forum posts and videos...RIP Tippers too...

Just thought I would consult my family (Yes, you awesome people :p ) and maybe someone has some helpful pointers before I lose it tonight..which I know i will, those dam coils are fn small!!!

Thanks in advance for any guidance. I will take pictures and tomorrow you will either see success or a coil destroyed in what ever demonic fashion i find appropriate at the time.

PS. Creative coil destruction suggestions are welcome :-@
 
@Andre, Thanks for the link...missed that thread somehow.

I got some 30AWG as per Gizmo's advice, who BTW can see perfectly fine still :)

So used http://www.steam-engine.org to work out what i will need to get as close to 1.8ohm and got something along the lines of the following (Attached screenshot for your viewing pleasure)

Inner diameter: 1.4mm
Number of wraps: 9.36 (Will do 9 wraps)

Going to drill out the 1.5mm holes as suggested and do a horizontal coil.

Think it will be much easier then trying to do it the way RIP did it.
 

Attachments

  • 1.8ohm aspire BVC.PNG
    1.8ohm aspire BVC.PNG
    72 KB · Views: 35
@Andre, Thanks for the link...missed that thread somehow.

I got some 30AWG as per Gizmo's advice, who BTW can see perfectly fine still :)

So used http://www.steam-engine.org to work out what i will need to get as close to 1.8ohm and got something along the lines of the following (Attached screenshot for your viewing pleasure)

Inner diameter: 1.4mm
Number of wraps: 9.36 (Will do 9 wraps)

Going to drill out the 1.5mm holes as suggested and do a horizontal coil.

Think it will be much easier then trying to do it the way RIP did it.

Hey @Guunie

Let us know how it works out with the horizontal coils! I know the guys do it with the Atlantis coils, but there is so much more room to work!

Good luck
 
Thanks @Oliver Barry,

Just realized I still need boil my organic cotton so won't get it finished tonight but will start modifying the coil (DREMEL MAD LAUGHTER :devil: )

I am actually planning on doing the Horizontal mod with the first one and then doing my take on a vertical recoil aswell and see which is better...pro's and cons of course.

Wish i had an iStick 50w already...getting tired of this dam itaste clk...need me MOAR WATTS :eek:

Will post pics anyways
Hey there @Guunie , awesome that you are going to try that build I am still using the same build in the nautilus mini coil head, just with new cotton after a dry burn and it works great. Try aim for about 0.9 ohm if you have a device capable of firing sub ohm, with the amount of room within the coil head, the increased air flow and the lower ohms results in huge amounts of vapor and the flavor is epic.

Just don't forget to plug the other two juice inlet holes with a little bit of cotton otherwise it will flood the chamber. I use 28 gauge as well and it performs better than the 26 gauge. Also juice up the wick once it has been threaded through the coil and tuck the little tails up in the air before screwing the coil back into the tank system.

I was very surprised at the result after I tried this method. I also tried the vertical but it gave many issues, either over saturating the wick, resulting in gurgling or under saturating, resulting in dry hits. Then I tried the horizontal method and was extremely impressed. I hit it at about 15 watts and it is amazing. Anyways, please let me know if you need any assistance but it is relatively straight forward. Once you get the first coil drilled and made then the others are easy as pie.
 
@Phoenix would you mind doing a photo walk through of how you did it?
Hey there @Arthster I did a photo walk through over here: http://www.ecigssa.co.za/suywwacs-u...t2-pt3-nautilus-etc.t1613/page-14#post-167997

The only thing someone may struggle with is if they do not have a drill press or a clamp to hold down the little coil when drilling through. Another thing to note is that there are 4 small juice holes on the side of the little coil. 2 of those holes go directly into the chamber and 2 of them have a backing plate behind them, I drilled through the ones that have NO backing plate and then plugged the ones that do, we only need 2 holes to ensure optimal ejuice absorption into the wick.

Another thing to note is that I removed ALL of the interior Japanese cotton. There is a thin sheath of Jap cotton clasping the interior wall of the coil, pull that bugger out of there. Anyways, it is simple after the first attempt, dont be scared to pull that puppy apart. For the new guys rebuilding a coil for the first time, when reassembling, don't forget that one lead of the coil goes on the outside of the rubber grommet and one lead goes on the inside, this is your positive and negative terminal.
 
Ever tried soldering the other 2 holes closed? looking at the photos on your post that should be a fairly simple thing to do.
 
Ever tried soldering the other 2 holes closed? looking at the photos on your post that should be a fairly simple thing to do.
Yeah I would not like to use solder as some may contain unknown chemicals, the little coil gets really hot, so to avoid any possible dodgy fumes I would not use solder in that specific area. If you take a sowing pin/needle and snip the tip off, you have a good ramming device to force the cotton into the little holes and all you need is a tiny little bit.
 
Yeah I would not like to use solder as some may contain unknown chemicals, the little coil gets really hot, so to avoid any possible dodgy fumes I would not use solder in that specific area. If you take a sowing pin/needle and snip the tip off, you have a good ramming device to force the cotton into the little holes and all you need is a tiny little bit.

Yeah that is actually a good point. the coil walls also looks a little thin to do easy flow on it.
 
@Phoenix, Thanks for the advice...

Really appreciate the assistance and can't wait to pull the dremel out again. Hasn't been used for a year, I'm ashamed!

Used to be abused with the pc case mods I did...now just gathering dust.

I know it's just drilling a wider hole but the tinker'rrrr in me is itching to get going!
 
I did see that there is another attachment after you remove the pin and grommet. This is what covers the other 2 holes. So i will remove that as well and should be easier to work with...will post pictures of what I'm talking about if I'm not making any sense in my excited bantering :)
 
Just asking the gautrain conductor to push this train to the 275kmh it can easily go and skrew eskom if they moan about the power draw...I need to get home! We should ask for a vapor carriage on the gautrain :)
 
@Arthster, that sounds like a plan! Just want to research which solder to use...always as healthy as possible us vapors
 
@Arthster, that sounds like a plan! Just want to research which solder to use...always as healthy as possible us vapors

U use to get solder for extreamly high heat applications. Basically used to solder heating elements. in that case you would need a proper soldering iron. I just cant remember how it was labeled but I am sure you would be able to get some from Communica in Samrand.
 
I did see that there is another attachment after you remove the pin and grommet. This is what covers the other 2 holes. So i will remove that as well and should be easier to work with...will post pictures of what I'm talking about if I'm not making any sense in my excited bantering :)
Awesome @Guunie , no need to remove anything else from the coil after you remover the grommet. Then if you watch the RipTrippers video he also shows how to reassemble the little bottom grommet with the two wire leads. i.e The positive and negative. Just make sure your coil is not touching the interior walls of the coil and you will be golden. Please let me know how it turns out. Oh yes, almost forgot, after you have made the little coil, put it into the coil chamber from the top, not from the bottom, then secure it with a 1.4mm screwdriver so as to make reassembling of the bottom grommet easier. This also results in the coil not moving while you are doing the reassembling.
 
So I took the day off so I could do this because last night just wasn't working.

I have attached a picture of that inner ring I spoke about.

Going to drill them holes now!
 

Attachments

  • uploadfromtaptalk1422609418917.JPG
    uploadfromtaptalk1422609418917.JPG
    164.1 KB · Views: 26
So I took the day off so I could do this because last night just wasn't working.

I have attached a picture of that inner ring I spoke about.

Going to drill them holes now!
Oh wow you managed to get that ring apart, excellent work man. Yeah I did not disassemble to that precise degree like you did. I just drilled the holes directly through the outer casing and inline with the channel in the center ring. Awesome work, please let me know how she turn out. You must have the hands of Da Vinci to get that ring apart from the base.
 
Thanks for the pics @Guunie . I also just removed that ring, because I saw that the holes on my coil do not line up with that insert and all 4 are closed off by that insert. That is maybe why some of the BVC coils don't wick so great, because all the holes are covered by that insert. Mine was like that. It would have been great if that insert was easier to remove and reposition so that all 4 holes are open. Mmmm.....obviously some guys in the factory are not paying attention.
 
@Phoenix, Thanks for the compliment... But it was more like a 9mm socket, an allenkey and a hammer
 
You won't believe what just happened...I knocked my vapesaber over and the fn nautilus glass just broke! The first time it drops and shattered...

Time to find someone with a replacement head
 
You won't believe what just happened...I knocked my vapesaber over and the fn nautilus glass just broke! The first time it drops and shattered...

Time to find someone with a replacement head
Hectic, sorry to hear that. That really sucks man. I was wishing you would taste the awesomeness of that remade coil system. Vaping on it now at 0.9ohms and it seriously kicks but. My new favorite rba, well, second to my Aqua. If I had a spare one I would give you in an instant, sorry man.
 
@Phoenix no stress...it did such big time but managed to pop in at eighties and pick up a new one. They had replacement coils but I told myself that I was going to recoil this baby if it's the last thing I do and the more dead coil hits I get the more motivated I become to get it right so going to steal the girlfriends tonight and carry on tomorrow.

Was hoping to pop into the vape meet at cesco's with my recoiled bvcs... But ya, can't wait for my plume veil to arrive!
 
Dam autocorrect...it S U C K E D big time and went to E C I G G I E S to get a replacement
 
Back
Top