

Hi Ecigssa members, In this review I take a look at the Thelema Quest 200W Box Mod from Lost Vape. The Lost Vape Thelema Quest 200W Box Mod was supplied for the purpose of this review by Sourcemore.
Lost Vape Thelema Quest 200W Mod Box Mod
Introduction
Lost Vape are best known for regularly manufacturing DNA chipset devices for the masses making it not necessary to donate an organ to be able to afford one. A couple of years ago many feared Lost Vape had completely moved away from premium chipset devices as they concentrated on both the pod market and their own Quest chipset although we did get the introduction of the DNA Go but a void was left in the market place which was swiftly spotted and filled by Dovpo!
Move on 2 years and Lost Vape have been back on form for the last 12 months going back to manufacturing both DNA chipset devices along with Quest budget versions which keep the same high end build quality but using their proprietary Chipset!
The Thelema Quest 200W Box Mod is the proprietary version of the Thelema DNA250C device and boasts the same design and build quality. We have the batteries fitting via a pull free spine and under the bonnet the full array of features to please most vapers! With the Quest version we see the introduction of a range of clear spines for those that like the transparent look as well as Carbon Fiber and Calf Leather options, Let's crack on and take a closer look!
_________________________________________________________________________
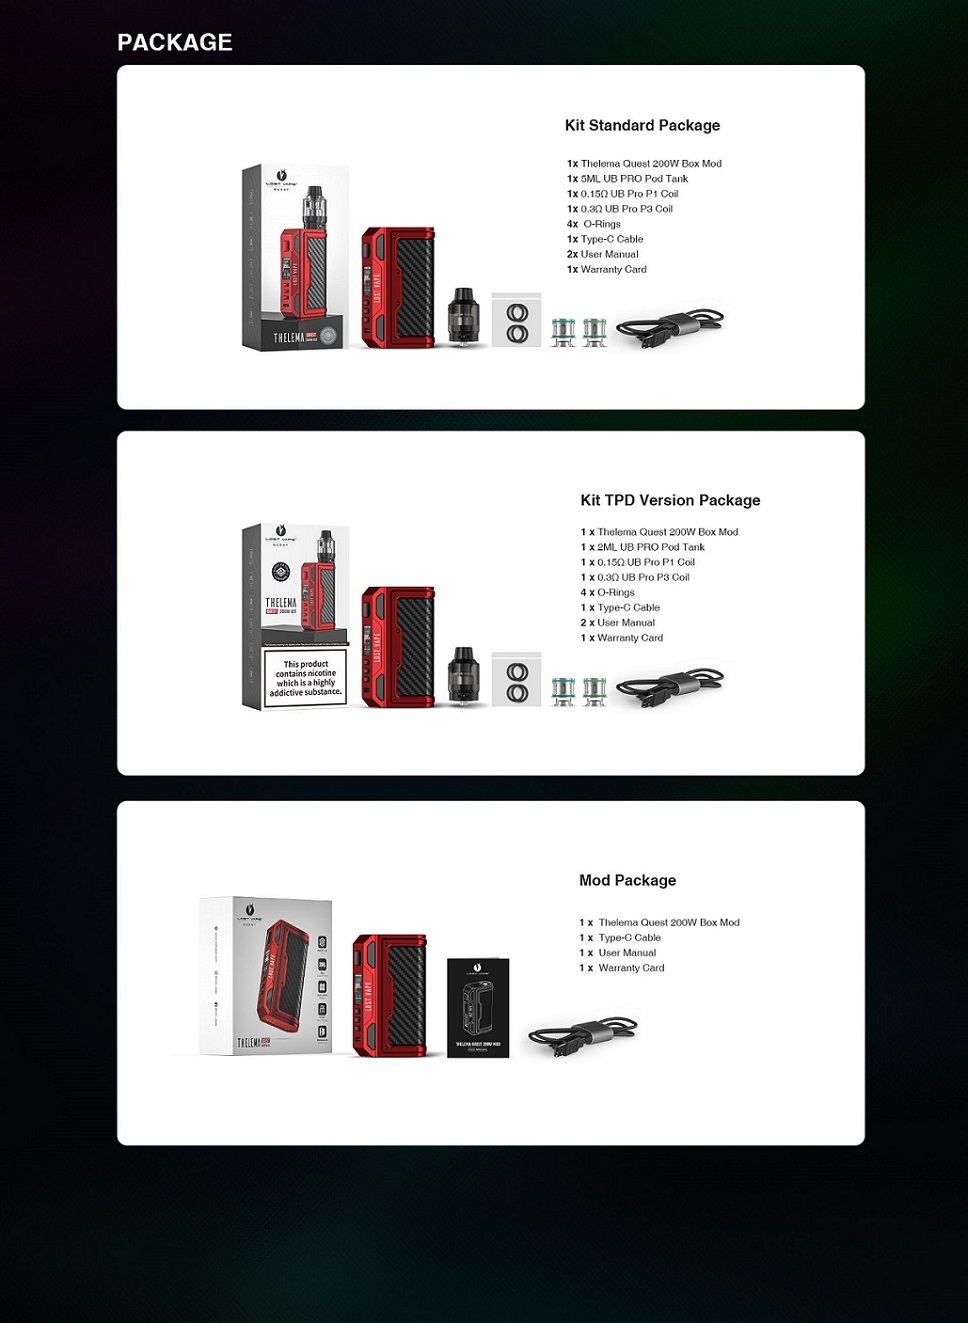
In The Box
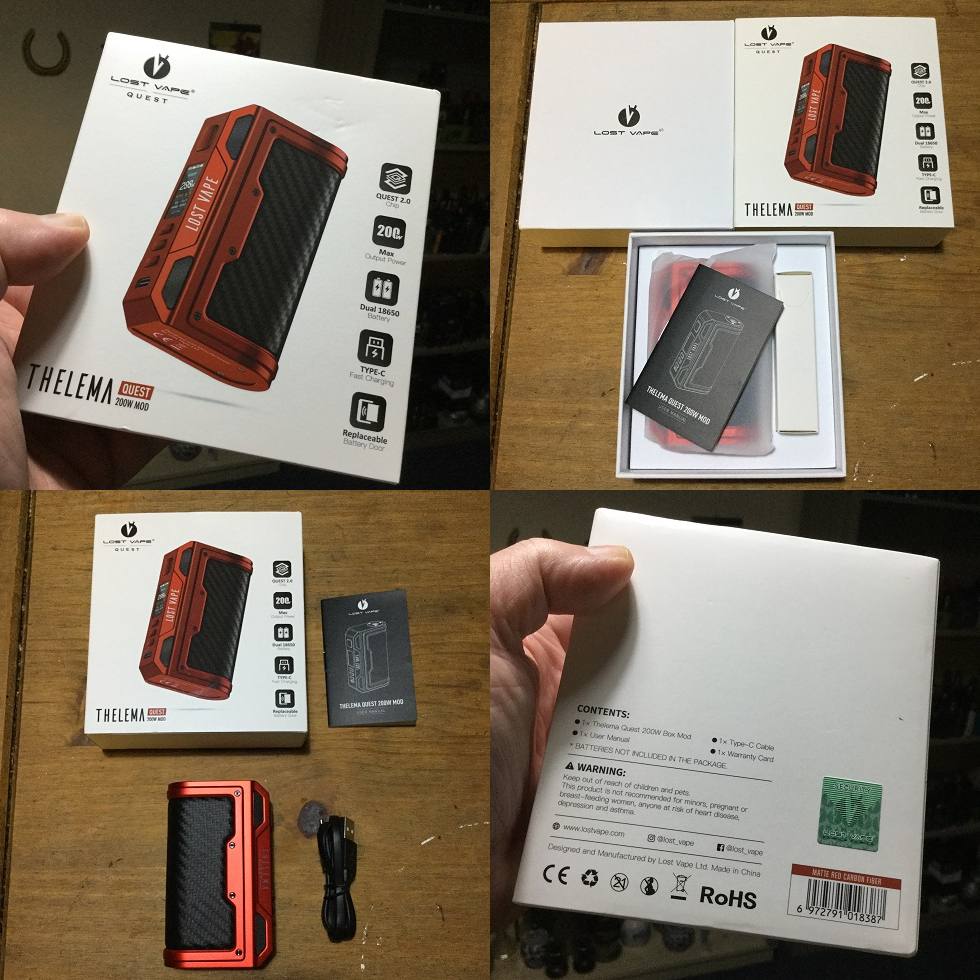
Contents:
1* Thelema Quest 200W Box Mod
1* Type-C Cable
1* User Manual
1* Warranty Card
_________________________________________________________________________
Aesthetics and Ergonomics
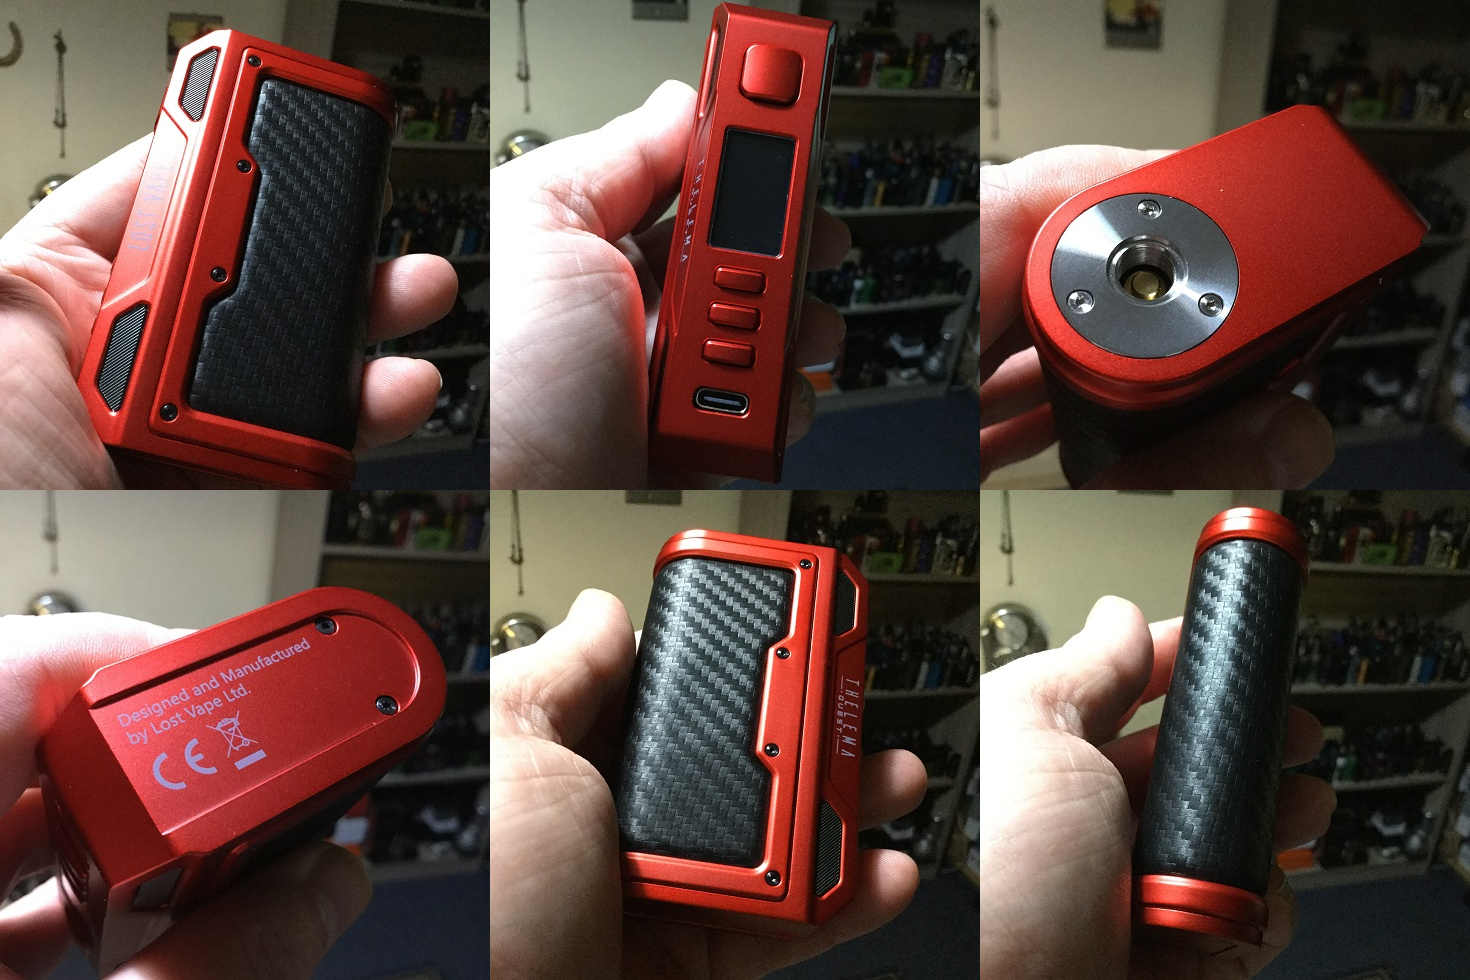
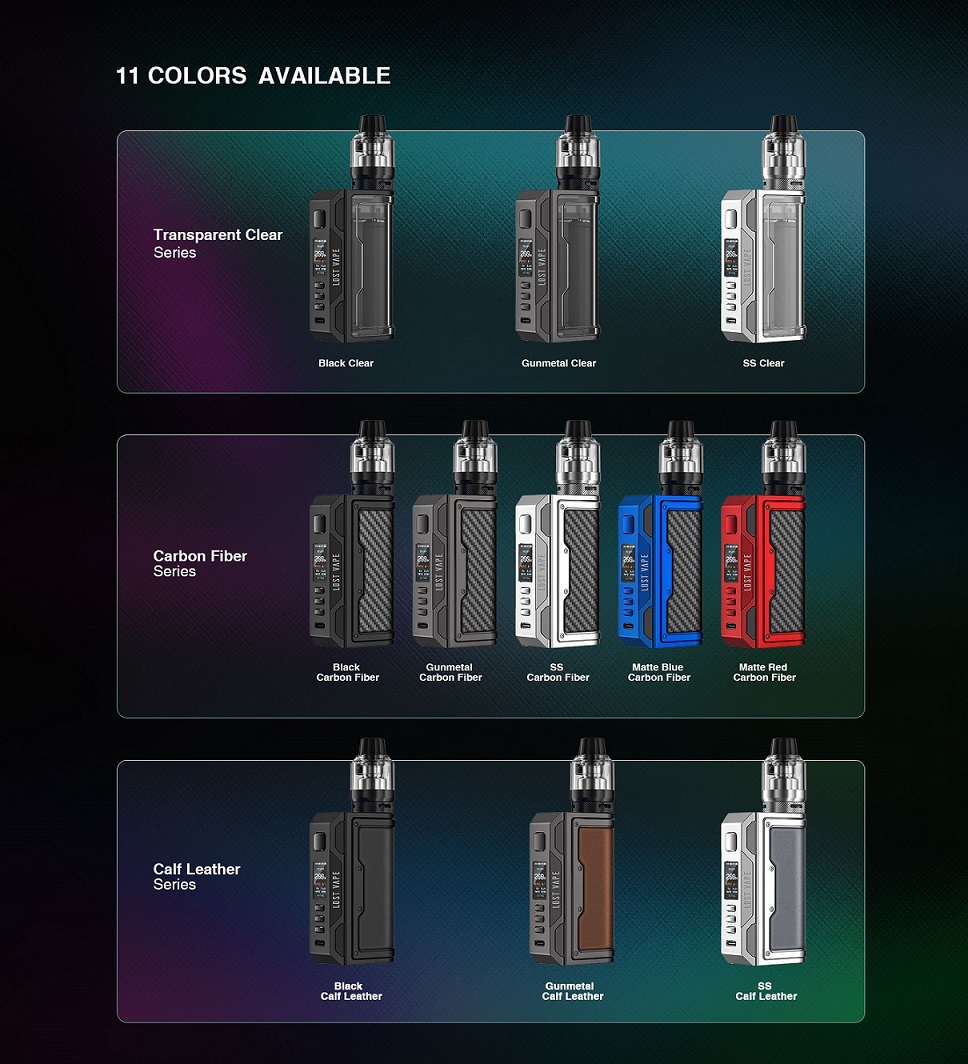
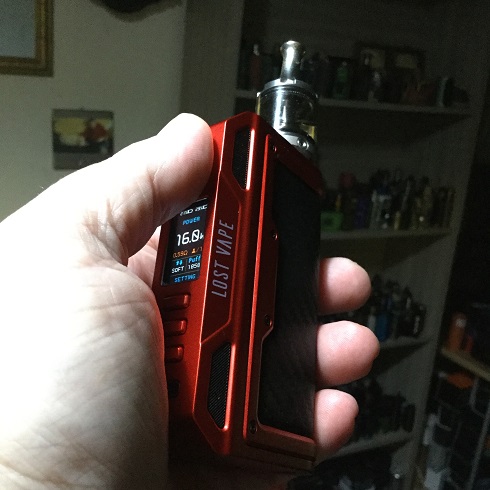
The Thelema Quest 200W Box Mod came in the usual White, square cardboard box packaging the Quest range come in with a raised picture of the device in the chosen colour on the lid and contents etc on the reverse. I received the Matte Red Carbon Fiber version which consists of a Red Zinc Alloy main chassis and Zinc Alloy spine/battery panel with padded Carbon Fiber finish. The options come in three ranges, the Clear range, the Carbon Fiber range and Calf Leather range giving the following options, Black Clear, Gunmetal Clear, SS Clear, Black Carbon Fiber, Gunmetal Carbon Fiber, SS Carbon Fiber, Matte Blue Carbon Fiber, Matte Red Carbon Fiber, Black Calf Leather, Gunmetal Calf Leather and SS Calf Leather.
The device has that classic C-frame form factor and see's the much loved pull free spine which many prefer to a bottom hinged door and also makes it possible for just the spines to be swapped to give the device a different look! If you like lighter devices you should consider the Clear range with the PC spine as the others have a Zinc Alloy spine and are on the heavy side once batteries are installed!
The build quality for the price range is beyond impressive and although I haven't handled the DNA 250C version it looks absolutely identical in regard design and build quality apart from different design spines and more branding visible on the premium version although for some that will be +1 to the Quest!
The curved spine helps make the device ergonomically sound and a natural thumb firer, for me though the weight makes it more a desktop rather than carry about device but then I much prefer single battery devices.
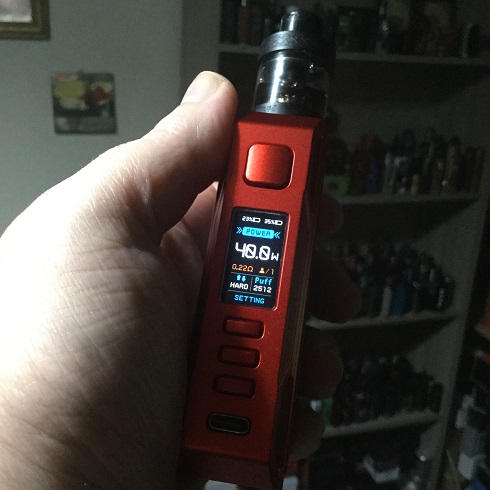
On the face we have a square fire button which protrudes and curves outwards, further down we have three rectangular protruding operational buttons lined up vertically which also curve outwards! The buttons really are a big pro, stiff and give a very definite heavy click which is so satisfying, they just feel as solid and high standard as the rest of the device when quite often a well made device can be let down with cheap buttons that have movement and feel a bit cr*p! Between the fire and operational buttons we have the screen and then right at the bottom the Type C USB connector!
On one side of the chassis towards the front we have "LOST VAPE" printed in White and on the opposite side in the same position "THELEMA", also in White. Moving to the base we have some low key branding and safety stamps and then moving up top towards the rear a 510 plate with Gold plated, spring loaded 510!
_________________________________________________________________________
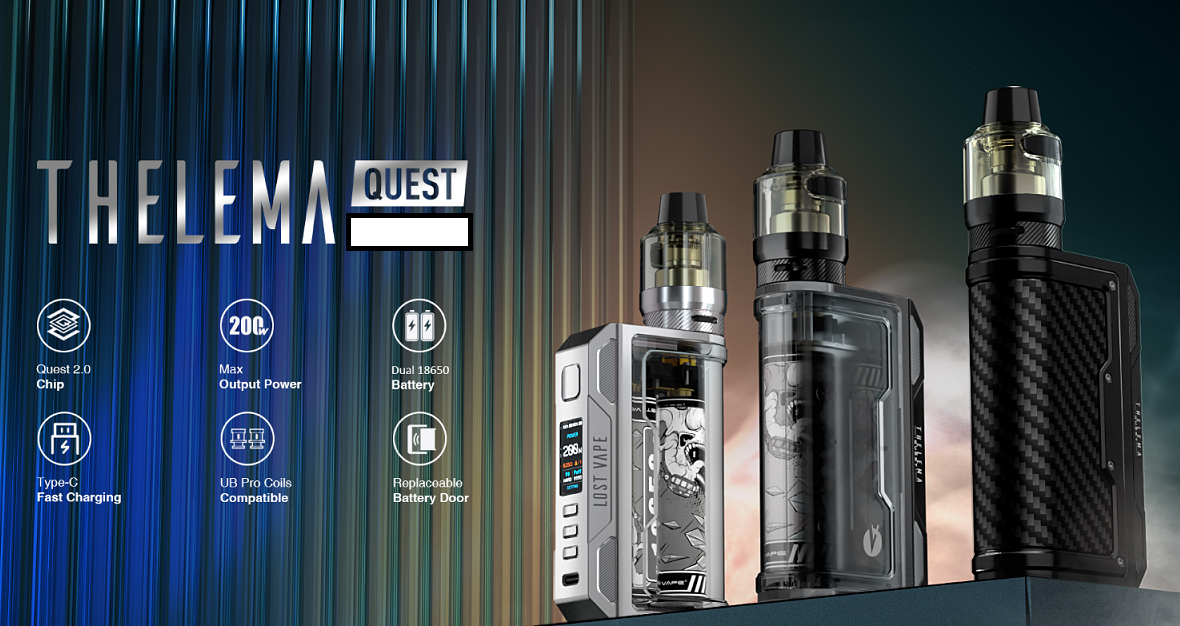
Thelema Quest Specs and Features:
Dimension: 56.1*27.6*92.5 mm
Battery: Dual 18650 Lithium Battery(not included)
Input Voltage: 6.0V-8.4V
Battery Voltage: 3.0V-4.2V
Output Voltage: 0.7V-8.0V
Power Range: 5-200W
Input Current: 1A-40A
Temperature Range: 200℉-600℉
Screen Pixel: 0.96 inch, 80*160
Material: Zinc-Alloy & Transparent PC
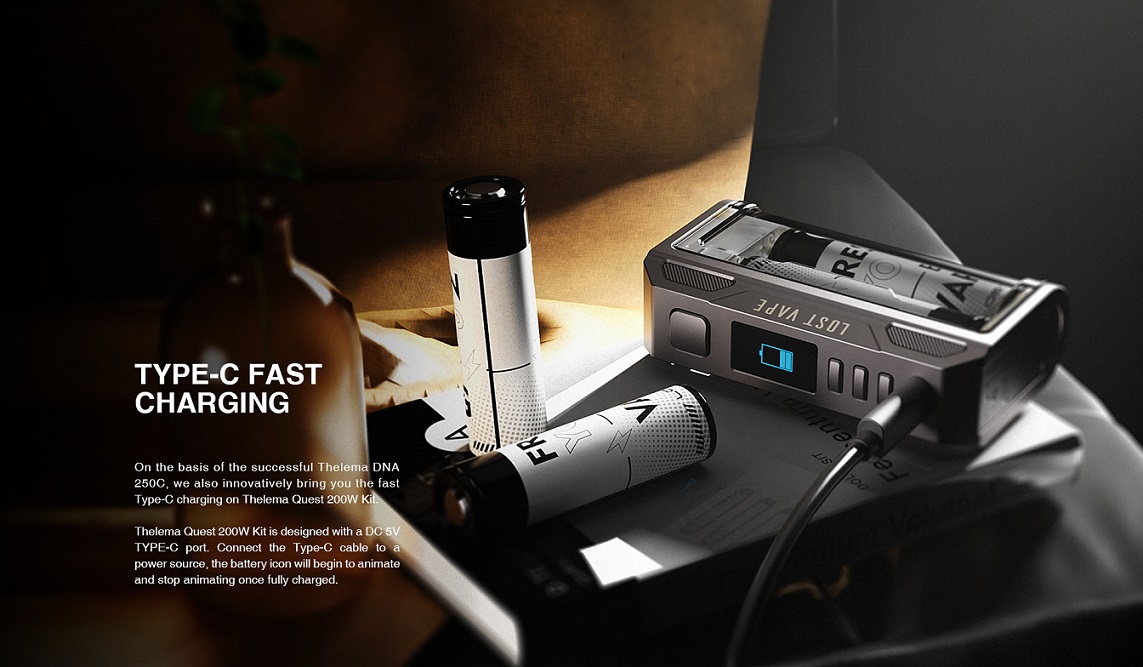
Charging: DC 5V Type-C fast charging
Quest 2.0 chipset
Five vaping modes: VPC/Bypass/Wattage/Voltage/Temperature Control(SS904/SS316/Ti/Ni)
Three firing mode: SOFT/NORM/HARD
Three user records (memory slots)
Multiple protections
Thread: 510
Colours: Black Clear, Gunmetal Clear, SS Clear, Black Carbon Fiber, Gunmetal Carbon Fiber, SS Carbon Fiber, Matte Blue Carbon Fiber, Matte Red Carbon Fiber, Black Calf Leather, Gunmetal Calf Leather, SS Calf Leather
_________________________________________________________________________
Fitting The Batteries
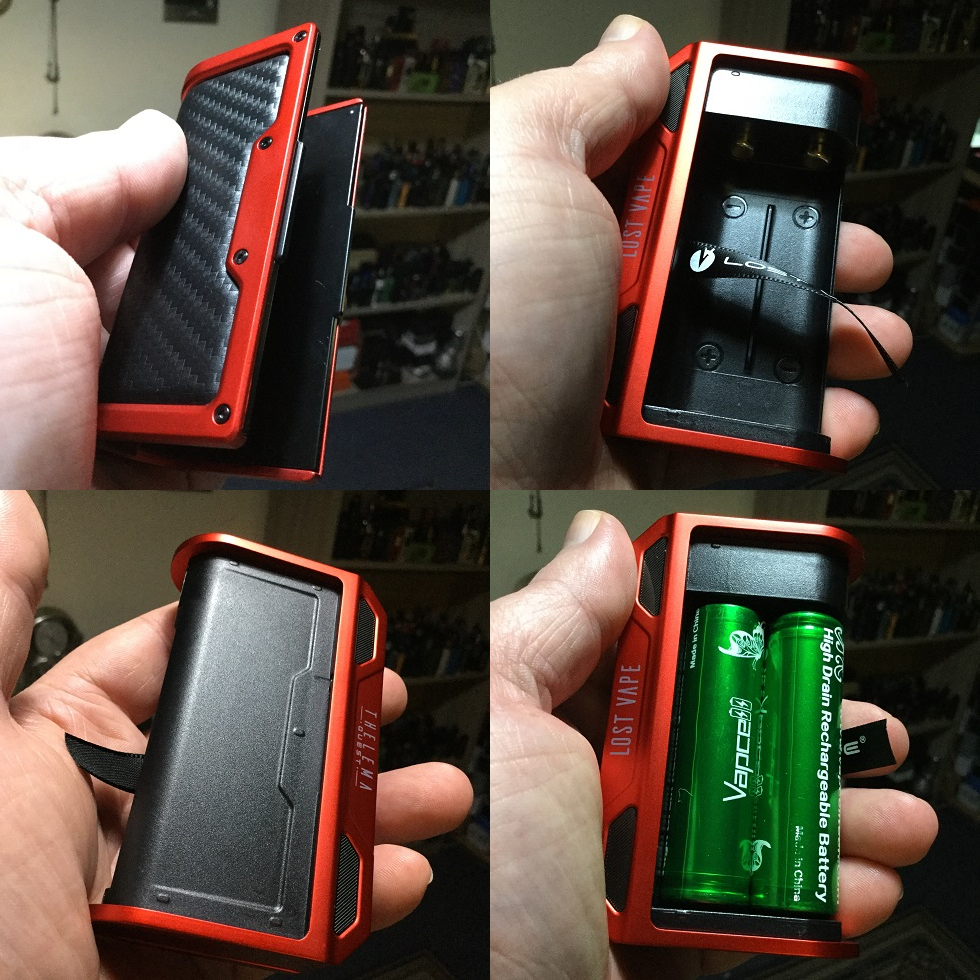
Apart from orientation is once again Black on Black rather than Bright White it's full marks and even with the orientation we have plenty of light so the symbols can quite easily be seen. We have a battery ribbon for easy removal and the batteries can be installed with absolutely no drama! The spine just pulls free to get access to the batteries and is secured via leading elongated tabs either side and very strong magnets top and bottom! Once secured we get absolutely no battery rattle of spine movement whatsoever, very impressed!
_________________________________________________________________________
The Display
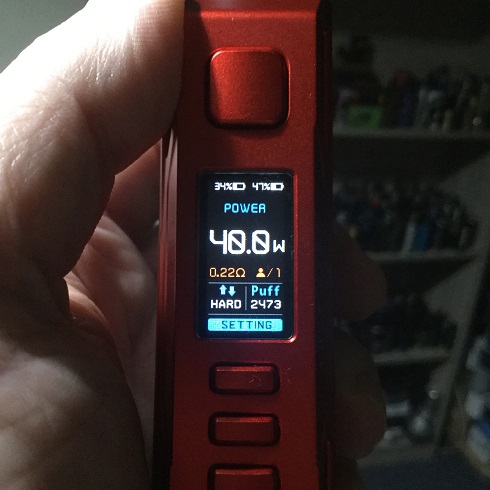
I really like this display, it's sharp, uses colour well and gives plenty of information but is very well laid out and not cluttered!
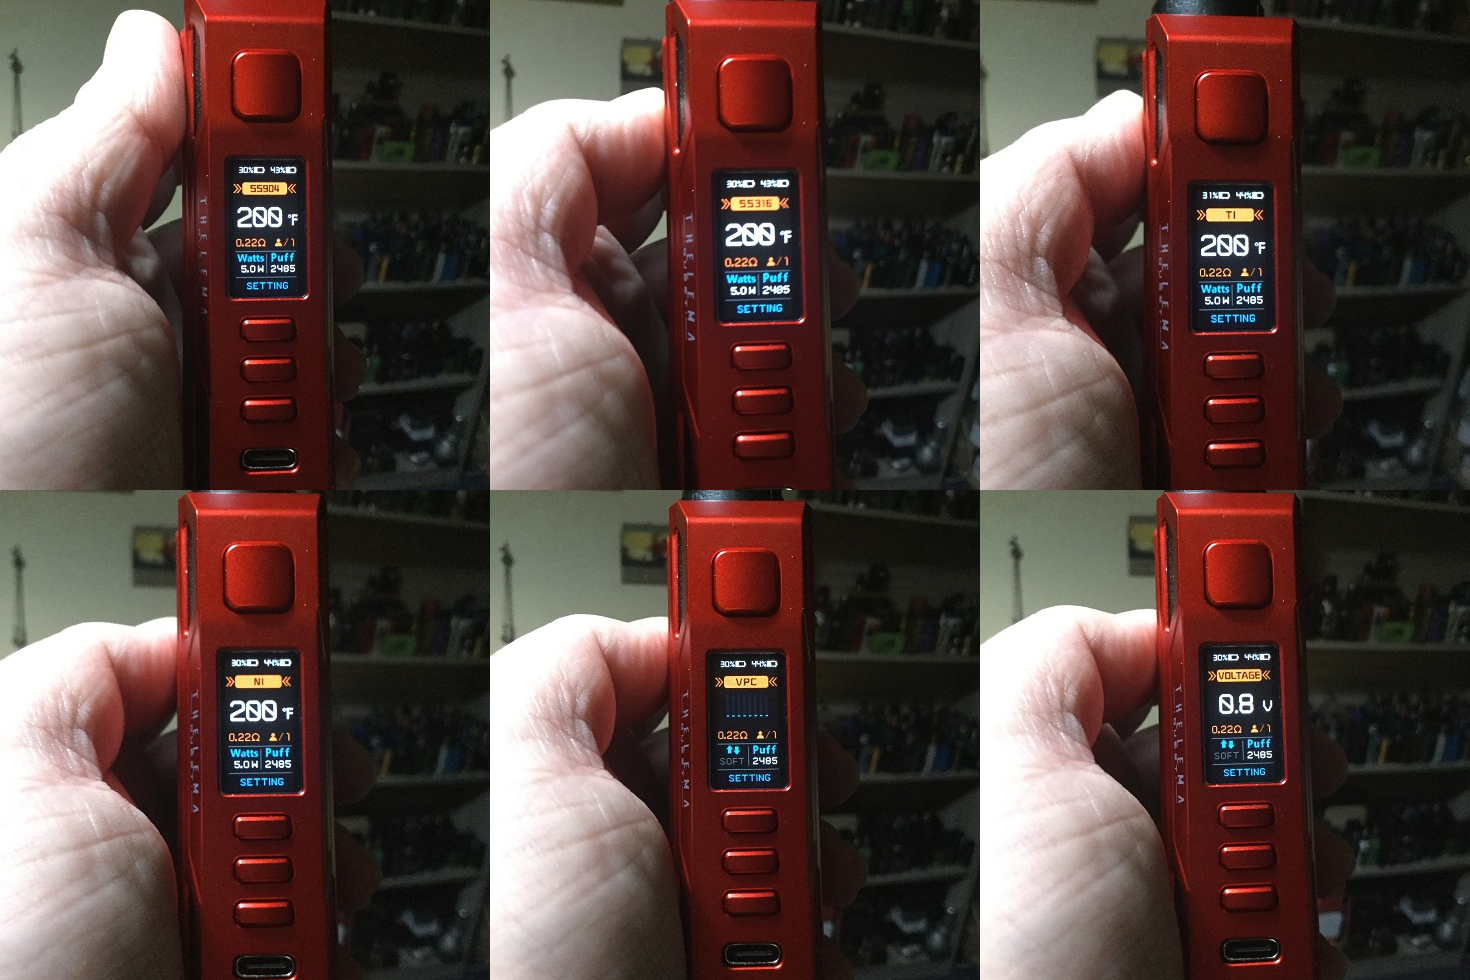
At the top we have two battery status bars, one for each battery and the charge is also given as a percentage, below we have the mode followed by the wattage, temperature or voltage depending which mode you are using.
Below to the left we have the resistance and then to the right a person icon and 1, 2 or 3 which just signifies the current settings are in one of the memory slots. Further down to the left we have the pre-heat which will be soft, Normal or Hard and to the right the four digit puff counter, during firing this will display vape duration! At the bottom we have settings which when selected enters the extra settings menu!
_________________________________________________________________________
Operating The Device!
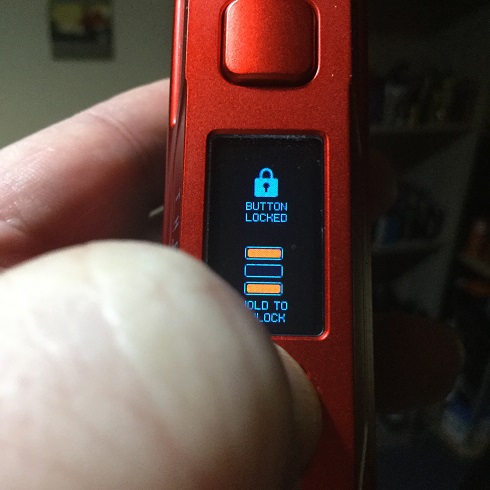
The device is the usual 5 clicks of the fire button in quick succession to both boot up and power down and once booted the up and down buttons pressed together locks the three operation buttons but the device will still fire.
The device is navigated by using the up and down buttons to move around the working screen and when the item you want is highlighted press the middle select button to select and then the navigational buttons to alter, select or fire confirms the change. Using this method of navigation allows to change between modes, alter wattage, temperature, voltage or curve segments depending which mode is active, you can change user profile (memory slot), alter the pre-heat or boost (Soft, Normal or Hard), reset the puff counter and select settings to go into the settings menu. When adjusting the wattage with single presses it alters in 0.1 increments from 5 to 20w and then 0.5w increments from 20 to 100w before switching to 1w increments right up to 200w, i like this a lot. When a button is held down for quicker adjustment it switches to 1w increments whatever the wattage is but unfortunately scrolls very slowly, it does round robin!
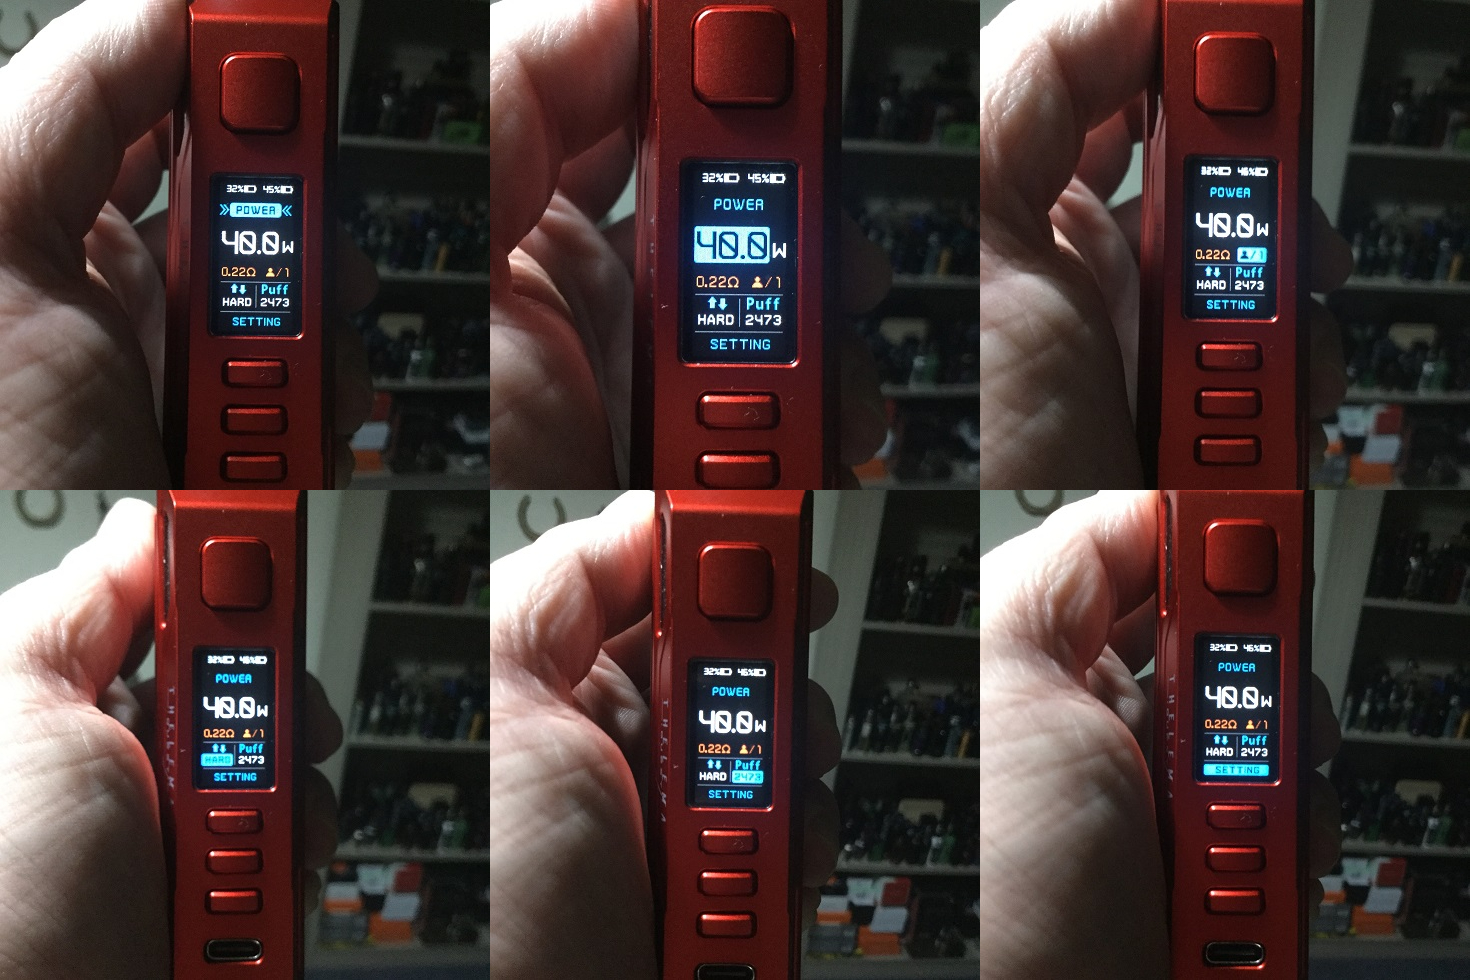
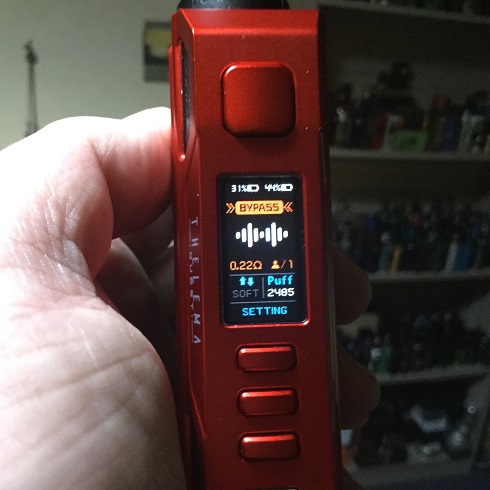
When choosing between the modes the options are Power, SS904, SS316, TI, NI, Curves, Voltage or Bypass!
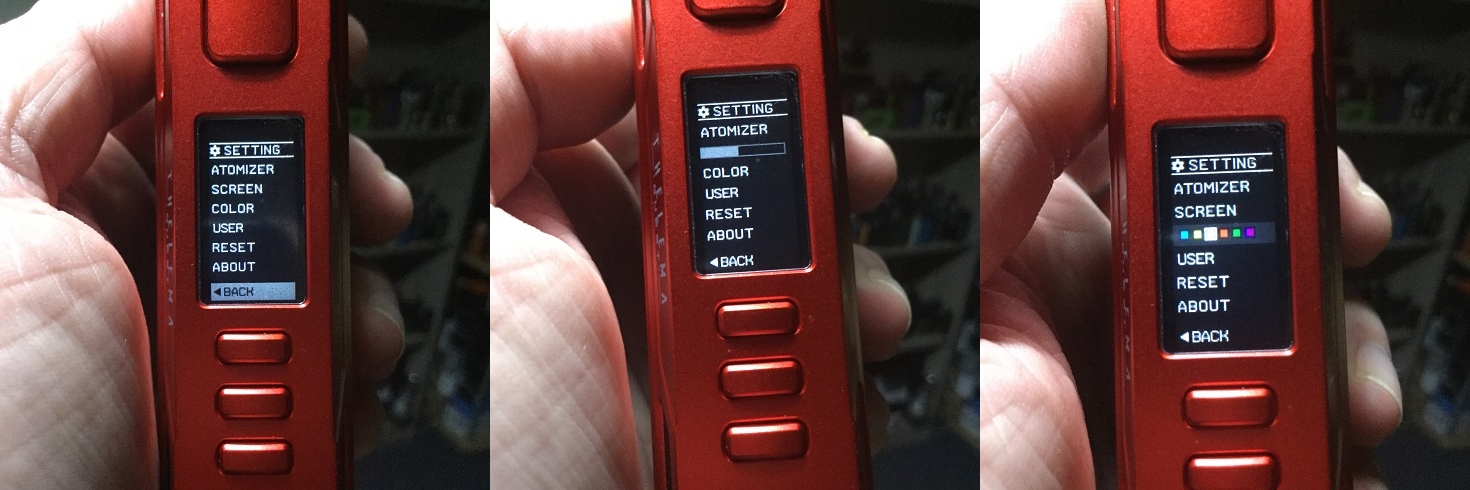
When selecting settings we enter the settings list which consists of Atomizer, Screen, Colour, User, Reset and About. When selecting screen it is actually the screen brightness and the word screen in the list is replaced with a progress bar which can be altered up and down with the navigational buttons to increase or decrease. When choosing Colour the word Colour (Color) is replaced by 6 little colour squares you can choose from which will determine the colour of certain items on the display, the options are Cyan, Yellow, White, Red, Green or Purple!
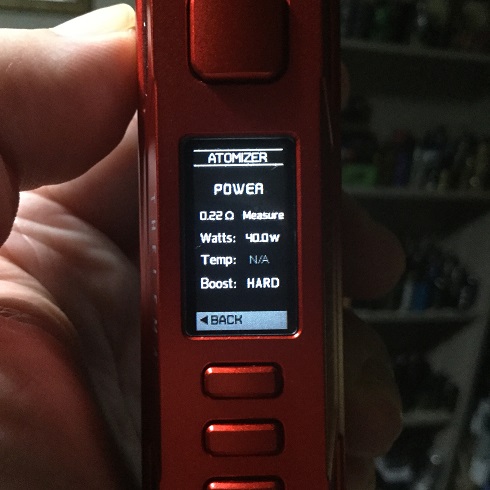
Atomiser brings up a screen which allows the wattage and boost to be set rather than altering on the main working screen and when in TC this is where you can alter and/or lock in resistance and set wattage.
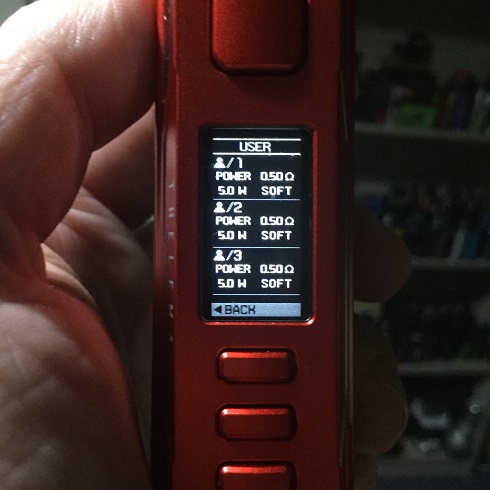
User is where you will find the parameters of the 3 User profiles which are basically memory slots, it comes pre-installed with them all the same in Power mode at 50W with Soft boost but you can change these and they can be set for any mode! That leaves Reset and About, Reset is factory reset and about brings up details about the chip!
_________________________________________________________________________
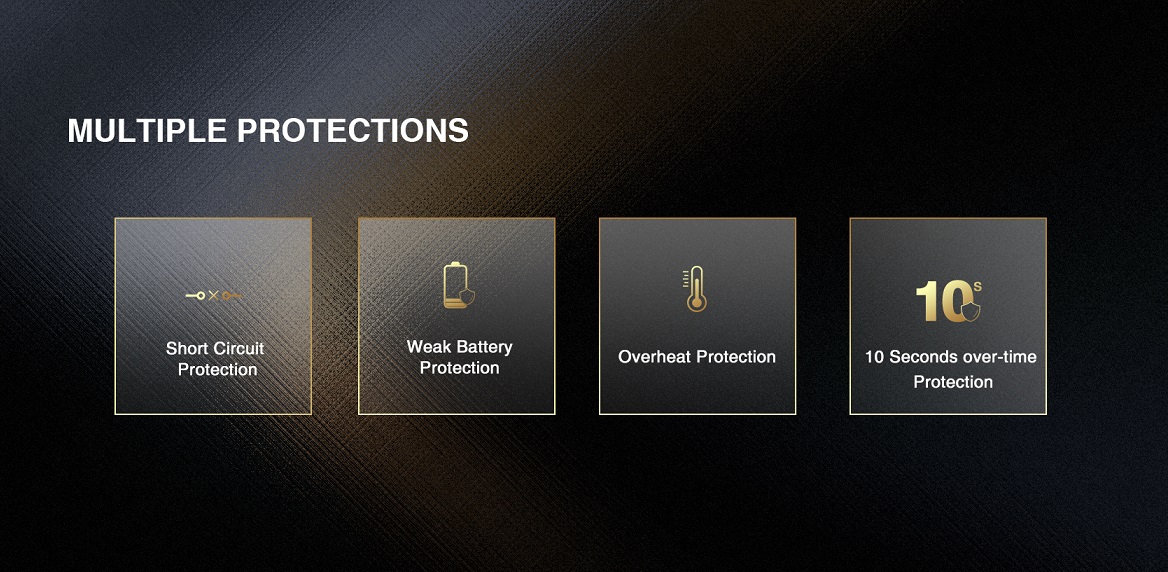
Protections:
Short Circuit Protection
Low Voltage Protection
Overheat Protection
10 seconds Over-time Protection
_________________________________________________________________________
Charging
As usual I recommend charging your batteries externally but if you do need to charge in the device we have a Type C connection and 2A Fast Charging. While charging just a central single charging progress icon is displayed which is a little basic, really would of preferred an icon for each battery, the charge to also be shown as a percentage and estimated charge time left! You can vape while charging but each time charging is paused and restarts after 30 seconds!
_________________________________________________________________________
My Thoughts!
The biggest pro for the Thelema Quest 200W device is it's value for money which is the most important thing to most, Ok we have no premium DNA chipset but the Quest chip certainly for power users is more than adequate and the overall build quality is impressive! The only negatives are the slow scrolling but then once your wattage is set not an issue, the Black on Black orientation although visibility is quite good and the start of the 510 thread seems to sit a little deep so the threading of the atomiser didn't always catch immediately but apart from that this is a damn fine device!
With TC, Curves, voltage, Bypass, voltage and Power modes the Thelema Quest covers all the bases although if you are a TC user I would do further research as I only tested the other modes!
I love that the select button has been maintained making navigating the device a breeze and how you just highlight selectable options on the main working screen for modes, memory slots, puff reset, pre-heats and selecting the settings menu.
The spine fits 100% securely and installing and removing batteries reveals no issues, The buttons are really superb with a stiffness which materialises into satisfying definite clicks with each press. The overall performance during testing was faultless with no delay and ramp up as good as with any modern regulated device! Having extra settings for brightness, display colour customisation etc all adds to the appeal of the device! Although scrolling the wattage with a button pressed down is very slow I do love how the lower the wattage is the more precision can be used in regard smaller increment adjustments with single presses!
The separate spines available for the Thelema DNA 250C device are also compatible allowing customisation and up to 26mm atomisers will fit up top which is about the limit for a classic C-frame device! Showing a status bar for each battery and the charge as a percentage is another pro as is the Type C connection and 2A Fast charging although I still recommend charging externally. The device does feel a little heavy although the Clear spine versions will be lighter, my final con is poor charging feedback which for such a good device is very basic!
_________________________________________________________________________
Likes
Great build quality
Plenty of spine options
Buy Thelema spines separately
Performed faultlessly during testing
Fired without delay
Very nice stiff clicky buttons
Spine fits very securely
No battery or button rattle or movement from the spine
Sharp colour display, well laid out and uncluttered
Display colour and brightness can be altered
Up, down and select buttons for easy navigation
Battery status bar for each battery and charge shown as percentage
4 digit puff counter that can manually be reset
Wattage adjustment 0.1 increments 5-20w, 0.5 increments 20-100w, 1w increments 100-200w
3 memory profiles
Power, Bypass, Voltage and Curves modes
TC (not tested)
Type C USB, 2A Fast charging
Fit up to 26mm atomisers without overhang
Can vape when USB connected (charging paused)
Cons
Slow scrolling
Quite heavy (Clear spine versions will be lighter)
Black on Black orientation
Poor charging Feedback
Start of 510 threading sits a little deep (or seems to, atomiser threading doesn't always catch immediately!)
As far as I am aware the Quest chipset can be updated but as it's not documented in the marketing or manual then can't commit!
I would once again like to thank Sourcemore for supplying the Thelema Quest 200W Box Mod for the purpose of this review, thanks for reading and stay safe!
Lost Vape Thelema Quest 200W Mod Box Mod
$33.99 - Lost Vape Thelema Quest 200W Mod
Code: LVTQM
Disclaimer: I am not affiliated with Sourcemore or benefit in any way from the use of the above code but was asked if i would include it in my content!
_________________________________________________________________________
Lost Vape Thelema Quest 200W Mod Box Mod
Introduction
Lost Vape are best known for regularly manufacturing DNA chipset devices for the masses making it not necessary to donate an organ to be able to afford one. A couple of years ago many feared Lost Vape had completely moved away from premium chipset devices as they concentrated on both the pod market and their own Quest chipset although we did get the introduction of the DNA Go but a void was left in the market place which was swiftly spotted and filled by Dovpo!
Move on 2 years and Lost Vape have been back on form for the last 12 months going back to manufacturing both DNA chipset devices along with Quest budget versions which keep the same high end build quality but using their proprietary Chipset!
The Thelema Quest 200W Box Mod is the proprietary version of the Thelema DNA250C device and boasts the same design and build quality. We have the batteries fitting via a pull free spine and under the bonnet the full array of features to please most vapers! With the Quest version we see the introduction of a range of clear spines for those that like the transparent look as well as Carbon Fiber and Calf Leather options, Let's crack on and take a closer look!
_________________________________________________________________________
In The Box
Contents:
1* Thelema Quest 200W Box Mod
1* Type-C Cable
1* User Manual
1* Warranty Card
_________________________________________________________________________
Aesthetics and Ergonomics
The Thelema Quest 200W Box Mod came in the usual White, square cardboard box packaging the Quest range come in with a raised picture of the device in the chosen colour on the lid and contents etc on the reverse. I received the Matte Red Carbon Fiber version which consists of a Red Zinc Alloy main chassis and Zinc Alloy spine/battery panel with padded Carbon Fiber finish. The options come in three ranges, the Clear range, the Carbon Fiber range and Calf Leather range giving the following options, Black Clear, Gunmetal Clear, SS Clear, Black Carbon Fiber, Gunmetal Carbon Fiber, SS Carbon Fiber, Matte Blue Carbon Fiber, Matte Red Carbon Fiber, Black Calf Leather, Gunmetal Calf Leather and SS Calf Leather.
The device has that classic C-frame form factor and see's the much loved pull free spine which many prefer to a bottom hinged door and also makes it possible for just the spines to be swapped to give the device a different look! If you like lighter devices you should consider the Clear range with the PC spine as the others have a Zinc Alloy spine and are on the heavy side once batteries are installed!
The build quality for the price range is beyond impressive and although I haven't handled the DNA 250C version it looks absolutely identical in regard design and build quality apart from different design spines and more branding visible on the premium version although for some that will be +1 to the Quest!
The curved spine helps make the device ergonomically sound and a natural thumb firer, for me though the weight makes it more a desktop rather than carry about device but then I much prefer single battery devices.
On the face we have a square fire button which protrudes and curves outwards, further down we have three rectangular protruding operational buttons lined up vertically which also curve outwards! The buttons really are a big pro, stiff and give a very definite heavy click which is so satisfying, they just feel as solid and high standard as the rest of the device when quite often a well made device can be let down with cheap buttons that have movement and feel a bit cr*p! Between the fire and operational buttons we have the screen and then right at the bottom the Type C USB connector!
On one side of the chassis towards the front we have "LOST VAPE" printed in White and on the opposite side in the same position "THELEMA", also in White. Moving to the base we have some low key branding and safety stamps and then moving up top towards the rear a 510 plate with Gold plated, spring loaded 510!
_________________________________________________________________________
Thelema Quest Specs and Features:
Dimension: 56.1*27.6*92.5 mm
Battery: Dual 18650 Lithium Battery(not included)
Input Voltage: 6.0V-8.4V
Battery Voltage: 3.0V-4.2V
Output Voltage: 0.7V-8.0V
Power Range: 5-200W
Input Current: 1A-40A
Temperature Range: 200℉-600℉
Screen Pixel: 0.96 inch, 80*160
Material: Zinc-Alloy & Transparent PC
Charging: DC 5V Type-C fast charging
Quest 2.0 chipset
Five vaping modes: VPC/Bypass/Wattage/Voltage/Temperature Control(SS904/SS316/Ti/Ni)
Three firing mode: SOFT/NORM/HARD
Three user records (memory slots)
Multiple protections
Thread: 510
Colours: Black Clear, Gunmetal Clear, SS Clear, Black Carbon Fiber, Gunmetal Carbon Fiber, SS Carbon Fiber, Matte Blue Carbon Fiber, Matte Red Carbon Fiber, Black Calf Leather, Gunmetal Calf Leather, SS Calf Leather
_________________________________________________________________________
Fitting The Batteries
Apart from orientation is once again Black on Black rather than Bright White it's full marks and even with the orientation we have plenty of light so the symbols can quite easily be seen. We have a battery ribbon for easy removal and the batteries can be installed with absolutely no drama! The spine just pulls free to get access to the batteries and is secured via leading elongated tabs either side and very strong magnets top and bottom! Once secured we get absolutely no battery rattle of spine movement whatsoever, very impressed!
_________________________________________________________________________
The Display
I really like this display, it's sharp, uses colour well and gives plenty of information but is very well laid out and not cluttered!
At the top we have two battery status bars, one for each battery and the charge is also given as a percentage, below we have the mode followed by the wattage, temperature or voltage depending which mode you are using.
Below to the left we have the resistance and then to the right a person icon and 1, 2 or 3 which just signifies the current settings are in one of the memory slots. Further down to the left we have the pre-heat which will be soft, Normal or Hard and to the right the four digit puff counter, during firing this will display vape duration! At the bottom we have settings which when selected enters the extra settings menu!
_________________________________________________________________________
Operating The Device!
The device is the usual 5 clicks of the fire button in quick succession to both boot up and power down and once booted the up and down buttons pressed together locks the three operation buttons but the device will still fire.
The device is navigated by using the up and down buttons to move around the working screen and when the item you want is highlighted press the middle select button to select and then the navigational buttons to alter, select or fire confirms the change. Using this method of navigation allows to change between modes, alter wattage, temperature, voltage or curve segments depending which mode is active, you can change user profile (memory slot), alter the pre-heat or boost (Soft, Normal or Hard), reset the puff counter and select settings to go into the settings menu. When adjusting the wattage with single presses it alters in 0.1 increments from 5 to 20w and then 0.5w increments from 20 to 100w before switching to 1w increments right up to 200w, i like this a lot. When a button is held down for quicker adjustment it switches to 1w increments whatever the wattage is but unfortunately scrolls very slowly, it does round robin!
When choosing between the modes the options are Power, SS904, SS316, TI, NI, Curves, Voltage or Bypass!
When selecting settings we enter the settings list which consists of Atomizer, Screen, Colour, User, Reset and About. When selecting screen it is actually the screen brightness and the word screen in the list is replaced with a progress bar which can be altered up and down with the navigational buttons to increase or decrease. When choosing Colour the word Colour (Color) is replaced by 6 little colour squares you can choose from which will determine the colour of certain items on the display, the options are Cyan, Yellow, White, Red, Green or Purple!
Atomiser brings up a screen which allows the wattage and boost to be set rather than altering on the main working screen and when in TC this is where you can alter and/or lock in resistance and set wattage.
User is where you will find the parameters of the 3 User profiles which are basically memory slots, it comes pre-installed with them all the same in Power mode at 50W with Soft boost but you can change these and they can be set for any mode! That leaves Reset and About, Reset is factory reset and about brings up details about the chip!
_________________________________________________________________________
Protections:
Short Circuit Protection
Low Voltage Protection
Overheat Protection
10 seconds Over-time Protection
_________________________________________________________________________
Charging
As usual I recommend charging your batteries externally but if you do need to charge in the device we have a Type C connection and 2A Fast Charging. While charging just a central single charging progress icon is displayed which is a little basic, really would of preferred an icon for each battery, the charge to also be shown as a percentage and estimated charge time left! You can vape while charging but each time charging is paused and restarts after 30 seconds!
_________________________________________________________________________
My Thoughts!
The biggest pro for the Thelema Quest 200W device is it's value for money which is the most important thing to most, Ok we have no premium DNA chipset but the Quest chip certainly for power users is more than adequate and the overall build quality is impressive! The only negatives are the slow scrolling but then once your wattage is set not an issue, the Black on Black orientation although visibility is quite good and the start of the 510 thread seems to sit a little deep so the threading of the atomiser didn't always catch immediately but apart from that this is a damn fine device!
With TC, Curves, voltage, Bypass, voltage and Power modes the Thelema Quest covers all the bases although if you are a TC user I would do further research as I only tested the other modes!
I love that the select button has been maintained making navigating the device a breeze and how you just highlight selectable options on the main working screen for modes, memory slots, puff reset, pre-heats and selecting the settings menu.
The spine fits 100% securely and installing and removing batteries reveals no issues, The buttons are really superb with a stiffness which materialises into satisfying definite clicks with each press. The overall performance during testing was faultless with no delay and ramp up as good as with any modern regulated device! Having extra settings for brightness, display colour customisation etc all adds to the appeal of the device! Although scrolling the wattage with a button pressed down is very slow I do love how the lower the wattage is the more precision can be used in regard smaller increment adjustments with single presses!
The separate spines available for the Thelema DNA 250C device are also compatible allowing customisation and up to 26mm atomisers will fit up top which is about the limit for a classic C-frame device! Showing a status bar for each battery and the charge as a percentage is another pro as is the Type C connection and 2A Fast charging although I still recommend charging externally. The device does feel a little heavy although the Clear spine versions will be lighter, my final con is poor charging feedback which for such a good device is very basic!
_________________________________________________________________________
Likes
Great build quality
Plenty of spine options
Buy Thelema spines separately
Performed faultlessly during testing
Fired without delay
Very nice stiff clicky buttons
Spine fits very securely
No battery or button rattle or movement from the spine
Sharp colour display, well laid out and uncluttered
Display colour and brightness can be altered
Up, down and select buttons for easy navigation
Battery status bar for each battery and charge shown as percentage
4 digit puff counter that can manually be reset
Wattage adjustment 0.1 increments 5-20w, 0.5 increments 20-100w, 1w increments 100-200w
3 memory profiles
Power, Bypass, Voltage and Curves modes
TC (not tested)
Type C USB, 2A Fast charging
Fit up to 26mm atomisers without overhang
Can vape when USB connected (charging paused)
Cons
Slow scrolling
Quite heavy (Clear spine versions will be lighter)
Black on Black orientation
Poor charging Feedback
Start of 510 threading sits a little deep (or seems to, atomiser threading doesn't always catch immediately!)
As far as I am aware the Quest chipset can be updated but as it's not documented in the marketing or manual then can't commit!
I would once again like to thank Sourcemore for supplying the Thelema Quest 200W Box Mod for the purpose of this review, thanks for reading and stay safe!
Lost Vape Thelema Quest 200W Mod Box Mod
$33.99 - Lost Vape Thelema Quest 200W Mod
Code: LVTQM
Disclaimer: I am not affiliated with Sourcemore or benefit in any way from the use of the above code but was asked if i would include it in my content!
_________________________________________________________________________
Last edited:

