Hi Ecigssa members, In this review i take a look at the Panda Hybrid RDTA from Bear Lair Mods. The Panda Hybrid RDTA was supplied for the purpose of this review by Nikita from Bear Lair Mods.
https://blmods.com/panda-hybrid/
Introduction
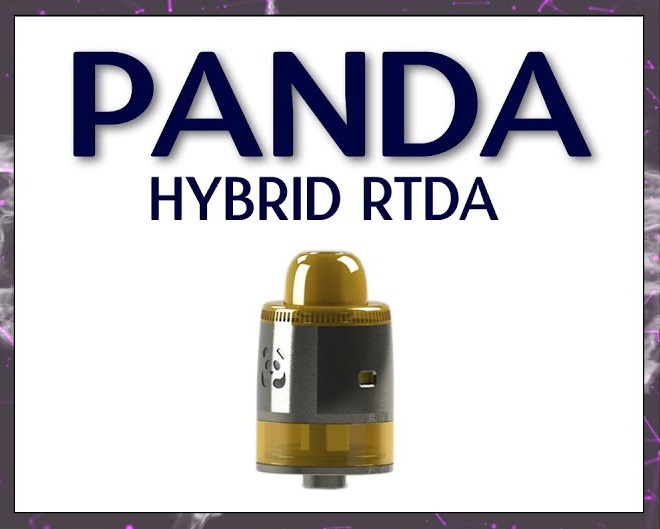
Bear Lair mods are based in Russia and produce Genesis style high end products for those that still like using mesh as a wicking material. The Panda is actually a single coil Hybrid allowing it to be wicked with cotton when doing an horizontal build, then when changed to Genesis mode for a vertical build either mesh or cotton can be used. The Panda arrived with a BF pin installed but a standard is included and it offers both a restricted lung hit or loose MTL draw dependant on how you adjust the simple but clever airflow system. I have never used mesh as the sole wicking material before so am quite eager to share my experience, so let's do just that!
___________________________________________________________________
In The Box
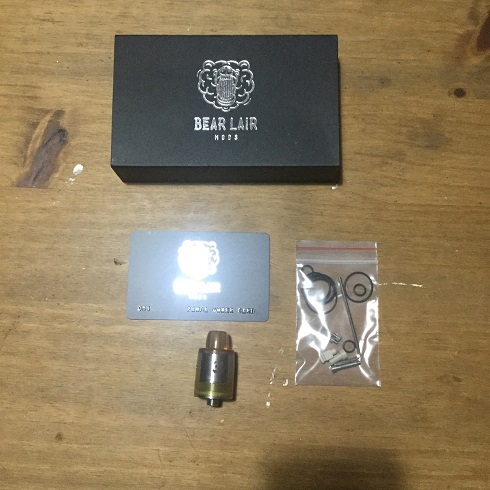
Contents:
• 1x PANDA Hybrid Atty
• 1x Reducer for genesis mode
• 1x BF Pin with insulator
• 1x Non-bf pin with insulator
• 1x Spare Parts
• 1x Plastic owners card with serial number
• 1x Gift Pack
___________________________________________________________________
Aesthetics
The Panda arrived in cardboard drawer style packaging, and pulling out the drawer revealed a unique looking atty and Plastic Panda's owners club card with serial number.
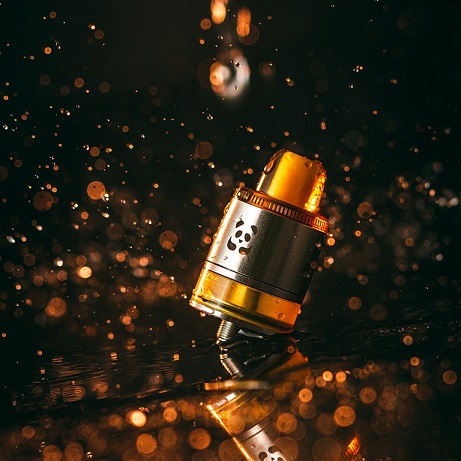
The Panda comes in just the one colour option which is a Stainless Steel outer sleeve and base with Ultem inner sleeve, 510 drip tip and tank section. On the outer sleeve we see an abstract Panda logo front and a 1mm in height rectangular airflow slot on the reverse. Both sides of the sleeve also have centrally positioned rectangular airflow slots, these being 2mm in height.
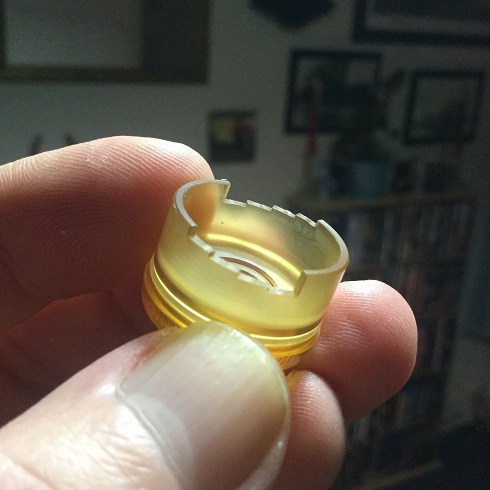
Above the outer sleeve we can see the protruding polished Ultem of the inner sleeve which can be turned for airflow adjustment, the inner sleeve up top accommodates a polished Ultem drip tip. The drip tip has quite a distinct look which will be like Marmite (you will love it or hate it) being very rounded, thick walled with quite narrow bore and goes so well with the matchy matchy inner sleeve it does look one solid piece but does actually pop out with a tug to reveal a standard 510 fitting.
The Tank section is also Ultem which looks aesthetically pleasing with having the matching Ultem upper section then moving to the base we have branding in the form of "BEAR LAIR MODS" and the Bear Lair Mods logo. The one i received came pre-installed with a BF pin with Peek surround although a standard pin with separate Peek section is included.
The build quality is top-notch with clean machining, tolerances perfect and every part of the Panda having a high quality feel and look to it!

___________________________________________________________________
Panda Specs and Features:
Diameter: 22mm
Height (without drit-tip and connector): 27mm
Capacity: 1.5ml in BF mode, 2ml in non-bf mode
Diameter of mesh holes and refueling hole: 3.5mm
Air flow control: DL in RDTA mode (2x slots 4x steps 0.5mm) / MTL in Vertical coil mode (Regulated single blowing through the hole 1mm or 0.5mm)
Atty materials: atty, screws, plugs – SS AISI 316, tank – ULTEM, insulators – PEEK
O-rings: Silicone
Positive pin: SS, not adjustable BF and non-BF
Weight: 35g
Thread: 510
Colour: Stainless Steel & Ultem
___________________________________________________________________
What You Receive?
The Atty i received was sent for review and the box unsealed so it is possible a couple of extra items could come with the purchased atty so for example i received a strong good quality allen key for changing the pins but no flathead screwdriver was in the box for tightening or loosening the grub screws.
The Panda came pre-installed with the BF pin although some literature i've read say's it comes pre-installed with the standard pin so this would need to be checked first but whichever pin is installed the other with its own peek surround section is also included, the pin it'self secures the atty together tight.
Installed is the unique looking Ultem drip tip, you don't receive an alternative but it is a standard 510 fit so you can fit one of your own if you prefer. We then have the inner Ultem sleeve which controls airflow and outer stainless steel sleeve which fits over the o-rings of the deck with just the right tolerance, not too tight but not loose.
Underneath the sleeve we have the deck set up for a horizontal single coil build with 2 wicking channels which double up as fill ports when the BF pin is not being used. On the underside of the deck we get the central pipe section that leads from the deck to the bottom of the atty, the Ultem tank gets fitted between. The Ultem tank section has a 2ml capacity which is reduced to 1.5ml when in Genesis mode as the wicking/fill hole plug that needs to be inserted sits deep reducing the capacity but as the Panda is really designed for use with the BF pin (especially when in Genesis mode) the main capacity comes from your squonk bottle. You don't receive a spare tank section or alternate glass option but then glass wouldn't really go with the look of the Atty.
As mentioned you receive a wicking/fill hole plug, spare screws and o-rings and finally an allen key but no cotton/mesh or wire included which has to go down as a con because in my opinion any rebuildable should come with what is needed to do at least one build.
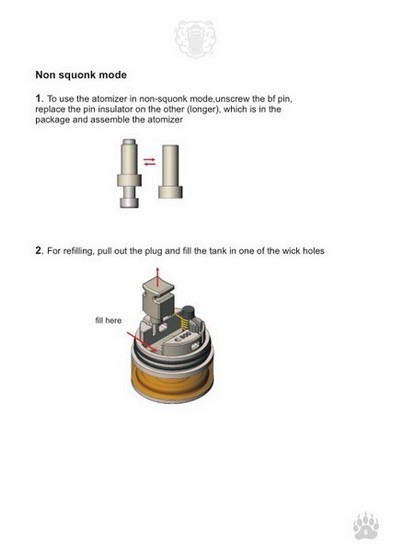
Some Useful Information From The Manufacturer!


___________________________________________________________________
The Airflow
The airflow as been designed to give air from both sides of the coil which can be adjusted with a horizontal build but also gives adjustable airflow from one side when doing a vertical build whether this is with cotton or mesh wick.
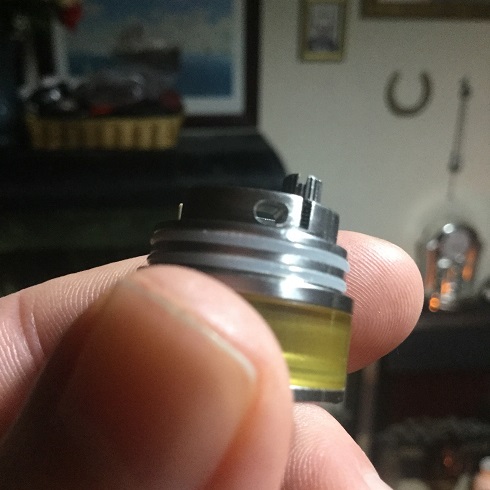
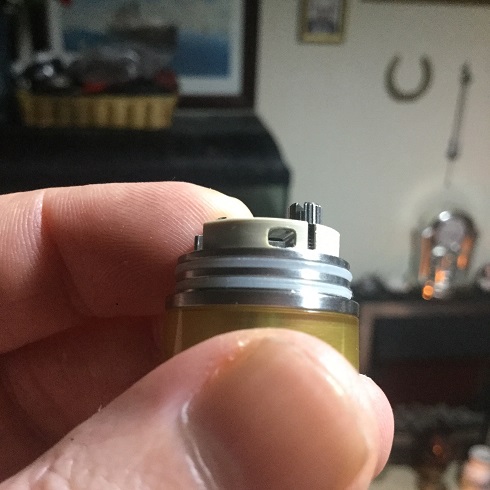
On the posts we have 2mm high rectangular cutout sections to allow air to be directed through the posts and at the sides of the coil. On the outer sleeve we also have the same sized rectangular slots that get lined up with the cutouts when fitting the sleeve over the deck. With the airflow slots on the sleeve and posts lined up we do have a very narrow cavity between allowing for the inner sleeve to turn between.
Looking at the inner sleeve we can see both sides have steps but very narrow stepping with each one only being 0.5mm different to the step before. This means with the airflow fully open we have the mentioned 2mm high slots, but as we turn the sleeve this can be reduced each side to 1.5mm, 1.0mm or even just a 0.5mm narrow slot either side.
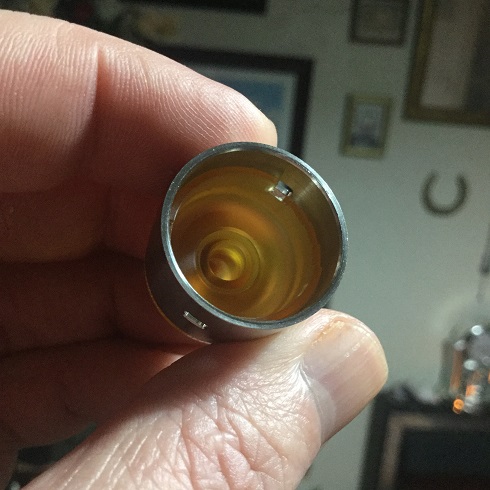
As mentioned either side on the outer sleeve we have 2mm airflow rectangular cutouts and on the front we have the Panda logo but on the reverse to the logo (the remaining side) we have a smaller 1mm rectangular slot which while using the dual airflow for the horizontal build is closed off by the inner sleeve so redundant.
When doing a vertical build the small 1mm slot gets lined up with your coil and the inner sleeve needs turning until the stepping comes into play or just before if you want the airflow fully open. With the stepping one side now at where we have the smaller slot the inner sleeve has closed the 2mm airflow slots and are now redundant, likewise the other side stepping is also redundant and will be positioned inside the sleeve around where the logo is. With the vertical build and smaller airflow inlet the 4 steps are no longer all in play as the slot is only 1mm in height so the choice is 1mm, 0.5mm or you can have a part step so for example have 0.5mm but start to move the 3rd step over which will close the airflow off completely just leaving a small gap. Finally when looking inside the sleeve it has a domed shape which in theory should encourage flavour.

___________________________________________________________________
Using With An Horizontal Build
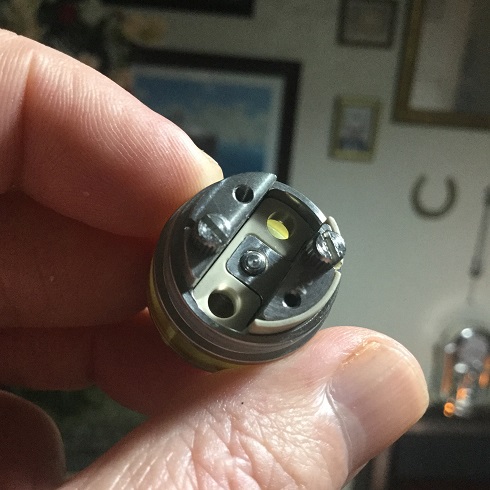
I mainly wanted to try the Panda with mesh wicking and share my thoughts but as i was doing research for a while on mesh wicking as it's new to me i chucked a horizontal build in just to see how it performs, and you literally can just chuck a build in it's that easy.
The two posts face each other and we have open horizontal slots diagonal to each other with your screws being fastened from above and acting as clamps. The grub screws are a good size, have large heads and are good quality so i simply removed them completely as the screws aren't small and fiddly.
We now have open vertical slots in the posts for your leads to just fall into and then putting the screws back in place and tightening down the leads just can't pop out as there is nowhere for them to go other than wave the White flag and get clamped in place.
Once fastened you can improve the coils position with a coiling rod or fit for purpose tool and then snip your leads. Wicking is quite simple, you have two large wick ports which your cotton ends need poking through, some have them barely poking through, others go to the other extreme and have the cotton reaching the bottom of the tank, i would just suggest do whatever works best for you just bare in mind if you are using the standard pin these wicking holes is also where you fill so don't have your cotton packed tight (even when using BF pin as it won't wick so freely).
___________________________________________________________________
Preparing Deck For Vertical Build
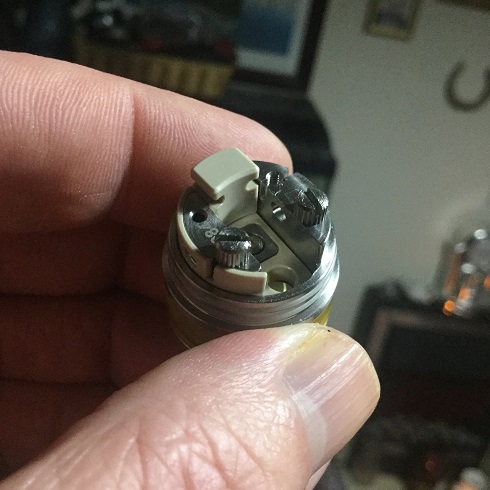
Whether using cotton or mesh for wicking a couple of alterations are needed to the deck to do a vertical build. Instead of the terminals being diagonal to each other with a fair distance between the 2 we need the terminals closer occupying just one small area of the deck and we also need to introduce some height difference between the positive and negative leads.
On the opposite ends of the posts to where we have our terminal slots we have a hole on each post. The hole on the positive post is just a breathing hole but the one on the negative has threading for a grub screw. Taking the screw out of it's usual position on the negative post where it clamps down the lead where we have the terminal slot it can be moved and threaded into the hole positioned on the negative post opposite the positive slot. This also introduces the height difference needed as the positive lead gets clamped by the screw bottom in the positive slot while the negative lead gets clamped on the top of the negative post by the screw head.
With only one of the wick holes needed for the vertical build included is a plug for the other which needs inserting, this also reduces the chamber.
___________________________________________________________________
Preparing The Mesh Wicking
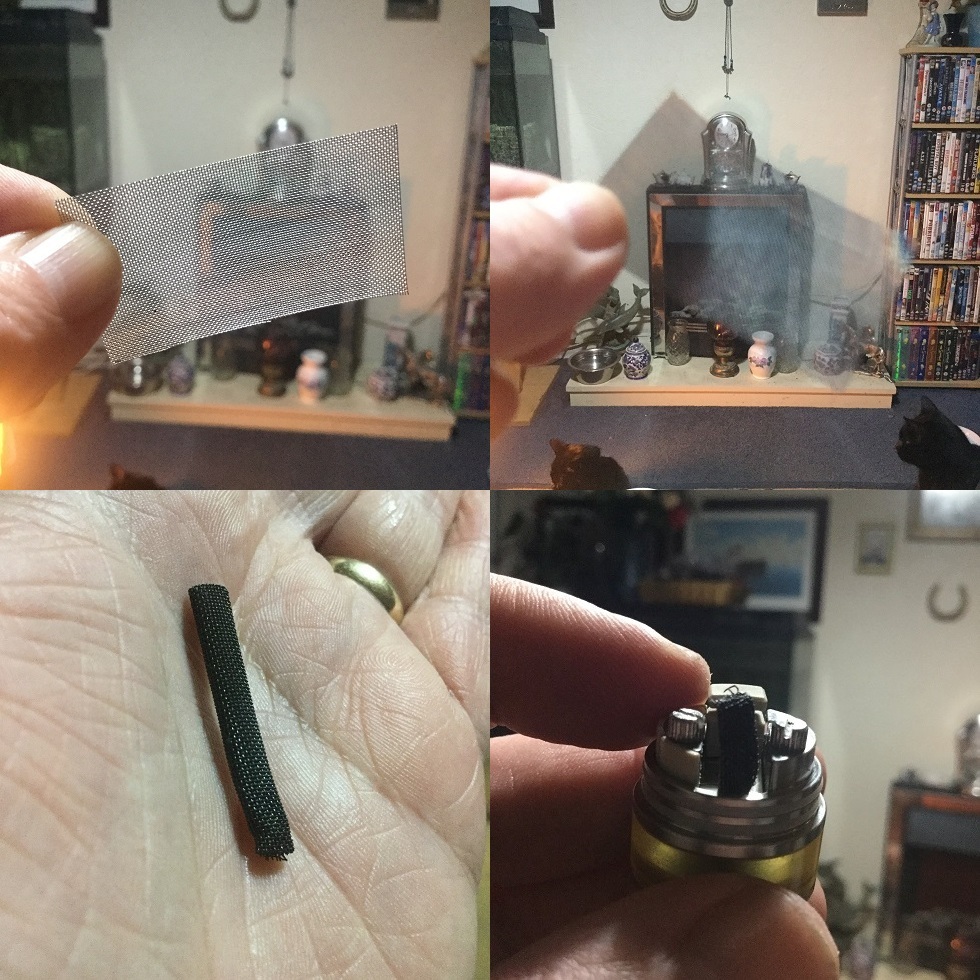
This was the first time i have used mesh for wicking so hit Youtube to get some pointers which was part an help but also made it more time consuming than it should of been as they all seemed to prepare a wick starting with a 5cm by 4cm sheet which after my initial roll i found was not just far too long but also at least twice as thick as needed (not even close to fitting through the wicking port). Length wasn't a problem as it can simply be cut to the correct length once the wick is completed and luckily i had only oxidised and rolled the mesh before realising the wick would be far too thick so i could unroll and cut to a more appropriate size which i found to be both 2.5cm for height and length to get it thin enough and the correct height.
Making the mesh wick does take a little time but is pretty straightforward and far less time consuming than i thought and that was even including my trial and error on getting the correct size. First holding the mesh with tweezers i blow torched the mesh sheet both sides to oxidise it and get rid of any impurities. Then i made a small fold one end before rolling it from the other around something thin, i used the thinnest allen key i have. Then i drenched the wick with e-liquid before blow torching and burning this off, i repeated this process 3 times. Finally i heated the wick with the blow torch until it was glowing then plunged it into water, again i repeated this process 3 times and that's the wick made.
Despite making the wick thinner than it was initially going to be it still was a very tight fit getting it through the wick hole but this allowed me to suspend it a couple of milometers above the bottom of the tank and kept the wick very securely in place so at this stage i'm thinking as long as wicking isn't an issue this is the size and thickness i want.
___________________________________________________________________
Vertical Build With Mesh Wick
I have already explained getting the deck ready for a vertical build but really using the mesh wick for the first time i wasn't expecting it to turn out.
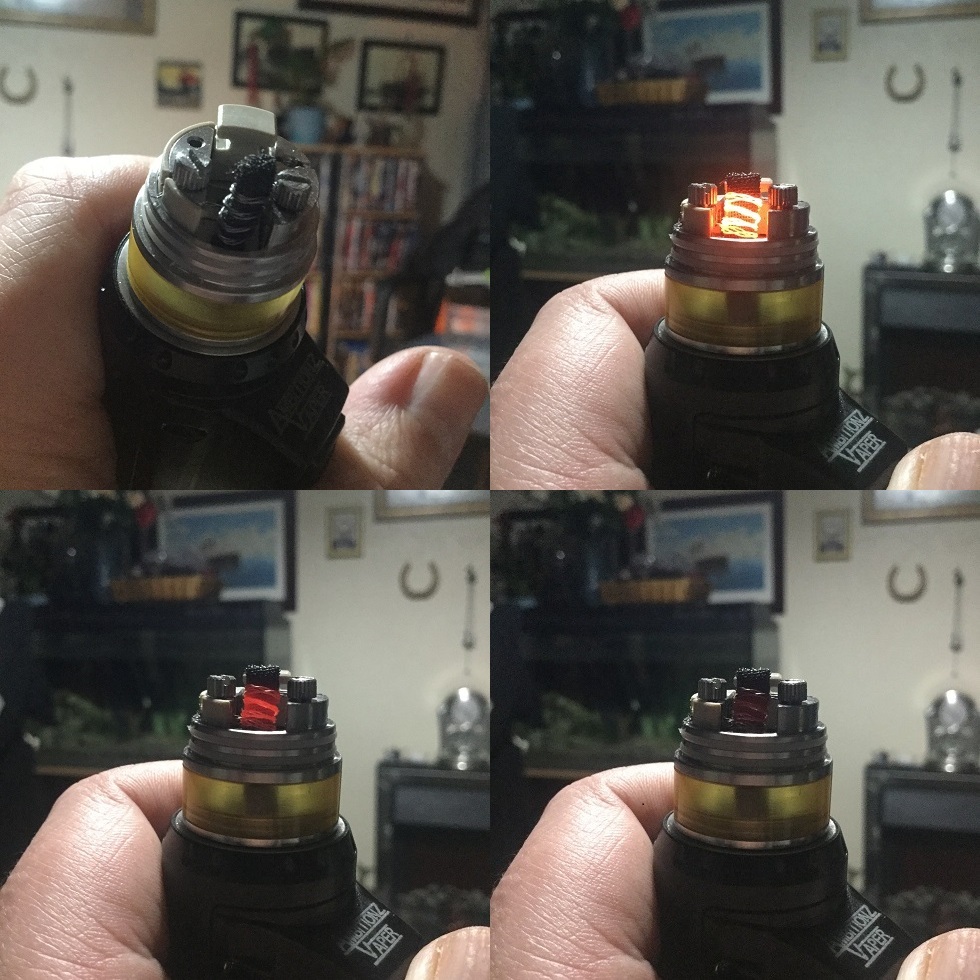
I found a loose length of wire in my wick box and as i only buy Kanthal and SS wire either single round wire or prepared fused clapton all i can say is it was fused clapton but giving any other specs would be purely guesswork.
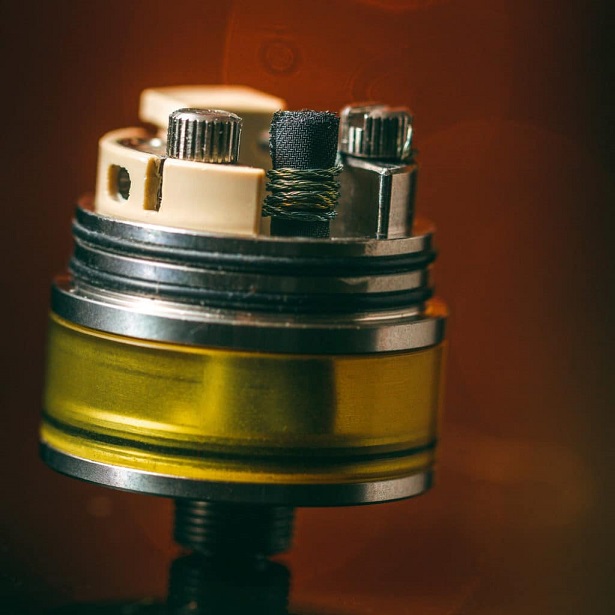
I placed one end of the wire in the positive slot and tightened the screw down then simply wrapped the wire around the mesh wicking a few times before securing the wire underneath the grub screw head on the negative post, snipped the leads and expected very little.
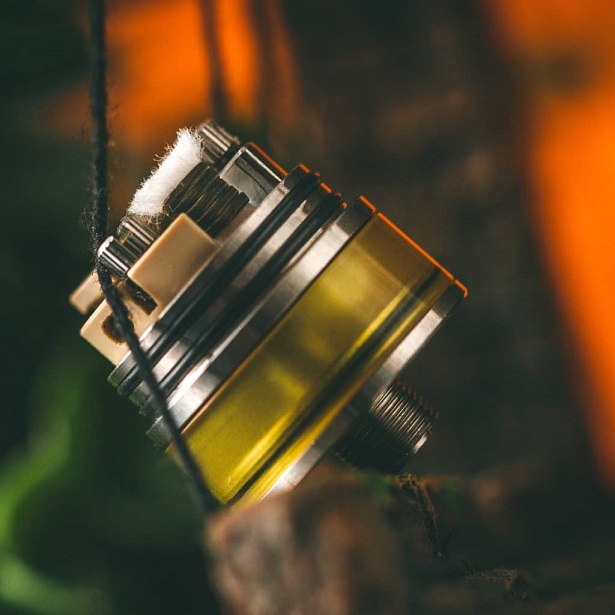
I pulsed and hey presto i have glowing wire around the mesh, as you can see from the pics it's not going to win a prettiest build contest but after dripping a little liquid over the mesh and seeing it vaporise with another pulse i am now getting quite excited, checked the resistance and it's 0.84 which kept the good news coming.
I used the Panda with the BF pin but before putting it on my squonking device i did remove the wicking plug and filled the tank before securing the plug back into place and then placed the sleeve over the deck with the correct airflow lined up.
___________________________________________________________________
How The Panda Performs And My Thoughts!
First i briefly used the Panda with a horizontal build and cotton wicking and as explained earlier in the review the build and wicking is very straightforward with the only things to point out being the terminal slots are not that wide so it's not suitable for chunky exotic coils, also there is no independent fill port so if using the standard pin then the panda both needs filling down one of the wick holes and with only being 2ml capacity it will need filling often.
The draw using an horizontal coil with dual airflow is a restrictive direct lung vape and as you close each step on the airflow down it becomes more restrictive, in fact with just dual 0.5mm slots it is suitable for both a very restrictive lung hit or even a loose MTL style. With the horizontal build i had no issues with flavour either, the airflow was smooth, it just gave a really nice vape. With this build i used Kanthal fused clapton i wound myself that came out to 0.56ohm which i preferred with the airflow slots being 1.5mm and was at 25W.
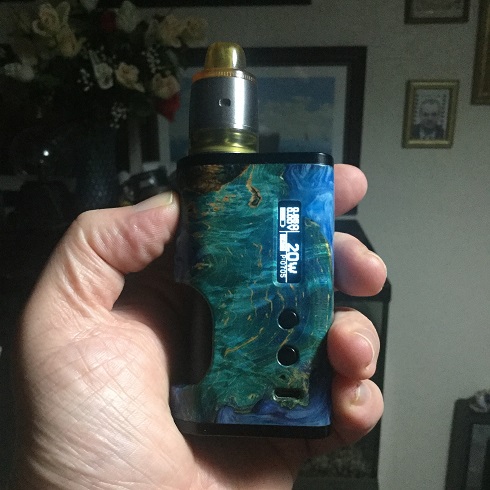
The vertical build in Genesis mode was how i have for the most part been using the Panda and despite the ugly looking build it couldn't have turned out any better from a vaping experience point of view. The wick i have wound very tight and it's also a very tight fit through the wicking port so i was worried about how well it would wick but it's wicking like a trooper and how tight the wick is allowed me to just have the Panda in my pocket on top of my Aether squonk mod when i was out and about. One of the issues i have heard about mesh wicking is that the tank needs to be kept upright else it will leak everywhere but with the wick being tight this turned out not to be the case at all.
I had just one dry hit in the whole time of using the Panda and that was only when on purpose i was doing some mad chain vaping to test it out. It was quite weird because unlike cotton where you get warning as the vape gets less and less saturated before you get a dry hit the mesh just gave saturated vapes then out of the blue the worst dry hit i have ever experienced, i won't be experimenting chain vaping with mesh again that's for sure. After saying that i just waited 30 seconds and nervously took another vape and it was straight back to a saturated vape and under normal vaping conditions i had no other dry hits.
Another thing i noticed was despite hearing the vapor production is not as great using mesh wicking i really didn't notice any reduction and in fact the vapor is much denser than with cotton to the point i needed to keep the living room door closed because it kept setting off the smoke alarm. Bearing in mind the smoke alarm only goes off occasionally when vaping normally and sometimes if testing certain atty's i can be at about 60W and with the Panda i was just at 20W with a loose MTL style so the lack of vapor production seems to be a complete myth.
The draw with the airflow wide open with the vertical build allows for either a loose MTL or very restrictive lung hit, personally i had the slot at 0.5mm which still gave quite a loose MTL but not as loose as fully open and no longer possible for a DL vape of any satisfaction, as mentioned i was using fused clapton that came out to 0.84ohm and was at 20W.
The flavour i just can't compare to anything as this is the first time using mesh wick but it's a much cleaner crisper flavour than using cotton and in my opinion superior. I was very impressed with the flavour and came to the conclusion although not realising it even when i think i am getting good flavour using cotton, cotton must mute the flavour slightly because the mesh is different league.
The last thing to mention is the drip tip which i feel will divide opinion aesthetically, but whether you like the look or not it must be about the most comfortable drip tip i have used and the option of fitting your own is always there.
Conclusion
I am enjoying the Panda that much with mesh wicking i have ordered a couple of other Genesis style tanks to have a play with!
___________________________________________________________________
Likes
High end build quality
Polished Ultem and Stainless Steel finish
Extremely comfortable drip tip (will divide opinion aesthetically)
Drip tip standard 510 fit (can use your own)
Standard single coil horizontal build
Horizontal Build: very easy build and wick, Good flavour, smooth airflow, various restricted DL or even loose MTL smallest airflow setting.
Deck can be altered for Vertical build (mesh or cotton wicking)
Preparing mesh wick easier than expected
Vertical Build very easy (even if my build looks ugly)
Mesh wicking: Superior cleaner, crisper flavour
Vertical Build: smooth airflow, mid to loose MTL, very restricted DL possible with airflow fully open
Dual or single airflow design
0.5mm airflow stepping on inner sleeve
Fully adjustable airflow
Top and drip tip stay very cool
Despite hearing differently could use the Panda out and about with mesh wicking without leaking issues.
Mesh wicked like a trooper
Mesh gave dense, creamy vapour (just lush with flavour to match)
Included wicking port plug
BF and standard pins included with their own peek surround sections
Grub screws are high quality with large heads (spares included)
Can use squonk bottle as extension of capacity
Cons
No independent fill port (only applicable when using standard pin)
Small capacity (only an issue with standard pin)
No building material included
Preparing mesh wick is time consuming (but easier than i thought)
Can't use thick wire
I would once again like to thank Nikita from Bear Lair Mods for supplying the Panda Hybrid BF RDTA for the purpose of this review.
https://blmods.com/panda-hybrid/
___________________________________________________________________
https://blmods.com/panda-hybrid/

Introduction
Bear Lair mods are based in Russia and produce Genesis style high end products for those that still like using mesh as a wicking material. The Panda is actually a single coil Hybrid allowing it to be wicked with cotton when doing an horizontal build, then when changed to Genesis mode for a vertical build either mesh or cotton can be used. The Panda arrived with a BF pin installed but a standard is included and it offers both a restricted lung hit or loose MTL draw dependant on how you adjust the simple but clever airflow system. I have never used mesh as the sole wicking material before so am quite eager to share my experience, so let's do just that!
___________________________________________________________________
In The Box

Contents:
• 1x PANDA Hybrid Atty
• 1x Reducer for genesis mode
• 1x BF Pin with insulator
• 1x Non-bf pin with insulator
• 1x Spare Parts
• 1x Plastic owners card with serial number
• 1x Gift Pack
___________________________________________________________________
Aesthetics
The Panda arrived in cardboard drawer style packaging, and pulling out the drawer revealed a unique looking atty and Plastic Panda's owners club card with serial number.
The Panda comes in just the one colour option which is a Stainless Steel outer sleeve and base with Ultem inner sleeve, 510 drip tip and tank section. On the outer sleeve we see an abstract Panda logo front and a 1mm in height rectangular airflow slot on the reverse. Both sides of the sleeve also have centrally positioned rectangular airflow slots, these being 2mm in height.
Above the outer sleeve we can see the protruding polished Ultem of the inner sleeve which can be turned for airflow adjustment, the inner sleeve up top accommodates a polished Ultem drip tip. The drip tip has quite a distinct look which will be like Marmite (you will love it or hate it) being very rounded, thick walled with quite narrow bore and goes so well with the matchy matchy inner sleeve it does look one solid piece but does actually pop out with a tug to reveal a standard 510 fitting.
The Tank section is also Ultem which looks aesthetically pleasing with having the matching Ultem upper section then moving to the base we have branding in the form of "BEAR LAIR MODS" and the Bear Lair Mods logo. The one i received came pre-installed with a BF pin with Peek surround although a standard pin with separate Peek section is included.
The build quality is top-notch with clean machining, tolerances perfect and every part of the Panda having a high quality feel and look to it!

___________________________________________________________________
Panda Specs and Features:
Diameter: 22mm
Height (without drit-tip and connector): 27mm
Capacity: 1.5ml in BF mode, 2ml in non-bf mode
Diameter of mesh holes and refueling hole: 3.5mm
Air flow control: DL in RDTA mode (2x slots 4x steps 0.5mm) / MTL in Vertical coil mode (Regulated single blowing through the hole 1mm or 0.5mm)
Atty materials: atty, screws, plugs – SS AISI 316, tank – ULTEM, insulators – PEEK
O-rings: Silicone
Positive pin: SS, not adjustable BF and non-BF
Weight: 35g
Thread: 510
Colour: Stainless Steel & Ultem

___________________________________________________________________
What You Receive?
The Atty i received was sent for review and the box unsealed so it is possible a couple of extra items could come with the purchased atty so for example i received a strong good quality allen key for changing the pins but no flathead screwdriver was in the box for tightening or loosening the grub screws.
The Panda came pre-installed with the BF pin although some literature i've read say's it comes pre-installed with the standard pin so this would need to be checked first but whichever pin is installed the other with its own peek surround section is also included, the pin it'self secures the atty together tight.
Installed is the unique looking Ultem drip tip, you don't receive an alternative but it is a standard 510 fit so you can fit one of your own if you prefer. We then have the inner Ultem sleeve which controls airflow and outer stainless steel sleeve which fits over the o-rings of the deck with just the right tolerance, not too tight but not loose.
Underneath the sleeve we have the deck set up for a horizontal single coil build with 2 wicking channels which double up as fill ports when the BF pin is not being used. On the underside of the deck we get the central pipe section that leads from the deck to the bottom of the atty, the Ultem tank gets fitted between. The Ultem tank section has a 2ml capacity which is reduced to 1.5ml when in Genesis mode as the wicking/fill hole plug that needs to be inserted sits deep reducing the capacity but as the Panda is really designed for use with the BF pin (especially when in Genesis mode) the main capacity comes from your squonk bottle. You don't receive a spare tank section or alternate glass option but then glass wouldn't really go with the look of the Atty.
As mentioned you receive a wicking/fill hole plug, spare screws and o-rings and finally an allen key but no cotton/mesh or wire included which has to go down as a con because in my opinion any rebuildable should come with what is needed to do at least one build.
Some Useful Information From The Manufacturer!


___________________________________________________________________
The Airflow
The airflow as been designed to give air from both sides of the coil which can be adjusted with a horizontal build but also gives adjustable airflow from one side when doing a vertical build whether this is with cotton or mesh wick.
On the posts we have 2mm high rectangular cutout sections to allow air to be directed through the posts and at the sides of the coil. On the outer sleeve we also have the same sized rectangular slots that get lined up with the cutouts when fitting the sleeve over the deck. With the airflow slots on the sleeve and posts lined up we do have a very narrow cavity between allowing for the inner sleeve to turn between.
Looking at the inner sleeve we can see both sides have steps but very narrow stepping with each one only being 0.5mm different to the step before. This means with the airflow fully open we have the mentioned 2mm high slots, but as we turn the sleeve this can be reduced each side to 1.5mm, 1.0mm or even just a 0.5mm narrow slot either side.
As mentioned either side on the outer sleeve we have 2mm airflow rectangular cutouts and on the front we have the Panda logo but on the reverse to the logo (the remaining side) we have a smaller 1mm rectangular slot which while using the dual airflow for the horizontal build is closed off by the inner sleeve so redundant.
When doing a vertical build the small 1mm slot gets lined up with your coil and the inner sleeve needs turning until the stepping comes into play or just before if you want the airflow fully open. With the stepping one side now at where we have the smaller slot the inner sleeve has closed the 2mm airflow slots and are now redundant, likewise the other side stepping is also redundant and will be positioned inside the sleeve around where the logo is. With the vertical build and smaller airflow inlet the 4 steps are no longer all in play as the slot is only 1mm in height so the choice is 1mm, 0.5mm or you can have a part step so for example have 0.5mm but start to move the 3rd step over which will close the airflow off completely just leaving a small gap. Finally when looking inside the sleeve it has a domed shape which in theory should encourage flavour.


___________________________________________________________________
Using With An Horizontal Build
I mainly wanted to try the Panda with mesh wicking and share my thoughts but as i was doing research for a while on mesh wicking as it's new to me i chucked a horizontal build in just to see how it performs, and you literally can just chuck a build in it's that easy.
The two posts face each other and we have open horizontal slots diagonal to each other with your screws being fastened from above and acting as clamps. The grub screws are a good size, have large heads and are good quality so i simply removed them completely as the screws aren't small and fiddly.
We now have open vertical slots in the posts for your leads to just fall into and then putting the screws back in place and tightening down the leads just can't pop out as there is nowhere for them to go other than wave the White flag and get clamped in place.
Once fastened you can improve the coils position with a coiling rod or fit for purpose tool and then snip your leads. Wicking is quite simple, you have two large wick ports which your cotton ends need poking through, some have them barely poking through, others go to the other extreme and have the cotton reaching the bottom of the tank, i would just suggest do whatever works best for you just bare in mind if you are using the standard pin these wicking holes is also where you fill so don't have your cotton packed tight (even when using BF pin as it won't wick so freely).

___________________________________________________________________
Preparing Deck For Vertical Build
Whether using cotton or mesh for wicking a couple of alterations are needed to the deck to do a vertical build. Instead of the terminals being diagonal to each other with a fair distance between the 2 we need the terminals closer occupying just one small area of the deck and we also need to introduce some height difference between the positive and negative leads.
On the opposite ends of the posts to where we have our terminal slots we have a hole on each post. The hole on the positive post is just a breathing hole but the one on the negative has threading for a grub screw. Taking the screw out of it's usual position on the negative post where it clamps down the lead where we have the terminal slot it can be moved and threaded into the hole positioned on the negative post opposite the positive slot. This also introduces the height difference needed as the positive lead gets clamped by the screw bottom in the positive slot while the negative lead gets clamped on the top of the negative post by the screw head.
With only one of the wick holes needed for the vertical build included is a plug for the other which needs inserting, this also reduces the chamber.

___________________________________________________________________
Preparing The Mesh Wicking
This was the first time i have used mesh for wicking so hit Youtube to get some pointers which was part an help but also made it more time consuming than it should of been as they all seemed to prepare a wick starting with a 5cm by 4cm sheet which after my initial roll i found was not just far too long but also at least twice as thick as needed (not even close to fitting through the wicking port). Length wasn't a problem as it can simply be cut to the correct length once the wick is completed and luckily i had only oxidised and rolled the mesh before realising the wick would be far too thick so i could unroll and cut to a more appropriate size which i found to be both 2.5cm for height and length to get it thin enough and the correct height.
Making the mesh wick does take a little time but is pretty straightforward and far less time consuming than i thought and that was even including my trial and error on getting the correct size. First holding the mesh with tweezers i blow torched the mesh sheet both sides to oxidise it and get rid of any impurities. Then i made a small fold one end before rolling it from the other around something thin, i used the thinnest allen key i have. Then i drenched the wick with e-liquid before blow torching and burning this off, i repeated this process 3 times. Finally i heated the wick with the blow torch until it was glowing then plunged it into water, again i repeated this process 3 times and that's the wick made.
Despite making the wick thinner than it was initially going to be it still was a very tight fit getting it through the wick hole but this allowed me to suspend it a couple of milometers above the bottom of the tank and kept the wick very securely in place so at this stage i'm thinking as long as wicking isn't an issue this is the size and thickness i want.

___________________________________________________________________
Vertical Build With Mesh Wick
I have already explained getting the deck ready for a vertical build but really using the mesh wick for the first time i wasn't expecting it to turn out.
I found a loose length of wire in my wick box and as i only buy Kanthal and SS wire either single round wire or prepared fused clapton all i can say is it was fused clapton but giving any other specs would be purely guesswork.
I placed one end of the wire in the positive slot and tightened the screw down then simply wrapped the wire around the mesh wicking a few times before securing the wire underneath the grub screw head on the negative post, snipped the leads and expected very little.
I pulsed and hey presto i have glowing wire around the mesh, as you can see from the pics it's not going to win a prettiest build contest but after dripping a little liquid over the mesh and seeing it vaporise with another pulse i am now getting quite excited, checked the resistance and it's 0.84 which kept the good news coming.
I used the Panda with the BF pin but before putting it on my squonking device i did remove the wicking plug and filled the tank before securing the plug back into place and then placed the sleeve over the deck with the correct airflow lined up.

___________________________________________________________________
How The Panda Performs And My Thoughts!
First i briefly used the Panda with a horizontal build and cotton wicking and as explained earlier in the review the build and wicking is very straightforward with the only things to point out being the terminal slots are not that wide so it's not suitable for chunky exotic coils, also there is no independent fill port so if using the standard pin then the panda both needs filling down one of the wick holes and with only being 2ml capacity it will need filling often.
The draw using an horizontal coil with dual airflow is a restrictive direct lung vape and as you close each step on the airflow down it becomes more restrictive, in fact with just dual 0.5mm slots it is suitable for both a very restrictive lung hit or even a loose MTL style. With the horizontal build i had no issues with flavour either, the airflow was smooth, it just gave a really nice vape. With this build i used Kanthal fused clapton i wound myself that came out to 0.56ohm which i preferred with the airflow slots being 1.5mm and was at 25W.
The vertical build in Genesis mode was how i have for the most part been using the Panda and despite the ugly looking build it couldn't have turned out any better from a vaping experience point of view. The wick i have wound very tight and it's also a very tight fit through the wicking port so i was worried about how well it would wick but it's wicking like a trooper and how tight the wick is allowed me to just have the Panda in my pocket on top of my Aether squonk mod when i was out and about. One of the issues i have heard about mesh wicking is that the tank needs to be kept upright else it will leak everywhere but with the wick being tight this turned out not to be the case at all.
I had just one dry hit in the whole time of using the Panda and that was only when on purpose i was doing some mad chain vaping to test it out. It was quite weird because unlike cotton where you get warning as the vape gets less and less saturated before you get a dry hit the mesh just gave saturated vapes then out of the blue the worst dry hit i have ever experienced, i won't be experimenting chain vaping with mesh again that's for sure. After saying that i just waited 30 seconds and nervously took another vape and it was straight back to a saturated vape and under normal vaping conditions i had no other dry hits.
Another thing i noticed was despite hearing the vapor production is not as great using mesh wicking i really didn't notice any reduction and in fact the vapor is much denser than with cotton to the point i needed to keep the living room door closed because it kept setting off the smoke alarm. Bearing in mind the smoke alarm only goes off occasionally when vaping normally and sometimes if testing certain atty's i can be at about 60W and with the Panda i was just at 20W with a loose MTL style so the lack of vapor production seems to be a complete myth.
The draw with the airflow wide open with the vertical build allows for either a loose MTL or very restrictive lung hit, personally i had the slot at 0.5mm which still gave quite a loose MTL but not as loose as fully open and no longer possible for a DL vape of any satisfaction, as mentioned i was using fused clapton that came out to 0.84ohm and was at 20W.
The flavour i just can't compare to anything as this is the first time using mesh wick but it's a much cleaner crisper flavour than using cotton and in my opinion superior. I was very impressed with the flavour and came to the conclusion although not realising it even when i think i am getting good flavour using cotton, cotton must mute the flavour slightly because the mesh is different league.
The last thing to mention is the drip tip which i feel will divide opinion aesthetically, but whether you like the look or not it must be about the most comfortable drip tip i have used and the option of fitting your own is always there.

Conclusion
I am enjoying the Panda that much with mesh wicking i have ordered a couple of other Genesis style tanks to have a play with!
___________________________________________________________________
Likes
High end build quality
Polished Ultem and Stainless Steel finish
Extremely comfortable drip tip (will divide opinion aesthetically)
Drip tip standard 510 fit (can use your own)
Standard single coil horizontal build
Horizontal Build: very easy build and wick, Good flavour, smooth airflow, various restricted DL or even loose MTL smallest airflow setting.
Deck can be altered for Vertical build (mesh or cotton wicking)
Preparing mesh wick easier than expected
Vertical Build very easy (even if my build looks ugly)
Mesh wicking: Superior cleaner, crisper flavour
Vertical Build: smooth airflow, mid to loose MTL, very restricted DL possible with airflow fully open
Dual or single airflow design
0.5mm airflow stepping on inner sleeve
Fully adjustable airflow
Top and drip tip stay very cool
Despite hearing differently could use the Panda out and about with mesh wicking without leaking issues.
Mesh wicked like a trooper
Mesh gave dense, creamy vapour (just lush with flavour to match)
Included wicking port plug
BF and standard pins included with their own peek surround sections
Grub screws are high quality with large heads (spares included)
Can use squonk bottle as extension of capacity
Cons
No independent fill port (only applicable when using standard pin)
Small capacity (only an issue with standard pin)
No building material included
Preparing mesh wick is time consuming (but easier than i thought)
Can't use thick wire


I would once again like to thank Nikita from Bear Lair Mods for supplying the Panda Hybrid BF RDTA for the purpose of this review.
https://blmods.com/panda-hybrid/
___________________________________________________________________
Last edited:


