Oi, where will it end? I need to get a pypie for my coiling now!
Navigation
Install the app
How to install the app on iOS
Follow along with the video below to see how to install our site as a web app on your home screen.

Note: this_feature_currently_requires_accessing_site_using_safari
More options
You are using an out of date browser. It may not display this or other websites correctly.
You should upgrade or use an alternative browser.
You should upgrade or use an alternative browser.
Inception Coil.
- Thread starter TylerD
- Start date
This look insane. Wonder how it vapes
have you guys seen the starfish coil? @Rowan Francis and @Gizmo I'm still waiting for one of you to build it 
Yoh! A coil within a coil, within a coil. Within a coil. All placed within a coil.
I need to get my hands on bulk Kanthal. Anyone got some ideas?
http://industrialalloys.co.za/elements.html
LOVE IT @Reinvanhardt !
excellent @Reinvanhardt
Awesome! do it!Found some pypie at my local hobby shop
Also found some 2mm screws
Sent from my GT-I9500 using Tapatalk
Is it possible foor you to get me a pypie as well? Will pay you at the meet or as you wish.Found some pypie at my local hobby shop
Also found some 2mm screws
Sent from my GT-I9500 using Tapatalk
If it's not too much trouble. If it's too much of a mission, just say.
Also watched this today! Can only try this on monday! Can't wait for monday! Can't wait for monday! Cmon monday Y U SO FAR!
This is not a Spur add!!!
Sent from my BlackBerry 9800 using Tapatalk
This is not a Spur add!!!
Sent from my BlackBerry 9800 using Tapatalk
I wanna try this with a nano 26g coil on the inside and a 32g macro on the outside making it a duel coil!
Sent from my BlackBerry 9800 using Tapatalk
Sent from my BlackBerry 9800 using Tapatalk
That sound cool! I might just do a dual with a 1.5mm on one side and a 2mm on the other side! While the one heats up you can start sucking one the micro until the other one kicks in. Awesome idea @Hein510 !I wanna try this with a nano 26g coil on the inside and a 32g macro on the outside making it a duel coil!
Sent from my BlackBerry 9800 using Tapatalk
I've never thought about doing 2 different coils on either sides! That's a good idea @TylerD! Also thinking now how bout a nano inside a mini coil inside a macro coil! Wrap the nano with cotton, goes inside a mini, macro goes over mini and then macro gets wrapped in cotton again giving you vapor from inside the nano coming out and btween the mini and macro coming out!!!
Sent from my BlackBerry 9800 using Tapatalk
Sent from my BlackBerry 9800 using Tapatalk
@TylerD I actually wanted to give you some pypie as well - in exchange for the Bamboo wick you are giving me 
So done deal, one 3mm and one 5mm pypie are all yours.
I think I am going to cut mine down into thirds, as the length of the lead that Riptrippers left on the coil seems unnecessarily long, and you can do without that length lead if you have a klein pypie
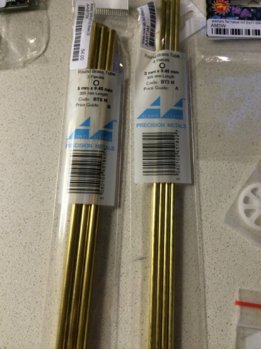
So done deal, one 3mm and one 5mm pypie are all yours.
I think I am going to cut mine down into thirds, as the length of the lead that Riptrippers left on the coil seems unnecessarily long, and you can do without that length lead if you have a klein pypie

Wow! Awesome @devdev ! Thank you so much! Really appreciate it a lot!!!@TylerD I actually wanted to give you some pypie as well - in exchange for the Bamboo wick you are giving me
So done deal, one 3mm and one 5mm pypie are all yours.
I think I am going to cut mine down into thirds, as the length of the lead that Riptrippers left on the coil seems unnecessarily long, and you can do without that length lead if you have a klein pypie
View attachment 2572
So I sat down with some 0.36mm Kanthal (I measured with micrometer) and got building after I had chopped up some pypie. No idea what thickness .36mm is, probably 28G
First off, to get this build right, I needed to resurrect my Igo. When I got pypie at the hobby shop I also got some M2x30mm screws. A few quick cuts with the cutting wheel on the dremel, and I was back in business with two new decks screws, which also have a much broader head (cheese head) for securing the coils.
I cut the 3mm and 5mm pypie into 50mm lengths. The 5mm seems too big, but I might have other coil related plans for it.
I followed the Riptrippers video, except because the pypie was short, I didn't tape the leg of the coil, I just held it in place.
I made the micro coil first, heated it, tweezed it, and then after cooling set about getting the outer coil sorted.
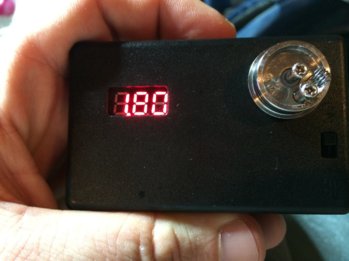
Here she is on the ohm meter - 1.8 was higher than I had wanted :|
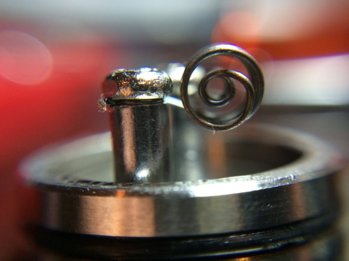
You can't really tweeze the coils, but if you keep the needle and the pypie in place you can shift things around. I found I was able to get it pretty neat:
 ??
??
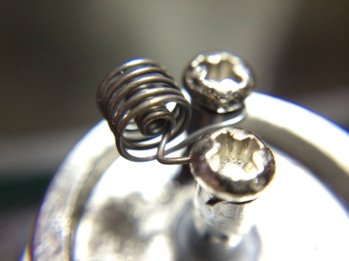
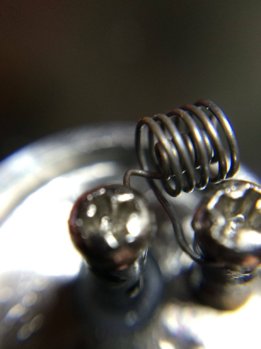
It looks like the leg going to the outer screw is very close to the other leg. The angle of the pictures makes it look like it is almost touching.
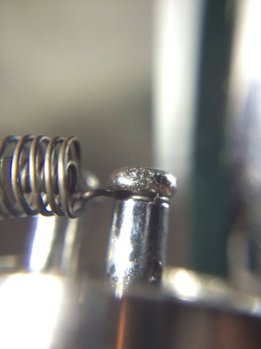
Here's a different angle showing the distance between the legs:
Fired it up on a fresh IMR Efest on the Magneto
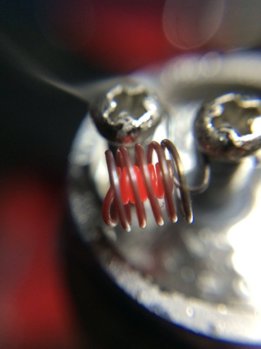
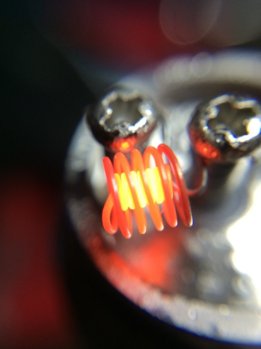
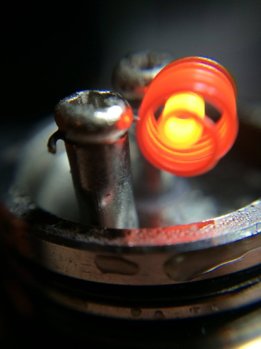
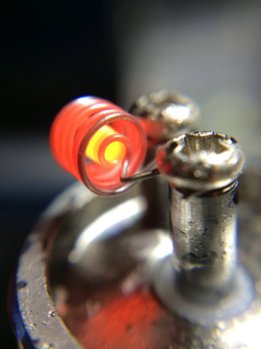
It takes a very long time for the coil to heat up. I tried it with some VM Vanilla Custard 12mg, and it is a little too strong.
The positioning of the airhole is important, and I found I was making huge clouds with the airhole placed right by the coil. I landed up drilling the airhole out from 1.2 to 1.6, which gave a much airier draw.
I think I am going to need to make a new one of these, with a few less wraps to get the Ohms a bit lower
First off, to get this build right, I needed to resurrect my Igo. When I got pypie at the hobby shop I also got some M2x30mm screws. A few quick cuts with the cutting wheel on the dremel, and I was back in business with two new decks screws, which also have a much broader head (cheese head) for securing the coils.
I cut the 3mm and 5mm pypie into 50mm lengths. The 5mm seems too big, but I might have other coil related plans for it.
I followed the Riptrippers video, except because the pypie was short, I didn't tape the leg of the coil, I just held it in place.
I made the micro coil first, heated it, tweezed it, and then after cooling set about getting the outer coil sorted.
Here she is on the ohm meter - 1.8 was higher than I had wanted :|

You can't really tweeze the coils, but if you keep the needle and the pypie in place you can shift things around. I found I was able to get it pretty neat:
 ??
??

It looks like the leg going to the outer screw is very close to the other leg. The angle of the pictures makes it look like it is almost touching.
Here's a different angle showing the distance between the legs:

Fired it up on a fresh IMR Efest on the Magneto


It takes a very long time for the coil to heat up. I tried it with some VM Vanilla Custard 12mg, and it is a little too strong.
The positioning of the airhole is important, and I found I was making huge clouds with the airhole placed right by the coil. I landed up drilling the airhole out from 1.2 to 1.6, which gave a much airier draw.
I think I am going to need to make a new one of these, with a few less wraps to get the Ohms a bit lower
Last edited:
Awesome! Pro coiling that! Pic quality is ama-zing!!!
Nice going! I'm itching to make some coils but stuck till monday!!!
Sent from my BlackBerry 9800 using Tapatalk
Nice going! I'm itching to make some coils but stuck till monday!!!
Sent from my BlackBerry 9800 using Tapatalk
Awesome @devdev ! That looks brilliant! That is so cool! I will definitely try it on my side as well. Awesome pics!So I sat down with some 0.36mm Kanthal (I measured with micrometer) and got building after I had chopped up some pypie. No idea what thickness .36mm is, probably 28G
First off, to get this build right, I needed to resurrect my Igo. When I got pypie at the hobby shop I also got some M2x30mm screws. A few quick cuts with the cutting wheel on the dremel, and I was back in business with two new decks screws, which also have a much broader head (cheese head) for securing the coils.
I cut the 3mm and 5mm pypie into 50mm lengths. The 5mm seems too big, but I might have other coil related plans for it.
I followed the Riptrippers video, except because the pypie was short, I didn't tape the leg of the coil, I just held it in place.
I made the micro coil first, heated it, tweezed it, and then after cooling set about getting the outer coil sorted.
Here she is on the ohm meter - 1.8 was higher than I had wanted :|
View attachment 2581
You can't really tweeze the coils, but if you keep the needle and the pypie in place you can shift things around. I found I was able to get it pretty neat:
View attachment 2587 ??
View attachment 2588
View attachment 2586
It looks like the leg going to the outer screw is very close to the other leg. The angle of the pictures makes it look like it is almost touching.
Here's a different angle showing the distance between the legs:
View attachment 2589
Fired it up on a fresh IMR Efest on the Magneto
View attachment 2582
View attachment 2583
View attachment 2584
View attachment 2585
It takes a very long time for the coil to heat up. I tried it with some VM Vanilla Custard 12mg, and it is a little too strong.
The positioning of the airhole is important, and I found I was making huge clouds with the airhole placed right by the coil. I landed up drilling the airhole out from 1.2 to 1.6, which gave a much airier draw.
I think I am going to need to make a new one of these, with a few less wraps to get the Ohms a bit lower
Similar threads
- Replies
- 7
- Views
- 276
- Replies
- 2
- Views
- 247
- Replies
- 1
- Views
- 409
- Replies
- 4
- Views
- 392


