Navigation
Install the app
How to install the app on iOS
Follow along with the video below to see how to install our site as a web app on your home screen.

Note: This feature currently requires accessing the site using the built-in Safari browser.
More options
You are using an out of date browser. It may not display this or other websites correctly.
You should upgrade or use an alternative browser.
You should upgrade or use an alternative browser.
Show us your Builds - Other Atomisers
- Thread starter devdev
- Start date

Very nice build there mate. Should give you days of vaping pleasure. I've built something similar in the past and loved it. Only, I didn't have 24g back then and did mine with 26g. Was still awesome tho.

Really good looking setup! Really keen to get a veritas. Must hold a ton of juice with that much cotton in it?
Sent from my iPhone using Tapatalk
Sent from my iPhone using Tapatalk
lol nice coils, too bad they weren't posted here
http://ecigssa.co.za/threads/suywwacs-drippers-trident-igo-era-patriot.1611/page-35#post-115931
")
http://ecigssa.co.za/threads/suywwacs-drippers-trident-igo-era-patriot.1611/page-35#post-115931
My bad.... Again
Sent from my iPhone using Tapatalk
Sent from my iPhone using Tapatalk
still a dripper, still in the wrong section
Apologies
all fixed
no worries dude, keep them coils coming
Veritas.
28g kanthal, dual coil.
5/6 wraps each.
0.6~ Ohms.
INSANELY awesome flavour and vapour production!
View attachment 11797
That's a really awesome looking coil mate! Enjoy!
I wish this thread was titled "Alternative Coil Porn" instead
thats actually a very suitable name for this thread lol
Twisted 28g 6/7 wraps 1 ohm in The Rose

Last edited:
looking good dude, nice coil
Rewicking the Rose
My NET tends to gunk up the wick pretty fast and i have to redo my wick every second day. With some more Rose's coming in i thought this might be helpful.
After i took the old wick out i heat the coil to get rid of all the gunk that is on there, i rinse and repeat until i can see the coil is clear from the black gunk.
The coil that i have in here is almost a month old, the same coil i posted a few posts up.
I use a thin piece of Rayon, i put a ear bud in the photo for size comparison.

I have a small piece of 32g Kanthal i always use to wrap the Rayon around.

I use the wire to drag the wick trough the coil. I tried to wick the coil before i install it but for me this way was easier.

Just be gentle when you pull the wire with the Rayon, you might brake the Rayon and have to redo everything. What i do, as soon as i can grab the Rayon on the other side do so. Then there is not so much tension in one spot were the wire is so the wick will not brake so easily

After you have the coil in the middle of your piece of wick remove the wire. You will now have on thick piece of wick one side and two thinner pieces on the other side of the coil. You will see on the thicker side were the wire was through. Stick a small sharp scissor in there and cut the wick there so that you have four equal parts of wick.

Use a small screw driver or the Allan key that came with the Rose to stuff the wicks in the hole in the ceramic cup.

At this stage i wet the wicks with some juice so that they are easier to cut.

I dont cut my wicks so short, like this have worked for me.

I fill my Rose from the top. I just make sure the air flow control is closed and the juice control is closed tight. I dont get as much juice in the atty but this way is just faster for me.

When the atty is full, replace the top cap. Just as the threads are taking grip turn the atty upside down. Wait for all the juice to settle at the top now the bottom. Then close the atty all the way.

You will get a drop or two of juice being pushed out of the top cap when you close it. You might get some juice in the drip tip as well, that is most of the time if the juice control is not closed properly.
Wile the atty is upside down open the air and turn it right side up.
Just clean the juice on the atty and screw it onto your device. I like to give it one vape with the juice control still closed, then give half a turn and give a vape again, If the drip tip gets hot when you vape, you should open the juice control a bit more.

Nothing like a new wick
I like the no mess no fuss of the Rose. I hope this will help some one enjoy the Rose as much is i do
My NET tends to gunk up the wick pretty fast and i have to redo my wick every second day. With some more Rose's coming in i thought this might be helpful.
After i took the old wick out i heat the coil to get rid of all the gunk that is on there, i rinse and repeat until i can see the coil is clear from the black gunk.
The coil that i have in here is almost a month old, the same coil i posted a few posts up.
I use a thin piece of Rayon, i put a ear bud in the photo for size comparison.
I have a small piece of 32g Kanthal i always use to wrap the Rayon around.
I use the wire to drag the wick trough the coil. I tried to wick the coil before i install it but for me this way was easier.
Just be gentle when you pull the wire with the Rayon, you might brake the Rayon and have to redo everything. What i do, as soon as i can grab the Rayon on the other side do so. Then there is not so much tension in one spot were the wire is so the wick will not brake so easily
After you have the coil in the middle of your piece of wick remove the wire. You will now have on thick piece of wick one side and two thinner pieces on the other side of the coil. You will see on the thicker side were the wire was through. Stick a small sharp scissor in there and cut the wick there so that you have four equal parts of wick.
Use a small screw driver or the Allan key that came with the Rose to stuff the wicks in the hole in the ceramic cup.
At this stage i wet the wicks with some juice so that they are easier to cut.
I dont cut my wicks so short, like this have worked for me.
I fill my Rose from the top. I just make sure the air flow control is closed and the juice control is closed tight. I dont get as much juice in the atty but this way is just faster for me.
When the atty is full, replace the top cap. Just as the threads are taking grip turn the atty upside down. Wait for all the juice to settle at the top now the bottom. Then close the atty all the way.
You will get a drop or two of juice being pushed out of the top cap when you close it. You might get some juice in the drip tip as well, that is most of the time if the juice control is not closed properly.
Wile the atty is upside down open the air and turn it right side up.
Just clean the juice on the atty and screw it onto your device. I like to give it one vape with the juice control still closed, then give half a turn and give a vape again, If the drip tip gets hot when you vape, you should open the juice control a bit more.
Nothing like a new wick
I like the no mess no fuss of the Rose. I hope this will help some one enjoy the Rose as much is i do
Great tutorial. Consider using dental floss instead of wire to pull the wick through. It is less likely to break the wick when pulling through.Rewicking the Rose
My NET tends to gunk up the wick pretty fast and i have to redo my wick every second day. With some more Rose's coming in i thought this might be helpful.
After i took the old wick out i heat the coil to get rid of all the gunk that is on there, i rinse and repeat until i can see the coil is clear from the black gunk.
The coil that i have in here is almost a month old, the same coil i posted a few posts up.
I use a thin piece of Rayon, i put a ear bud in the photo for size comparison.
I have a small piece of 32g Kanthal i always use to wrap the Rayon around.
I use the wire to drag the wick trough the coil. I tried to wick the coil before i install it but for me this way was easier.
Just be gentle when you pull the wire with the Rayon, you might brake the Rayon and have to redo everything. What i do, as soon as i can grab the Rayon on the other side do so. Then there is not so much tension in one spot were the wire is so the wick will not brake so easily
After you have the coil in the middle of your piece of wick remove the wire. You will now have on thick piece of wick one side and two thinner pieces on the other side of the coil. You will see on the thicker side were the wire was through. Stick a small sharp scissor in there and cut the wick there so that you have four equal parts of wick.
Use a small screw driver or the Allan key that came with the Rose to stuff the wicks in the hole in the ceramic cup.
At this stage i wet the wicks with some juice so that they are easier to cut.
I dont cut my wicks so short, like this have worked for me.
I fill my Rose from the top. I just make sure the air flow control is closed and the juice control is closed tight. I dont get as much juice in the atty but this way is just faster for me.
When the atty is full, replace the top cap. Just as the threads are taking grip turn the atty upside down. Wait for all the juice to settle at the top now the bottom. Then close the atty all the way.
You will get a drop or two of juice being pushed out of the top cap when you close it. You might get some juice in the drip tip as well, that is most of the time if the juice control is not closed properly.
Wile the atty is upside down open the air and turn it right side up.
Just clean the juice on the atty and screw it onto your device. I like to give it one vape with the juice control still closed, then give half a turn and give a vape again, If the drip tip gets hot when you vape, you should open the juice control a bit more.
Nothing like a new wick
I like the no mess no fuss of the Rose. I hope this will help some one enjoy the Rose as much is i do
Rewicking the Rose
My NET tends to gunk up the wick pretty fast and i have to redo my wick every second day. With some more Rose's coming in i thought this might be helpful.
After i took the old wick out i heat the coil to get rid of all the gunk that is on there, i rinse and repeat until i can see the coil is clear from the black gunk.
The coil that i have in here is almost a month old, the same coil i posted a few posts up.
I use a thin piece of Rayon, i put a ear bud in the photo for size comparison.
I have a small piece of 32g Kanthal i always use to wrap the Rayon around.
I use the wire to drag the wick trough the coil. I tried to wick the coil before i install it but for me this way was easier.
Just be gentle when you pull the wire with the Rayon, you might brake the Rayon and have to redo everything. What i do, as soon as i can grab the Rayon on the other side do so. Then there is not so much tension in one spot were the wire is so the wick will not brake so easily
After you have the coil in the middle of your piece of wick remove the wire. You will now have on thick piece of wick one side and two thinner pieces on the other side of the coil. You will see on the thicker side were the wire was through. Stick a small sharp scissor in there and cut the wick there so that you have four equal parts of wick.
Use a small screw driver or the Allan key that came with the Rose to stuff the wicks in the hole in the ceramic cup.
At this stage i wet the wicks with some juice so that they are easier to cut.
I dont cut my wicks so short, like this have worked for me.
I fill my Rose from the top. I just make sure the air flow control is closed and the juice control is closed tight. I dont get as much juice in the atty but this way is just faster for me.
When the atty is full, replace the top cap. Just as the threads are taking grip turn the atty upside down. Wait for all the juice to settle at the top now the bottom. Then close the atty all the way.
You will get a drop or two of juice being pushed out of the top cap when you close it. You might get some juice in the drip tip as well, that is most of the time if the juice control is not closed properly.
Wile the atty is upside down open the air and turn it right side up.
Just clean the juice on the atty and screw it onto your device. I like to give it one vape with the juice control still closed, then give half a turn and give a vape again, If the drip tip gets hot when you vape, you should open the juice control a bit more.
Nothing like a new wick
I like the no mess no fuss of the Rose. I hope this will help some one enjoy the Rose as much is i do
awesome bud!! i dont think you could have made that tutorial any simpler. pictures and instruction is on point. thanks for sharing this with us. very helpfull
Not my neatest work, I was just messing around with builds on my reo and came up with this. It turned our really well so thought I would post it in case anyone else wanted to give it a try. Draw is slightly tighter than my nano coil, but the flavour is awesome. Someone's probably made one, but in case they haven't I'm calling in the Gambit coil Haha. 26g around 20 gauge needle, 12 wraps came out at 0.9 ohms. Done on Reomizer 2.0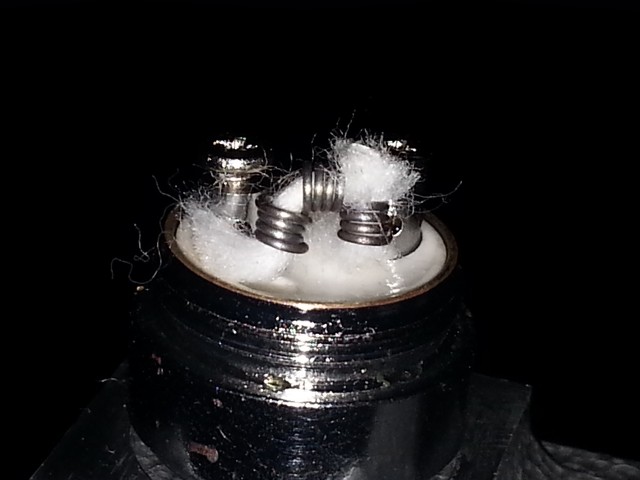
Not my neatest work, I was just messing around with builds on my reo and came up with this. It turned our really well so thought I would post it in case anyone else wanted to give it a try. Draw is slightly tighter than my nano coil, but the flavour is awesome. Someone's probably made one, but in case they haven't I'm calling in the Gambit coil Haha. 26g around 20 gauge needle, 12 wraps came out at 0.9 ohms. Done on Reomizer 2.0
That's a cool looking coil there @Gambit
I trust the reo is serving you well bud?
PS. We have a thread dedicated to the reomiser coil builds here
http://ecigssa.co.za/index.php?threads/1596/
This would be a great place to get some ideas for cool builds as well as to share your own

yeah loving it dude, it hasn't left my hand since I got it working. Ah crap, I did search for reomiser threads, but didn't see any. Maybe someone can move this for me.That's a cool looking coil there @Gambit
I trust the reo is serving you well bud?
PS. We have a thread dedicated to the reomiser coil builds here
http://ecigssa.co.za/index.php?threads/1596/
This would be a great place to get some ideas for cool builds as well as to share your own
Doneyeah loving it dude, it hasn't left my hand since I got it working. Ah crap, I did search for reomiser threads, but didn't see any. Maybe someone can move this for me.

Similar threads
- Replies
- 1
- Views
- 291
- Replies
- 0
- Views
- 89
