SXmini and Vulgarian Studio Rotary RTA Reviewed by SessionDrummer

SessionDrummer

The SteamCrave Guy
LV
8
 
Joined
11/4/22
Posts
262
Awards
7
Location
US
0 Lede.png

Thanks out to @McDuckie who tipped me off to this one, as not only had I not heard ANYTHING about it from David from SXmini, I'd never heard of Vulgarian Studio before, and could find NO information about them.

I decided to pick up TWO, and an extra MQ Class Mod as they look(ed) great together. Let's get into this mysterious little RDTL/MTL RDA !!!!!
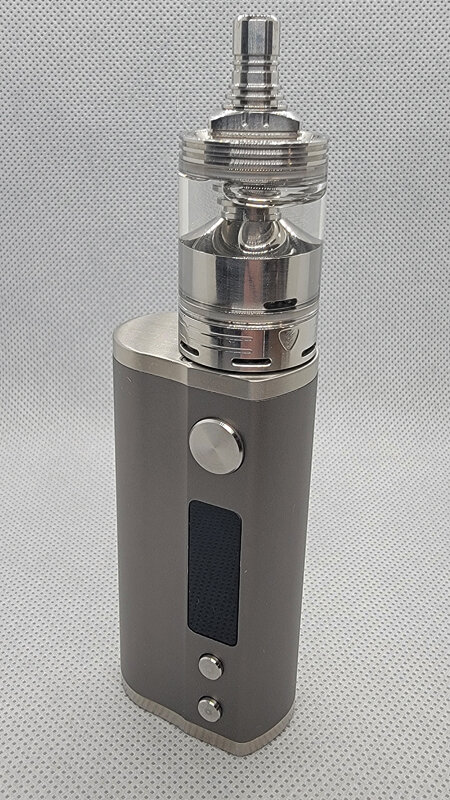

YIHI SXMINI X VULGARIAN STUDIO ROTARY RTA FEATURES:


• WIDEST POINT: 24mm
• TANK CAPACITY: 3.8mL
• FILL SYSTEM: Top-Fill
• COIL SUPPORT: Rebuildable Coils
• TANK CONNECTION: Threaded 510
• TANK MATERIAL: Stainless Steel
• DRIP TIP: MTL + RDL

INCLUDES:

• 1 Rotary RTA
• 1 PEI Tank
• 1 PEI Drip Tip
• 5 Airflow Pins: 2x0.8mm, 3x0.6mm(installed),3x0.8mm, 2.5mm, 3.0mm,3x0.6mm
• 1 Accessory Pack

1 Box Shot.jpg

Very nice Retro box ...

2 Box Shot Back.jpg

Flip side ....

3 Box Open.jpg

Contents nicely packaged ...

4 Instructions.jpg

Now RIGHT HERE, I could tell something was different. The instructions were very light on many details, somewhat vague, and NOT what I was accustomed to getting from the SXmini Team (my theory on this later) ..

5 Contents.jpg

Parts load out included the Rotary RDA w./ 3.8ml glass tank and SS tip, extra PEI tank and tip, (5) air flow pins (1 pre-installed), and spare o-rings, screws, and phillips driver.

6 Airflow Inserts.jpg

Close up of the air flow pins ...

7 Airflow Insert Closeup.jpg

Side shot, and BE advised, DUAL threaded, with 1 screw doubling as the coil post screw, and the other the 510 screw.

8 Airflow Sizes.jpg

Air flow pin markings with quantity, and sizes ...

9 Front.jpg

And finally, the Rotary RTA !!!!

10 Bottom.jpg


The bottom revealed the 510 connection, name, serial, and triangular rotary styled fixed plate.

11. Air Channels and Juiceflow.jpg

Side shot with the 510 connection protrusion, triangular rotary graphic, and 2 of the 4 air entry points.

12 Top Cap top.jpg

Double o-ringed top cap with SS tip, and some more rotary styling ...

13 Top Cap Bottom.jpg

Bottom of the top cap, showing the chimney threaded connection, single o-ring, and dual kidney juice fill ports.

14 Top Cap Drip Tip.jpg

Closeup of the dual o-ringed SS tip, and cap....

15 Top Separated.jpg

Main unit top and bottom pieces ....

16 Chimney Deck Side.jpg

I can attest to the "sticky-ness" of the triple o-rings which seal the deck to the chimney, as it took me forever to try and figure out HOW it came apart. VERY solidly sealed.

17 Chimney Deck .jpg

Chimney and deck ...

18 Chimney Juiceflow.jpg

Chimney (inverted) to show air flow ports, and juice flow port....
 
19 Deck Top.jpg

Top of deck, with (4) small juice flow holes per side, pre-installed air flow pin, and coil rod cut outs ...


20 Deck Side.jpg


Side shot showing (again), the TRIPLE (very tight) o-rings, juice flow slot, and air channels just above the fixed rotary plate (bottom).


21 Deck Juiceflow.jpg


Better shot showing the air flow pin installed, and 4 juice flow holes per side.


22 Deck Screw.jpg


To BEGIN to replace the air flow pins, 1 coil leg screw needed to be removed, and I used the included phillips driver....


23 510 Screw.jpg


Then, the 510 connection screw ALSO needed to be removed with a flathead driver (not included).


24 Insert Removal.jpg


Then the air flow pin could be slid out, and replaced ....


25 Coils.jpg


I whipped out some VV 2.5mm ID, (2) 27/40 ga. Ni80 coils for testing. My goal was to try and find a coil that would do both MTL, and RDTL ...


26 Coil Rod Grooves.jpg


Test fitting the coil (inverted) using the coil rod cut outs ...


27 Coil Flipped.jpg


Flipped the coil, and captured the legs with the screws ...


28 Coil Height.jpg


Coil snugged up just above the air flow pin inlet ...


29 Coil Leg Overhang.jpg


Trimmed the coils legs, BUT, there was some overhang ....


30 Coil Legs Fixed.jpg


Curled the coil leg tips around to prevent any shorts ...


31 Coil Blued.jpg


Pulsed, and stroked ...


32 Wicked.jpg


Had to cut down my typical 3mm I.D. cotton down to 2.5mm, fluffed, and tucked into the juice wells ...


33 Money Shot.jpg


Saucing the deck ...


34 Filling.jpg


Cosmo tip friendly, large juice fill ports Pay CLOSE attention to the keyed tabs before trying to remove cover and fill ....


35 Filled.jpg


Filled and ready to go !!!!!


36 Leak Test.jpg


PRE-testing leak test ................ PASSED !!!


Testing/Usage:


Alright, alright, alright, I have to get THIS out of the way. WOW, this was a frustrating one to get going. Firstly, the instructions were NOT so great, and again, NOT what I have ever seen from the SXmini team before. If I didn't know better, I'd say the Vulgarian team did the design, and instructions, and SXmini handled the production. Either way, I can't tell you how long I struggled to just get the chimney off of the deck. Same again, trying to get off the top of the top cap, to get to the filling ports. For two TRICKS, I recommend mounting the Rotary on a mod, then pulling from the glass tank upward to get them to separate. The top cap fill port (cover) was equally hard to get off, but once I finally did, I could see it was keyed, so the trick was to turn it to align the keyways before trying to remove. NOT the end of the world, but it happened, and I report it, as always. TBH, BETTER instructions would have solved it. I also had some issues trying to get the juiceflow to open/close/adjust. Once the tank was fully assembled, turning any part of it, just seemed to turn everything, so it was kind of a juggle trying to get, and keep the juice flow ports wide open.


OK, with all of THAT out of the way, I did extensive RDTL (Restricted Direct To Lung), and MTL (Mouth To Lung) testing, using the aforementioned coil. After much testing, I seemed to prefer the 1X3.0mm air tip for RDTL, and the 2X0.8mm for MTL, but your mileage may vary or differ. I tested a variety of higher NIC, fruit centric juices for the MTL, and creamier, custards for the RDTL.


Pros:


* Very unique design, and overall asthetics
* Did NOT leak when laid on it's side
* Glass and SS included for those who do not prefer PEI
* 5 swapable air flow tips
* O-rings were VERY snug !!!!!
* RDTL, and MTL
* Looked great on top of the SXmini MQ Class Mod
* Very good saturation and flavor on MTL


Cons:


* Instructions were poor, and omitted important details/steps
* See above, VERY hard to get apart initially
* Replacing air flow pins required removing 1 deck screw, and 510 connection screw
* With little to no knurling, and/or dedicated juice flow ring, adjusting juice flow complicated
* Sometimes drip tip would come out before top cap cover released for filling (minor gripe)
* No flathead driver included to remove 510 screw for air pin replacment (minor gripe)
* No coils or cotton provided, BUT, advisements were made in instructions


Conclusion:


While I liked a lot about the Rotary RTA, I feel confident in rec'ing it to "set it and forget"-ers more than "tweakers". It was kind of a PITA to have to fully pull apart, and remove both top and bottom screws (including removing the coil somewhat) before/during every air flow pin change. Again, not the end of the world, but it was kind of a pain if you were going to be hopping around, trying numerous air flow pin/ coil configs out. BUT, once you fond your sweet spot, and just set it and forget it, not bad at all. Perhaps my creamy/custards were an unfair match for the coil I chose, but I wanted to really center the review using a "middle" of the road coil. It did O.K. with creamy custards running the larger air flow pin, and in RDTL "mode", but clearly the way I had it setup, it favored MTL, and did VERY good with fruits. Again, might have been improved by further coil testing/changing, be advised. Leak free when laying on it's side, and again, the o-rings were SUPER tight, and sealed it up well. While writing this, I'm vaping it in MTL with a fruity peach mix, and it IS very good.


I really liked the aesthetics, rotary badging/styling, and only used the glass tank and stainless tip. It DID look stunning on the SXmini MQ Class mod. As I mentioned earlier in the review, starting with the instructions, and continuing on with some of the design choices, it just didn't seem up to the typical "polished" level that I have come to expect from SXmini. As mentioned, it's entirely possible, Vulgarian Studio did all the design work, and instructions, and SXmini just profuced it. Not that the Rotary wasn't good, it was, but just saying. I can tell you that I did purchase two, and WILL be keeping them, and will probably keep one running in my MTL rotation if that helps. A little quirky, not great instructions, fairly good machining, so-so RDTL vaping (specifically creams and custards), and VERY good MTL (specifically fruits) performance.


Thanks for giving up some of your free time, and reading this review, I appreciate it, as always.


37 Final.jpg


For the faithful, that have made it ALL the way down here to the bottom, I salute, and reward you ..............


Bonus:


38 Bonus 1.jpg

40 Bonus 3.jpg

41 Bonus 4.jpg

42 Bonus 5.jpg

43 Bonus 6.jpg

44 Outro.jpg


*S.D.*
 

Attachments

  • 39 Bonus 2.jpg
    39 Bonus 2.jpg
    323.9 KB · Views: 1
  • 40 Bonus 3.jpg
    40 Bonus 3.jpg
    344.8 KB · Views: 1
Back
Top