Things they should put into a REO user manual

Rob Fisher

ECIGSSA Admin
Staff member
Administrator
VIP
FINES MASTER
LV
64
 
Joined
3/2/14
Posts
39,399
Awards
51
Age
68
Location
Winston Park, Durbs
Having convinced one or two people to upgrade to a REO overtime I have come to realise they really should come with a how to manual. There are things they should put in a user manual for REO's or things you need to know that no one tells you until you whine!

Here are some tips I have learnt over time in no particular order. Credit has to go to the experts on ECIGS SA for most if not ALL of them!

Please try and not go off topic on this thread so we can keep it to Tips and Tricks for the REO only! If you want to discuss a point then please do it in another thread so we can keep this thread short and to the point for new REO owners.

Feel free to comment via the Like and Agree options but please don't feel aggrieved if comments are deleted or moved from this thread that are not tip or tricks or great info.

If you feel you can improve or correct any of the items please do so and I will delete the old one and replace it with your modified version.
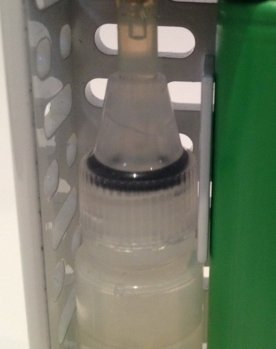
Cyclops 010.JPG
 
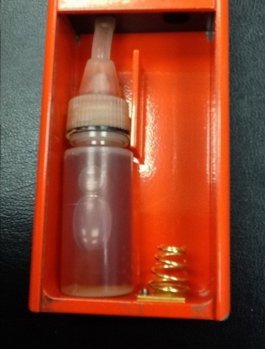
Never over tighten a REO juice bottle to the point that your O-Ring deforms... the juice will then leak and gurgle. Gently does it when screwing the top on.

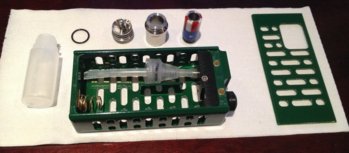
Tips 015.JPG
 
To clean your REO just take off the atomiser (and take it apart), take out the battery and unscrew the juice bottle then soak everything in warm water (you can add sunlight soap if you want to but then rinse a lot afterwards). Use a toothbrush to get to hard to reach places. If you have an ultrasonic bath then finish off with a 10 minute session. Use a syringe and squirt water down the 510 connection to really clean out the feed tube. Same with your BF atomiser.

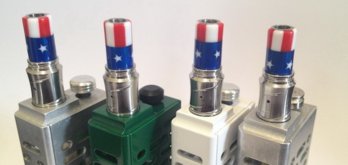
Brooklyn 002.JPG
 
Did you know you can lock the fire button on your REO? Turn the fire button clockwise to lock. On a Woodvil there is a switch in the base that is an on/off switch.
 
Last edited:
The correct way to install a fire button cover is to first lock the fire button then you can press the cover on without putting undue pressure on the firing system.
 
As you can see in the picture 3 posts above, the end of the juice tube has been cut. This is to prevent it from sucking fast against the bottom of the bottle and not feeding any juice on squonking.
 
For minimal voltage drop on painted or anodized Reo's (you will decrease voltage drop with minimum 2mV):

1. Remove negative spring,
2. Gently remove the paint or anodize on the square section that makes contact with the negative spring with a Dremel tool or sand paper.
3. Use a countersunk drill bit and gently remove paint or anodize in the tapered section of screw hole that secure the negative spring with Reo.
 
When you first get your new REO you need to make a small modification to the bottom of your feed tube otherwise there can be a juice lock at the base of the bottle. Cut a little V in the bottom of the tube or a 45 degree cut (which is what I do)... this will stop the juice suction lock issue that you may experience.
 
The correct way to install a fire button cover is to first lock the fire button then you can press the cover on without putting undue pressure on the firing system.
If the button cover is not tight enough, just lay a piece of dental floss across the top of the fire button and then press on the cover.
 
How full should you fill your juice bottle? Fill to just below the neck. If you fill it any more then when you insert the tube the juice will overflow and there will be juice everywhere! Actually every Reonaut needs to make this mistake at least once.
 
New to squonking (named after the sound of the juice sucking back into the juice bottle)? Take off your drip tip and look inside at the juice rising as you squonk. Will give you an idea of how long and at what pressure to squonk. Becomes very automatic after some time. Beware of oversquonking when vaping mindlessly.
 
Last edited:
Did you know? The spring inside a Reo is a "hot" spring. If you have a hard short, the spring will collapse and as a result the battery will move away from the firing pin. A great safety feature.
 
Apply a very thin layer of dielectric grease to your battery terminals once a week to avoid sparking, and the inevitable accumulation of carbon deposit buildup.
 
Which way should the air-hole of the RM2 (or any other atty) face? The air hole on all atomisers on the REO should be opposite to the fire button... if it's not you may get a steam burn on your fire finger. Added to that it's always best when vaping that the air-hole is facing upwards... better airflow and no leaking from over squonking.

Reo 026.JPG
 
As you can see in the picture 3 posts above, the end of the juice tube has been cut. This is to prevent it from sucking fast against the bottom of the bottle and not feeding any juice on squonking.

I cut mine in a V shape and it works beautifully. Never gets stuck to the bottom and use almost all the juice in the bottle.
 
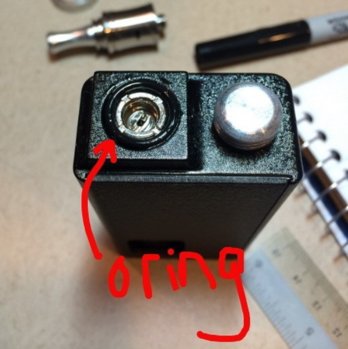
Do you need an O-Ring between the REO and RM2 (or other atty)... the easy answer is yes because it gives you more protection from leaking... it also helps to line up your air-hole to your required position. New REO's with RM2's normally line up perfectly but over time things loosen a little so an O-Ring really helps to get your lining up spot on.

O-Ring REO.jpg
 
If your door is loose or rattles, gently bend the door to create a slight curve - it will fit snug after that.
 
After installing a new wick and coil, block the atty airhole with your finger to prevent juice leaking from the hole - sqonk and hold until wick is properly saturated.
 
After installing a new wick and coil, block the atty airhole with your finger to prevent juice leaking from the hole - sqonk and hold until wick is properly saturated.

Figured this one out about a week after I got my Reo. Works perfectly (when you have a hand free of course...lol) When driving it works best, because you can keep your eyes on the road. Just bring the Reo up to your hand on the steering wheel, close the air holes and squonk. ;)
 
I prefer this position for the oring in the bottle . Can tighten better and never a spill .

image.jpg
 
Last edited by a moderator:
Do you need an O-Ring between the REO and RM2 (or other atty)... the easy answer is yes because it gives you more protection from leaking... it also helps to line up your air-hole to your required position. New REO's with RM2's normally line up perfectly but over time things loosen a little so an O-Ring really helps to get your lining up spot on.

View attachment 13116

This one over here I do agree with - but It makes the Reomiser seriously hard to get off when you want to check the ohms of your coil! Seriously mine is impossible to get off now :( - any tips?
 
This one over here I do agree with - but It makes the Reomiser seriously hard to get off when you want to check the ohms of your coil! Seriously mine is impossible to get off now :( - any tips?
I use a mini long nose plier and gently twist the atty off at the posts, dont be too hard or it could scratch the posts and make sure you have all 2 or 3 posts in the plier.
 
This one over here I do agree with - but It makes the Reomiser seriously hard to get off when you want to check the ohms of your coil! Seriously mine is impossible to get off now :( - any tips?

I use a bit of toilet roll and with the cap off I grip the posts and use a bit of hand strength to loosen it.
 
I use a mini long nose plier and gently twist the atty off at the posts, dont be too hard or it could scratch the posts and make sure you have all 2 or 3 posts in the plier.

eish no, just use a pair of pliers on the outside of the reomiser. afer covering reomiser with cloth or rubber gloves or something to protect it. not gonna risk snapping off a post. knowing my luck and all :)
 
Back
Top