

Hi Ecigssa members, In this review i take a look at the Brunhilde Top Coiler RTA from Vapefly and the German 103 Team. The Brunhilde Top Coiler RTA was supplied for the purpose of this review by Flora from Vapefly.
http://www.vapefly.com/vapefly-brunhilde...03-team-2/

Introduction
Vapefly was about the most underrated vaping manufacturer mostly going underneath the Radar with their first few releases despite bringing us some seriously good products which showed they were not going to shy away from trying to be innovative. Now the cat is out the bag and most vapers recognise Vapefly as an excellent manufacturer leading the way when it comes to innovative products especially regarding airflow designs that actually work and improve flavour. The German 103 Team were founded by Martin Hartkopf who has been a Youtube reviewer since 2013 with his channel DampfWolke7 and Vapefly. The team comprises of 103 mainly German speaking members headed by Martin who's goal is to think outside the box however crazy the idea to design innovative products and in Vapefly they have a perfect partner. The Brunhilde Top Coiler RTA is the second project, the first being the Core RTA and is an RTA which i thought oozes innovation with a unique way of feeding your wicks but then i remembered i did see another RTA somewhere that uses the same idea. It features a side fill method, large capacity, similar central airflow system that we saw on the Core RTA and the use of German materials, let's give the Brunhilde a look!
___________________________________________________________________
In The Box

Contents:
1 x Brunhilde Top Coiler RTA
1 x 510 Adaptor
1 x Allen Key
2 x Firebolt Cotton
2 x 0.35ohm Pre-Build Coils 26ga*2(KA1)+36ga(Ni80)
1 x Glass Tube 8ml
1 x Spare Parts Bag
1 x Stainless Steel Wires from Germany
O-rings&Screws
1 x Manual
___________________________________________________________________
Aesthetics
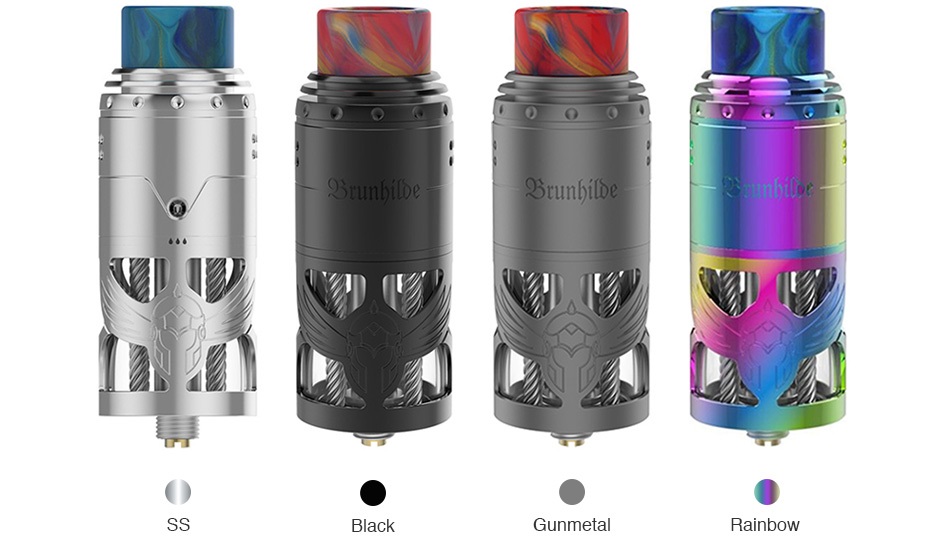
The Brunhilde comes in simple cardboard yet rather nice looking packaging which is a nice shade of beige. I received the Stainless Steel version and while i have no complaints i must say the Gunmetal is the pick for me. The colour options are Stainless Steel, Black, Gunmetal and Rainbow, up top is a Resin 810 drip tip which on the Stainless Steel version i received is Blue. The Brunhilde is 25.20mm in diameter and a whopping 65.5mm in height, it's a skyscraper. The tallness and overall look of the Brunhilde will separate people into three camps, those that think it's a monstrosity, those that really like it and those like me who like it but strictly not to be seen in public, just too tall for out and about. The RTA has a hell of a lot of metal to it and all machining and quality of finish is top notch, not just on the outside but also deck and inside the tank itself. I'm not going to get into an argument whats high end but does it need to have at least 3 figures to join the club. The bottom 40% is the glass section which has an outer cage which is 2 crests one on the front and the same on the back which shape leaves plenty of cutout sections to see both your liquid and the Steel replenishing rods, the crests also have some nice engraving on them, very nice. We then see the joint of the metal sleeve and further up what looks to be another joint but is just a machined groove for aesthetics. On the sleeve low down to one side we have what looks to be a 3mm diameter hole, this gets either lined up with the central airflow hole under the deck when in use or can be turned 180 degrees to line up with the fill port. Much further up on the sleeve we have airflow holes that consists of 2 rows of 4 holes both sides of the sleeve. We then have the joint for the top-cap/inner sleeve which is circled with round indentations which from any sort of distance looks like studding, above this the top-cap steps to the drip tip.

___________________________________________________________________
Brunhilde Specs and Features:
Diameter: 25.20mm
Height with Drip Tip: 65.50mm
Tank Material: SS Stainless
Drip Material: Resin
Coil Rebuildable: Dual Coil Building
Capacity: 2ml(TPD Edition) / 8ml(Standard Edition)
Airflow Adjustable: Top
Fill Liquid: Side
Exquisite appearance with SS hollow construction
Innovative surrounding top airflow system
Premium SS wire from Germany
Easy dual coil building, best coil position
Convenient side filling design
8ml large capacity for all day vaping
Thread: 510
Colours: Stainless Steel, Black, Gunmetal, Rainbow
___________________________________________________________________
What You Get?
As well as the Brunhilde RTA you also receive 2 sets of o-rings and spare screws. You get a 8ml spare glass and this is also the case with the TPD version. The TPD version has the exact same specifications as the standard version but has a silicone piece installed in the shipped RTA reducing the capacity to 2ml so a lot of silicone is going to find it's way into the bin. You also receive a 510 adaptor, allen key, example rod, 2 pieces of Firebolt cotton and 2 coils. The coils are fused claptons which are 26ga*2(KA1)+36ga(Ni80) 3.0ID which have a resistance of 0.35ohm per coil.
___________________________________________________________________
The Airflow
It seems the airflow on any product that Vapefly manufacture offers something above the norm and on the Brunhilde we have airflow from both the outer sleeve and the central wall of the deck giving complete airflow coverage. The outer airflow is pretty standard and what you adjust one side gets adjusted the other. On each side of the outer sleeve we have 2 rows of 4 holes which can be adjusted by turning the inner sleeve which has a stepped design. We can have just part of the bottom row open or the full row, keep turning and we can have the bottom row open and part of the top row open or both rows fully open. You do have the option of just having the central airflow and shutting this outer airflow off but you don't have the option of just having the top row. On the centre of the deck rather than having 2 shared posts we have one piece that spans the diameter of the deck. It comprises of the posts either side and a central airflow section, of course their is insulator separating the positive from negative. This airflow section is curved both sides to the contours of your coils giving really good coverage, both sides we have 2 rows of 3 holes. On the outside of the deck underneath the build section we have a 3mm hole each side, one is the fill port and the other is where the air enters underneath the deck up the hollow central section between the posts and out through the already mentioned holes. Really the central airflow needs to be used, in theory you can slightly turn the sleeve to shut this off and just have the outer airflow but when the hole in the sleeve is lined up with the airflow hole to feed the central system the outer airflow is perfectly lined up with your coils so doing this would mean the airflow would be off centre and not lined up correctly.


___________________________________________________________________
Filling
The Brunhilde uses a side fill method which means the sleeve just needs rotating 180 degrees to reveal the fill port so no need to take the sleeve off. On the outside of the deck section as mentioned in the airflow section, we have a 3mm hole each side and a 3mm hole on the outer sleeve. While vaping the hole on the outer sleeve should be lined up with the airflow hole and when you need to fill you turn the sleeve to line it up with the fill port, very simple and sounds great, but it's far from ideal. A 3mm hole is just not big enough, you can forget dropper bottles but you can get the end of Gorilla nozzles into the hole, but it's a tight fit so no air can escape and gets rather messy. The solution is using a needle nose bottle which works mess free but filling a 8ml capacity tank with a needle nose takes quite some time, at least once it's filled you don't need to refill for a while.

___________________________________________________________________
The Deck and Build
As mentioned you have a central wall that spans the deck which has a shared post on each end, the 2 terminals on each post are lined up vertically. Your screws get undone and tightened up from the sides of the posts so it's just a matter of popping one of your legs in either the top or bottom terminal in one post and your other leg in the opposite terminal in the other post. You then simply put the legs of your second coil in the unused terminals, hold in place and tighten up your screws. To save the slightly fiddly job of trimming the access legs i just pre-cut my legs to 5mm and had no need. Then just use a coiling rod or something similar to manoeuvre the coils into the perfect position which is done by using the central airflow system as a guide, if you have the coils lined up with the central airflow they will also be in the ideal position for the airflow holes on the sleeve. So installing your coils is quite straight forward and wicking is even easier, first just feed your cotton through the coils and cut them bow tie style. Now looking on the deck where you would expect to see wicking holes to poke your cotton ends through, you see they are there but already occupied by the Steel wire replenishing rods that just poke through. On the pictures of my build you can see they poke through about 1mm more than how you receive the RTA but i will explain that later. You simply place your cotton ends over the top of the steel wire rods, their is each side of the deck a raised ridge between the 2 wicking ports to keep each cotton end for each steel wire rod.


On the first picture that's the rods as it came just poking through and touching the floor of the tank. On the other picture's of the build you can see i have lifted them up slightly!
___________________________________________________________________
Replenishing Rods
As well as the tilt of the tank while vaping your cotton gets replenished via capillary action through Steel wire rods. The rods are made from premium German steel and is many strands of wire woven together to allow many hollows inside going from the bottom to the top. The rods are made from weaving 7 strands of Steel together, then 7 of these sections that comprise of seven strands of Steel are again woven together to complete one rod, so 49 strands of Steel in total. The Brunhilde comes with the four Steel rods already installed they just poke through the wicking ports and go to the bottom of the RTA. You also get one spare which i find weird, unless that's just so you can have a good look at one without uninstalling one that's already in place, they can be bought separately in sets of four.

___________________________________________________________________
Replenishing
I have been looking forward to reviewing the Brunhilde since before Christmas as it has been a staggered release only being available in a few countries before a global release. I have been reading about it during the time i have been waiting and some say it works great and others finding the replenishing rods are not doing their jobs and it only wicks the side you tilt. When i received it i couldn't help noticing the way the rods seem to of been installed in manufacturing is they are pushed through the wicking holes until they hit the bottom of the tank so the e-liquid does not go underneath the rods but just circulates them so no capillary action will take place. I took the bottom section of the tank off and just pushed the rods up by just 1mm so they are no longer touching the base. They catch the sides of the wicking ports enough that they don't drop down while doing your build and once the tank is filled the ends of the rods stay suspended in place by your e-liquid, they work fine.


Steel wire Rods suspended 1mm above floor of tank.

Sleeve taken off after some chain vaping, wicking evenly through steel replenishing rods!
___________________________________________________________________
How Does The Brunhilde Vape And Final Thoughts?
I'm vaping on it as i'm writing this and it's wicking (replenishing) fine with flavour on point, it also gives really good cloud production. The airflow doesn't give masses of air but enough for most and personally i have just the bottom row open and of course the central airflow open also, it's just slightly airier than the normal restriction i go for but no worries as it's very smooth. The build with the supplied coils came out at 0.23ohm and i'm rocking it at 60w. The Brunhilde in my opinion is just too tall to use out and about and filling is either messy or takes time. To get the steel rods replenishing properly they also need a bit of adjustment before first using but other than that i'm really enjoying it.

___________________________________________________________________
Likes
Excellent build quality
Aesthetically pleasing (in my opinion)
4 Colour options (Gunmetal the pick for me)
Unique look (kind of cool seeing the woven rods through the glass)
Clearly see juice level
8ml Capacity
Fill without removing sleeve
Steel wire rod replenishing system
Flavour on point
Good cloud production
Smooth airflow
510 adaptor included
Central and outer airflow systems
Easy build
Spare glass
Coils and cotton included
Example Steel Rod
Cons
Side fill takes time with needle nose bottle, using other nozzles is messy
When receiving it need to adjust rods for them to work as they should
Very tall, not really practical for out and about
I would once again like to thank Flora from Vapefly for supplying the Brunhilde Top Coiler RTA for the purpose of this review.
http://www.vapefly.com/vapefly-brunhilde...03-team-2/
___________________________________________________________________
http://www.vapefly.com/vapefly-brunhilde...03-team-2/

Introduction
Vapefly was about the most underrated vaping manufacturer mostly going underneath the Radar with their first few releases despite bringing us some seriously good products which showed they were not going to shy away from trying to be innovative. Now the cat is out the bag and most vapers recognise Vapefly as an excellent manufacturer leading the way when it comes to innovative products especially regarding airflow designs that actually work and improve flavour. The German 103 Team were founded by Martin Hartkopf who has been a Youtube reviewer since 2013 with his channel DampfWolke7 and Vapefly. The team comprises of 103 mainly German speaking members headed by Martin who's goal is to think outside the box however crazy the idea to design innovative products and in Vapefly they have a perfect partner. The Brunhilde Top Coiler RTA is the second project, the first being the Core RTA and is an RTA which i thought oozes innovation with a unique way of feeding your wicks but then i remembered i did see another RTA somewhere that uses the same idea. It features a side fill method, large capacity, similar central airflow system that we saw on the Core RTA and the use of German materials, let's give the Brunhilde a look!
___________________________________________________________________
In The Box
Contents:
1 x Brunhilde Top Coiler RTA
1 x 510 Adaptor
1 x Allen Key
2 x Firebolt Cotton
2 x 0.35ohm Pre-Build Coils 26ga*2(KA1)+36ga(Ni80)
1 x Glass Tube 8ml
1 x Spare Parts Bag
1 x Stainless Steel Wires from Germany
O-rings&Screws
1 x Manual
___________________________________________________________________
Aesthetics
The Brunhilde comes in simple cardboard yet rather nice looking packaging which is a nice shade of beige. I received the Stainless Steel version and while i have no complaints i must say the Gunmetal is the pick for me. The colour options are Stainless Steel, Black, Gunmetal and Rainbow, up top is a Resin 810 drip tip which on the Stainless Steel version i received is Blue. The Brunhilde is 25.20mm in diameter and a whopping 65.5mm in height, it's a skyscraper. The tallness and overall look of the Brunhilde will separate people into three camps, those that think it's a monstrosity, those that really like it and those like me who like it but strictly not to be seen in public, just too tall for out and about. The RTA has a hell of a lot of metal to it and all machining and quality of finish is top notch, not just on the outside but also deck and inside the tank itself. I'm not going to get into an argument whats high end but does it need to have at least 3 figures to join the club. The bottom 40% is the glass section which has an outer cage which is 2 crests one on the front and the same on the back which shape leaves plenty of cutout sections to see both your liquid and the Steel replenishing rods, the crests also have some nice engraving on them, very nice. We then see the joint of the metal sleeve and further up what looks to be another joint but is just a machined groove for aesthetics. On the sleeve low down to one side we have what looks to be a 3mm diameter hole, this gets either lined up with the central airflow hole under the deck when in use or can be turned 180 degrees to line up with the fill port. Much further up on the sleeve we have airflow holes that consists of 2 rows of 4 holes both sides of the sleeve. We then have the joint for the top-cap/inner sleeve which is circled with round indentations which from any sort of distance looks like studding, above this the top-cap steps to the drip tip.
___________________________________________________________________
Brunhilde Specs and Features:
Diameter: 25.20mm
Height with Drip Tip: 65.50mm
Tank Material: SS Stainless
Drip Material: Resin
Coil Rebuildable: Dual Coil Building
Capacity: 2ml(TPD Edition) / 8ml(Standard Edition)
Airflow Adjustable: Top
Fill Liquid: Side
Exquisite appearance with SS hollow construction
Innovative surrounding top airflow system
Premium SS wire from Germany
Easy dual coil building, best coil position
Convenient side filling design
8ml large capacity for all day vaping
Thread: 510
Colours: Stainless Steel, Black, Gunmetal, Rainbow

___________________________________________________________________
What You Get?
As well as the Brunhilde RTA you also receive 2 sets of o-rings and spare screws. You get a 8ml spare glass and this is also the case with the TPD version. The TPD version has the exact same specifications as the standard version but has a silicone piece installed in the shipped RTA reducing the capacity to 2ml so a lot of silicone is going to find it's way into the bin. You also receive a 510 adaptor, allen key, example rod, 2 pieces of Firebolt cotton and 2 coils. The coils are fused claptons which are 26ga*2(KA1)+36ga(Ni80) 3.0ID which have a resistance of 0.35ohm per coil.
___________________________________________________________________
The Airflow
It seems the airflow on any product that Vapefly manufacture offers something above the norm and on the Brunhilde we have airflow from both the outer sleeve and the central wall of the deck giving complete airflow coverage. The outer airflow is pretty standard and what you adjust one side gets adjusted the other. On each side of the outer sleeve we have 2 rows of 4 holes which can be adjusted by turning the inner sleeve which has a stepped design. We can have just part of the bottom row open or the full row, keep turning and we can have the bottom row open and part of the top row open or both rows fully open. You do have the option of just having the central airflow and shutting this outer airflow off but you don't have the option of just having the top row. On the centre of the deck rather than having 2 shared posts we have one piece that spans the diameter of the deck. It comprises of the posts either side and a central airflow section, of course their is insulator separating the positive from negative. This airflow section is curved both sides to the contours of your coils giving really good coverage, both sides we have 2 rows of 3 holes. On the outside of the deck underneath the build section we have a 3mm hole each side, one is the fill port and the other is where the air enters underneath the deck up the hollow central section between the posts and out through the already mentioned holes. Really the central airflow needs to be used, in theory you can slightly turn the sleeve to shut this off and just have the outer airflow but when the hole in the sleeve is lined up with the airflow hole to feed the central system the outer airflow is perfectly lined up with your coils so doing this would mean the airflow would be off centre and not lined up correctly.
___________________________________________________________________
Filling
The Brunhilde uses a side fill method which means the sleeve just needs rotating 180 degrees to reveal the fill port so no need to take the sleeve off. On the outside of the deck section as mentioned in the airflow section, we have a 3mm hole each side and a 3mm hole on the outer sleeve. While vaping the hole on the outer sleeve should be lined up with the airflow hole and when you need to fill you turn the sleeve to line it up with the fill port, very simple and sounds great, but it's far from ideal. A 3mm hole is just not big enough, you can forget dropper bottles but you can get the end of Gorilla nozzles into the hole, but it's a tight fit so no air can escape and gets rather messy. The solution is using a needle nose bottle which works mess free but filling a 8ml capacity tank with a needle nose takes quite some time, at least once it's filled you don't need to refill for a while.
___________________________________________________________________
The Deck and Build
As mentioned you have a central wall that spans the deck which has a shared post on each end, the 2 terminals on each post are lined up vertically. Your screws get undone and tightened up from the sides of the posts so it's just a matter of popping one of your legs in either the top or bottom terminal in one post and your other leg in the opposite terminal in the other post. You then simply put the legs of your second coil in the unused terminals, hold in place and tighten up your screws. To save the slightly fiddly job of trimming the access legs i just pre-cut my legs to 5mm and had no need. Then just use a coiling rod or something similar to manoeuvre the coils into the perfect position which is done by using the central airflow system as a guide, if you have the coils lined up with the central airflow they will also be in the ideal position for the airflow holes on the sleeve. So installing your coils is quite straight forward and wicking is even easier, first just feed your cotton through the coils and cut them bow tie style. Now looking on the deck where you would expect to see wicking holes to poke your cotton ends through, you see they are there but already occupied by the Steel wire replenishing rods that just poke through. On the pictures of my build you can see they poke through about 1mm more than how you receive the RTA but i will explain that later. You simply place your cotton ends over the top of the steel wire rods, their is each side of the deck a raised ridge between the 2 wicking ports to keep each cotton end for each steel wire rod.


On the first picture that's the rods as it came just poking through and touching the floor of the tank. On the other picture's of the build you can see i have lifted them up slightly!
___________________________________________________________________
Replenishing Rods
As well as the tilt of the tank while vaping your cotton gets replenished via capillary action through Steel wire rods. The rods are made from premium German steel and is many strands of wire woven together to allow many hollows inside going from the bottom to the top. The rods are made from weaving 7 strands of Steel together, then 7 of these sections that comprise of seven strands of Steel are again woven together to complete one rod, so 49 strands of Steel in total. The Brunhilde comes with the four Steel rods already installed they just poke through the wicking ports and go to the bottom of the RTA. You also get one spare which i find weird, unless that's just so you can have a good look at one without uninstalling one that's already in place, they can be bought separately in sets of four.
___________________________________________________________________
Replenishing
I have been looking forward to reviewing the Brunhilde since before Christmas as it has been a staggered release only being available in a few countries before a global release. I have been reading about it during the time i have been waiting and some say it works great and others finding the replenishing rods are not doing their jobs and it only wicks the side you tilt. When i received it i couldn't help noticing the way the rods seem to of been installed in manufacturing is they are pushed through the wicking holes until they hit the bottom of the tank so the e-liquid does not go underneath the rods but just circulates them so no capillary action will take place. I took the bottom section of the tank off and just pushed the rods up by just 1mm so they are no longer touching the base. They catch the sides of the wicking ports enough that they don't drop down while doing your build and once the tank is filled the ends of the rods stay suspended in place by your e-liquid, they work fine.


Steel wire Rods suspended 1mm above floor of tank.

Sleeve taken off after some chain vaping, wicking evenly through steel replenishing rods!
___________________________________________________________________
How Does The Brunhilde Vape And Final Thoughts?
I'm vaping on it as i'm writing this and it's wicking (replenishing) fine with flavour on point, it also gives really good cloud production. The airflow doesn't give masses of air but enough for most and personally i have just the bottom row open and of course the central airflow open also, it's just slightly airier than the normal restriction i go for but no worries as it's very smooth. The build with the supplied coils came out at 0.23ohm and i'm rocking it at 60w. The Brunhilde in my opinion is just too tall to use out and about and filling is either messy or takes time. To get the steel rods replenishing properly they also need a bit of adjustment before first using but other than that i'm really enjoying it.
___________________________________________________________________
Likes
Excellent build quality
Aesthetically pleasing (in my opinion)
4 Colour options (Gunmetal the pick for me)
Unique look (kind of cool seeing the woven rods through the glass)
Clearly see juice level
8ml Capacity
Fill without removing sleeve
Steel wire rod replenishing system
Flavour on point
Good cloud production
Smooth airflow
510 adaptor included
Central and outer airflow systems
Easy build
Spare glass
Coils and cotton included
Example Steel Rod
Cons
Side fill takes time with needle nose bottle, using other nozzles is messy
When receiving it need to adjust rods for them to work as they should
Very tall, not really practical for out and about
I would once again like to thank Flora from Vapefly for supplying the Brunhilde Top Coiler RTA for the purpose of this review.
http://www.vapefly.com/vapefly-brunhilde...03-team-2/
___________________________________________________________________

