My first RTA

StaticX

New Vaper
LV
5
 
Joined
26/11/17
Posts
79
Awards
9
Age
33
Location
Cape Town
Hi all

So i recently purchased my first vape kit (Vaporesso Revenger-X kit) i then had to send the kit back due to it having some problems.

I then purchase a Voopoo Drag Resin 157 with a Smok Cloud Beast.

I also ordered a Ammit 25 RTA with some pre-built coils. My question now is what is good coils to use for a single coil RTA and how do i calculated the wattage range for the coils?

Any advice would be awesome

Sent from my SM-G935F using Tapatalk
If pre-built coils are the route you would like to go to, check out coils by @smilelykumeenit if I'm not mistaken, he does 32g alien coils which would be perfect for a single coil RTA. @smilelykumeenit can give you more information on the wattage range of his coils if you PM him.

If you would like to build your own coils, Haywire Flat wire would be a good choice of wire to work with. 24g flat wire would be an excellent choice of wire. Another option is to use standard round N80 wire and build space coils. This will eliminate hot spots making it easier to work with.

You don't really need to calculate a wattage range. Generally, you start of at low wattage and then increase the wattage until you find the wattage you like.
 
Also wondered about wattage and what the limits are.

Tried a build on a goblin mini, with 24g kanthal. came to like 0.8 ohm wicked with Coil master organic cotton. tried 15-35 watts on my pico. No flavour, really warm vape and dry hits like a mofo. Put the tank back into the cupboard and went back to the melo3 mini tank.

Don't really have the time to get this diy coil stuff going. What was the issue with the revenger kit as I was seriously considering it as my next device with the NRG tank.
 
@daniel craig pre-build coils will be used for now, but in the future, i would like to try my hand at making them myself. Thank you for the info greatly appreciated
 
Also wondered about wattage and what the limits are.

Tried a build on a goblin mini, with 24g kanthal. came to like 0.8 ohm wicked with Coil master organic cotton. tried 15-35 watts on my pico. No flavour, really warm vape and dry hits like a mofo. Put the tank back into the cupboard and went back to the melo3 mini tank.

Don't really have the time to get this diy coil stuff going. What was the issue with the revenger kit as I was seriously considering it as my next device with the NRG tank.
That seems like the right range for a 0.8ohm coil.

One of the things with rebuilding is figuring out how to do a decent build in any tank. So what guage wire, what cotton, and how you put the cotton in make a big difference. I would hazard a guess that you put too much cotton in that Goblin, and that's why you got poor flavour and dry hits!
 
The wattage you need to use depends on the coil type (Alien coil, Fused Clapton, Clapton, normal round wire coils), the wire type (Ni80, Kanthal, Stainless Steel), Surface are (How big/fat the coils are), Resistance etc.

If you use coils like framed staples or aliens, you will need more wattage as these coils have a lot of mass compared to standard round wire coils.

There's no wattage range and since you are using a regulated device, the resistance of your coil does not matter (as long as it's above 0.1 and below 3 ohms). As a general rule of thumb, you should start off at low wattage and then increase the wattage until you find a wattage you like. The only time you need to build accordingly is if you're using a mech mod.

For your goblin mini I would suggest a build at around 0.3-0.5 ohms. You can use a tool like Steam Engine or any other coil building tool. The goblin isn't a very good RTA to start out with. I would suggest that you look at getting an RTA like a Pharaoh Mini, Geekvape Zeus or Serpent SMM. These are easier to build and wick and are more flavorful.

@franshorn @StaticX
 
@franshorn That Goblin mini is not a very user friendly RTA. You need to build and wick it perfectly which takes a lot of tries to get right. It is capable of producing decent flavor but it takes a lot of practise to get it right. I would suggest that you look at other RTA's instead as they are much more easier to build and wick.

If you don't want to build coils, you can buy pre-made coils from The Coil Company. Their coils are available at many stores and the quality and performance of these coils are excellent. 1 set of coils will last you around 3 months or more as long as you clean frequently (rewick, dry fire etc)

If you're looking at using sub-ohm tanks with coils the NRG tank is quite nice. The coils are compatible with the SMOK coils so they're pretty good. A wattage range is given on these coils but keep in mind that you don't need to follow these recommendations religiously. You just need to prime the coils, start at around 30w and increase the wattage until you find a sweet spot.
 
@daniel craig Thank you for all the information guys.


Ill post what coils i have bought once i receive it tomorrow and I will start to read up more regarding the build aspect of coils as well.

I have started to read around on the net a bit, but was sure i would get great advice on here.

Cant wait to wick for the first time and see how it works out.


@franshorn the Revenger kit is very nice and i would recommend it to anyone. My friend purchased one the same day i did and it works great day in and day out. I just had some bad luck seeing as mine did not want to unlock or turm off.


Sent from my SM-G935F using Tapatalk
 
@daniel craig

Thanks for the advice mate. Guess I was just a bit impatient playing around with the goblin.
Problem is I am limited to 22mm on the Pico, and also don't want to spend a fortune on a rta. So Picked up the goblin for a bargain and thought I'll try it out.

Only tried the single coil. figured it would be more forgiving that the dual post deck. Or do you think I should rather try the dual build deck?

@Stosta I also think I may have put too much cotton. Watched some videos about a bow tie method and i'll give it another shot over the holidays..
I haven't had much time to play with my Goblin, so can't really advise as to a good build. I just threw on a 6 wrap, 24g Kanthal coil with a 3mm ID, and it came out fairly decent. But I think it may be your wicking.

One other thing! Don't close the top cap fully! It seems this tank suffers from an airlock problem. So what you do is vape until you can feel it getting dry, then slowly open the top cap until you see some bubbles coming out of where the cotton is. Then you know it's wicking!

Stick to the single coil for now. I suspect the airlock thing might solve your problem!
 
@daniel craig

Thanks for the advice mate. Guess I was just a bit impatient playing around with the goblin.
Problem is I am limited to 22mm on the Pico, and also don't want to spend a fortune on a rta. So Picked up the goblin for a bargain and thought I'll try it out.

Only tried the single coil. figured it would be more forgiving that the dual post deck. Or do you think I should rather try the dual build deck?

@Stosta I also think I may have put too much cotton. Watched some videos about a bow tie method and i'll give it another shot over the holidays..
Good morning, you can get a heat sink adapter from The Vape Guy,http://vapeguy.co.za/accessories/spares-parts/22mm-heat-sink that you can use to lift the 510 to above the battery cap on the Pico. Waiting for my Pico to get back from holiday to try.;) This will allow you more options with regards to the tank that you buy.
 
@franshorn here's a guide I've been using for years.

Wicking, what I use. Cut a strip so that I get a tightish fit on my coil ID.

I trim the wicks in line with the outer posts, it looks small but it works.

I then trim the top edges slightly at an angle.

I then wet the wicks with a bit of juice so that it's easier to place. Wicks should be above the bottom end, into the juice channels as shown, trim more if you find they are too low/long in the juice channels.

Only once I have "moulded" the coils into place do I then screw on the chimney base section. If done correctly, the wicks will not interfere with the threading on the chimney base.

When filling:
- I close off the air channels
- A tip I got is once you have filled the tank, open the air channel and blow slightly 2 or 3 times into the tank through the drip tip. Sometimes you will get one or two drops on the base of the tank, just wipe and it will not leak.

Credits to @Pixstar for this guide. It's a tried and tested method which works excellent.

(The pictures are in order. I'm using Tapatalk so I couldn't place them properly under the text. I'll rearrange it when I get to a computer)

d2631e324a7e6adb4566d13d5800ccf8.jpg
f16350f79197379fd69c1169baae0584.jpg
ed46954d1041710af541a8e84c7cf9c3.jpg
abb810cb944a2ec2344516763c11c285.jpg
d8ea7da925553e80d1054585db993672.jpg
 
Hi All

So i received the RTA today but for the life of me I cant get the top piece to unscrew so I can add the e juice

I am worried I may crack the glass if I use any tools, but it just won't budge:speechless:
 
Hi All

So i received the RTA today but for the life of me I cant get the top piece to unscrew so I can add the e juice

I am worried I may crack the glass if I use any tools, but it just won't budge:speechless:
Some guys have had luck by putting their tanks in the freezer for a few hours. The theory is that the metal contracts with the cold.

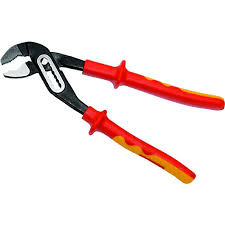
Personally I have had a lot of luck with a pair of joint pliers and a cloth... Or whatever these things are actually called...

groove-joint-pliers-633.jpg
 
Some guys have had luck by putting their tanks in the freezer for a few hours. The theory is that the metal contracts with the cold.

Personally I have had a lot of luck with a pair of joint pliers and a cloth... Or whatever these things are actually called...

groove-joint-pliers-633.jpg
I was thinking of using the same type of pliers, just dont want to damage it on the first day. . . i will try tonight and then tomorrow will be my first go at wicking the rta
 
I was thinking of using the same type of pliers, just dont want to damage it on the first day. . . i will try tonight and then tomorrow will be my first go at wicking the rta
I think my Serpent 25 remained unopened for weeks. Eventually I got so frustrated I just went at it and it worked fine.

So I do understand your hesitance, but I can promise you that eventually you'll find the rage-induced motivation!
 
Some guys have had luck by putting their tanks in the freezer for a few hours. The theory is that the metal contracts with the cold.

Personally I have had a lot of luck with a pair of joint pliers and a cloth... Or whatever these things are actually called...

groove-joint-pliers-633.jpg
Gas pliers, one size fits all. :D You can try by using electrical tape to cover the grip part, and not using too much force. But you did not hear that from me, and no guarantees. My dad used to say that with force you can break off you own finger in your ...@@@@@@@..., it still applies. ;)Rather get one of those ceramic tweezers that can be used to undo without causing damage.
https://www.vapeking.co.za/vaper-twizer-v8-ceramic-vape-tweezers.html
 
@Stosta I have always known them to be called water pump pliers. Can't guarantee that it's correct though.:)
untppitled.png
I have also held stuck top caps under the hot tap for as long as my fingers stay raw. Works for me.
 
Magic thanks @daniel craig

I have a goblin mini v3 though so no separate chimney to install. But will give it a try as described...
Try the same wicking method on V3.
I find the V3 easier to wick because of the nice wick holes.
Don’t over pack them.
Use a sharp object and poke the wick that’s in the holes.
Make sure your juice control is open when placing the wicks in the holes.
You should be able to see some cotton through the juice control holes. With a sharp object spread the wick that you can see through the juice control holes. If you get leaking from filling, you have too little cotton obviuosly.
I find that if after several tank fulls of vaping it tends to leak a little when filling, just rewick.
 
@franshorn here's a guide I've been using for years.

Wicking, what I use. Cut a strip so that I get a tightish fit on my coil ID.

I trim the wicks in line with the outer posts, it looks small but it works.

I then trim the top edges slightly at an angle.

I then wet the wicks with a bit of juice so that it's easier to place. Wicks should be above the bottom end, into the juice channels as shown, trim more if you find they are too low/long in the juice channels.

Only once I have "moulded" the coils into place do I then screw on the chimney base section. If done correctly, the wicks will not interfere with the threading on the chimney base.

When filling:
- I close off the air channels
- A tip I got is once you have filled the tank, open the air channel and blow slightly 2 or 3 times into the tank through the drip tip. Sometimes you will get one or two drops on the base of the tank, just wipe and it will not leak.

Credits to @Pixstar for this guide. It's a tried and tested method which works excellent.

(The pictures are in order. I'm using Tapatalk so I couldn't place them properly under the text. I'll rearrange it when I get to a computer)

d8ea7da925553e80d1054585db993672.jpg
Wow blast from the past. A long time ago in vape years...I still have my two V1’s, neatly packed away.
I have two V3’s in daily use that I use with tobacco and menthol flavours.
 
Wow blast from the past. A long time ago in vape years...I still have my two V1’s, neatly packed away.
I have two V3’s in daily use that I use with tobacco and menthol flavours.
This was such an excellent guide, I had to save it. The only wicking method that worked all the time. I think it's from like 2 years back
 
This was such an excellent guide, I had to save it. The only wicking method that worked all the time. I think it's from like 2 years back
I have to admit, it almost make me want to pull out my V1 all over again! But that juice-filling system... :rolleyes:
 
Okay so i did my first build this morning

I used Geek Vape Framed Staple Fused Clapton - 0.25ohm with Cotton Bacon

I did everything as per above and i have no leaks, but im getting a massive amount of super hot spitback

Firstly, the build on this deck forces you to unwrap one wrap seeing as the posts are on opposite sides.

What could be the cause of the spitback?
 
Back
Top