

Hi Ecigssa members, In this review i take a look at the INTAKE MTL RTA from Augvape. The AUGVAPE INTAKE MTL RTA was supplied for the purpose of this review by Ella from Sourcemore.
https://www.sourcemore.com/augvape-intake-mtl-rta.html

Introduction
Augvape were founded in 2014 and from the off have been a manufacturer trying to think "outside the box" with many of their products. Augvape have also had a long term collaboration with Mike Vapes with their INtake series of Atomizers and here we have the latest, the INtake MTL RTA!
The INtake MTL RTA is a large capacity tank for MTL offering airflow control by utilising both airflow inserts and an adjustable airflow ring. The design offers an RDL option while not compromising it's MTL credentials and has a clever top to bottom airflow design. The leak resistant RTA has an easy to build single coil GTA style build deck (once getting your head around screws with reversed threading, booooo!!!), so let's see how it shapes up!
___________________________________________________________________
In The Box

Contents:
1 x Intake MTL RTA, 1.4mm air plug pre-installed
4 x Reverse thread screws
1 x Bubble Glass
2 x Clapton Coils
5 x O-rings
1 x User Manual
4 x Air plugs
1 x Warranty Card

___________________________________________________________________
Aesthetics
The INtake MTL RTA came in a simple cardboard box with outer cardboard sleeve and on opening everything included can be found in one layer. I received the Stainless Steel version, the options are Stainless Steel, Matte Gunmetal or Matte Black, so just the 3 options.
We have a narrow metal base section and much more substantial metal on show up top with a stepped top-cap with knurled designed and underneath the AFC ring. The INtake is very substantial for a MTL RTA with main aesthetic features as well as the knurled design being the two sets of descending airflow holes on the AFC and "INtake MTL" in fancy font on the outside wall of the chamber.
Moving to the base we have etched branding and safety stamps and a nicely protruding Gold plated 510 positive pin! Up top we have a shapely Delrin drip tip with both a shape and bore which gives the impression its confused whether it's for MTL or RDL and finally all the threading and machining is well beyond it's price point, so far, so good!

___________________________________________________________________
INtake MTL RTA Specs and Features:
Size: (D)24 x 54.3mm
Capacity: 3.1ml/w straight glass & 4.6ml/w bubble glass
MTL clapton coils:
Resistance: 0.8+0.05
Kanthal+Ni80
Top to bottom air flow
Top refilling with leak proof design
6 different sizes of bottom air hole
Restricted DL vape airhole setup
MTL vape airhole setup
Thread: 510
Colours: Stainless Steel, Matte Gunmetal, Matte Black

___________________________________________________________________
What You Receive?
As well as the INtake MTL RTA with 3.1ml capacity straight glass and Delrin "Jack of all trades" drip tip you also receive a bubble glass with 4.6ml capacity. You receive the usual paperwork which includes a user manual which is barely an information leaflet and finally a bag of goodies.
In the bag of goodies we have spare O-rings, reversed threaded post screws and a spare fill seal. We also receive 4 of the 5 airflow inserts as the 1.4mm is pre-installed.
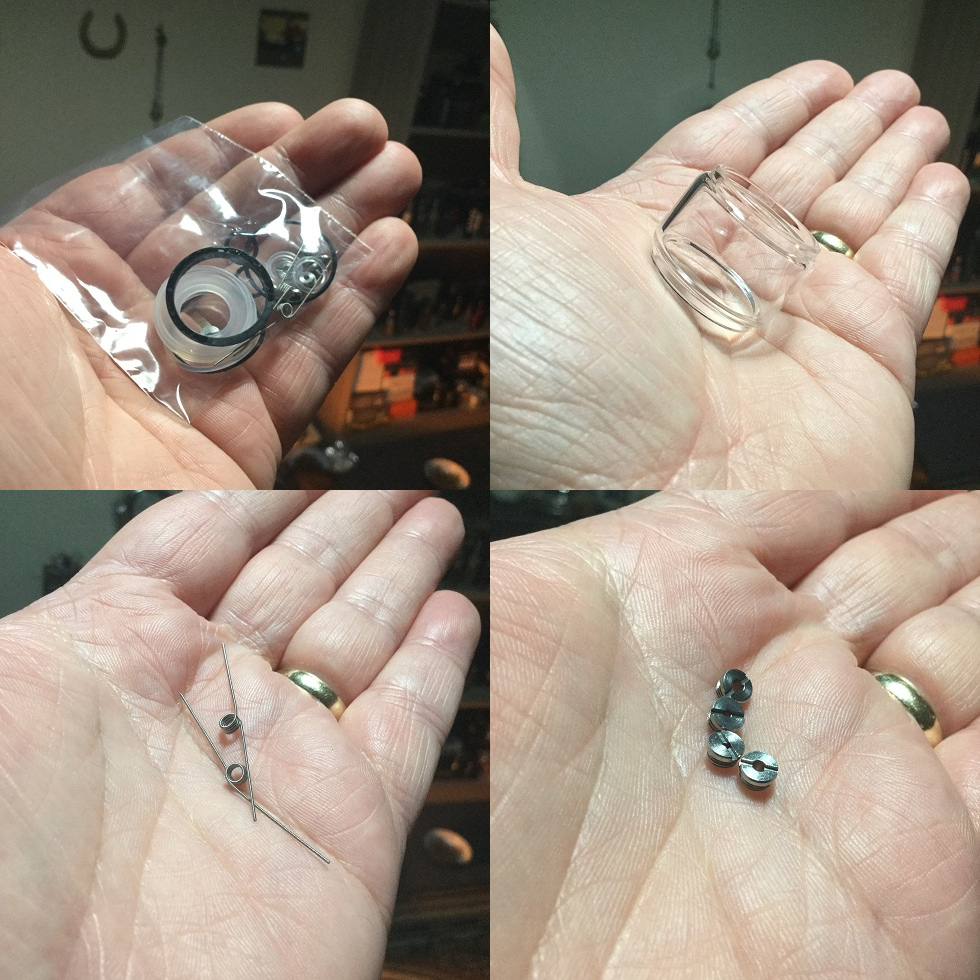
Finally we receive 2 MTL clapton coils, 0.8ohm +/- 0.05 Kanthal+Ni80 2.5ID! But no cotton included, alternative drip-tip or famous Blue Screwdriver (devastated)!

___________________________________________________________________
It's Various Parts!
Starting up top we have a Delrin drip tip which can just pass for a MTL vape but is also suitable for a RDL and basically i just don't like it and feel it's a poor effort to save money rather than including 2 drip-tips, one suitable for each style! Next we have my favourite type of top-cap incorporating a bayonet fitting so just a quarter turn and it's off and again a quarter turn clockwise to secure! Also the knurled design gives really good drip and the 2 fill ports are very generous, no issues whatsoever!

The base section unscrews which is the deck unscrewing from the chamber and the glass can just be dislodged simply from the top sealing O-ring, when the tank is screwed together the glass is also sealed by a bottom O-ring fitted to the base. As well as the straight glass, this can be swapped for the included 4.6ml bubble glass! This leaves the fill ports plate, chimney and chamber section with double sealing and top airflow inlet system, this is all one piece but the AFC is removable.


Finally the bottom central airflow outlet on the deck can have one of five different sized bore airflow inserts installed, or it can be used without but more about that in the next section!
___________________________________________________________________
Airflow Inserts
Although the amount of airflow entering the RTA is controlled via the AFC ring we have different inserts that can be screwed into the outlet on the deck which is positioned directly underneath where your coil will be positioned.
The inserts have different sized bores which include the pre-installed 1.4mm insert. Also included are airflow inserts with the following bores, 1.0mm, 1.2mm, 1.6mm and 1.8mm. Alternatively if you are after getting a RDL draw you can use the RTA with no insert installed giving the bottom airflow outlet a 3.7mm bore!
I do like RTA's that use a combination of airflow inserts and an airflow control ring to dial in the draw you are after but a couple of cons with the INtake which are not deal breakers as once you know which insert you prefer it no longer is an issue. Firstly the inserts can't be swapped on the fly and secondly even with no build they are very fiddly to get the threading to catch and do need a decent screwdriver!

___________________________________________________________________
The Airflow
The INtake has a top to bottom airflow design which sees air entering through the top inlet/inlets and travelling down tubes to the base before entering the deck up through the bottom airflow outlet.
The airflow control ring has two rows of airflow holes which go from 1.8mm down to 1.0mm, the rows are not quite side by side but unlike most dual airflow designs are not on opposite sides and that's because this isn't dual airflow as only one of the two rows is in operation at any one time.
When you remove the AFC the concept becomes clearer as underneath where one row will operate we have a single 1.8mm airflow hole and then for when the other row comes into play an airflow slot. Also we have a small tab to the inside of the ring and a rail on the main airflow section allowing the airflow control ring to be adjusted while also giving it stoppers!

Moving the AFC as far as it will go clockwise the 1.0mm hole is open and then we can turn counter clockwise to adjust to either the 1.2mm, 1.4mm, 1.6mm or 1.8mm single hole open. While you are using a single hole the row of holes that operate the slot are closed but if you then carry on turning the row starts opening against the slot so you can have one hole, two holes, three holes, four holes or all 5 holes open. Of course the single hole is most suited for MTL while using the series of holes is more for a RDL but nothings set in stone as i have been surprised by some MTL draws i have had using one or two holes open on the slot. If i had any criticism it does seem aesthetics played too much of a part in the two rows of airflow holes on the AFC as surely performance wise it would of made more sense with the row of holes being adjusted against the slot to either just be a row of equally sized holes or even a slot that can be opened or closed down but it wouldn't have had the same symmetrical look!
Looking inside the chamber we have a double ceiling with the lower one being constructed from peek! On the deck next to each post we have towering tubes and again when looking inside the chamber at the lower ceiling we have 2 holes one for each of the tubes to slot into before the chamber can be screwed onto the deck.


The air comes through the AFC into the cavity between the chamber ceilings, it then travels down the tubes and underneath the deck, then up through the bottom outlet on the deck which will either have a 3.7mm bore or one of the airflow inserts installed!
___________________________________________________________________
The Deck And Build!
I have already covered the airflow inserts and tall tubes which takes the air from the top inlets down to underneath the deck, just to mention if you intend to use an insert you do need to install it before doing your build as they can't be swapped over on the fly.
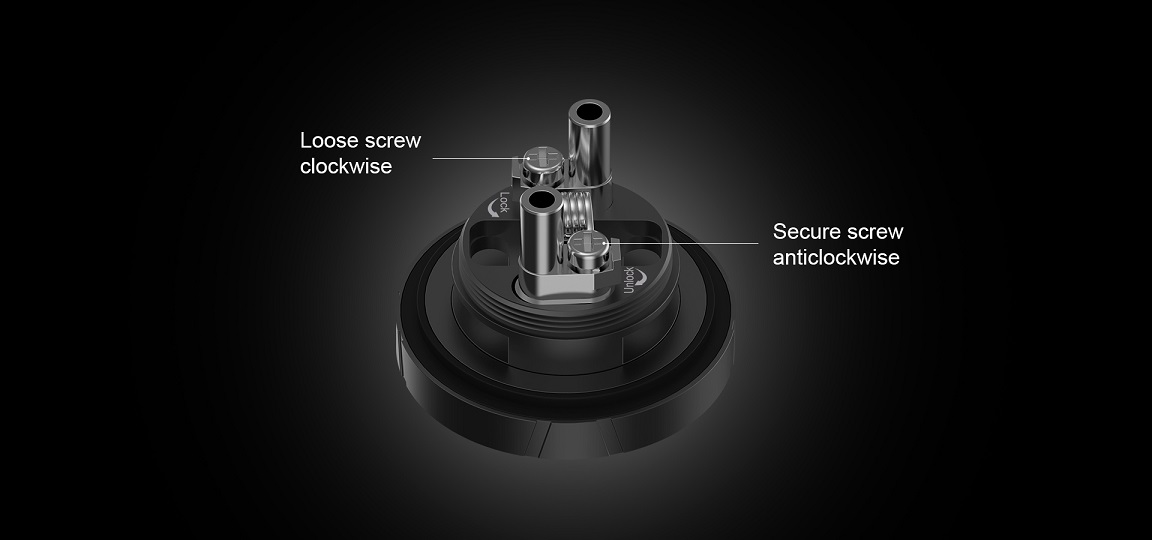
Next to each tube we have a post which are at the diagonal to each other, each post has a top philips screw head which also act as your clamps fixing your leads down in position. To the outside of each screw on the top of each post we have a lip which stops your lead popping out while securing in position. You need your legs facing in opposite directions but before going any further first it needs mentioning the screws are reversed threaded so to tighten and loosen you turn them in the opposite direction to what you naturally would do normally. It does have arrows and the words "Lock" and "unlock" printed on the deck and i was also well aware of the reverse threading before even receiving the RTA but it's still like a "moth to a light bulb" and easier said than done to always remember to turn the screws the correct (or is it incorrect) way, whatever the reasoning a big con for me!
Apart from the screws being reversed threaded the build itself couldn't be much easier, just slip your leads under your screw heads next to the post lips and holding your coil over the airflow outlet fasten your screws down! You can then use a coiling rod or fit for purpose tool to improve the position of the coil and snip your access leads! Just pulse your coil giving it a strum to get rid of any hotspots then it's time for your wicking!
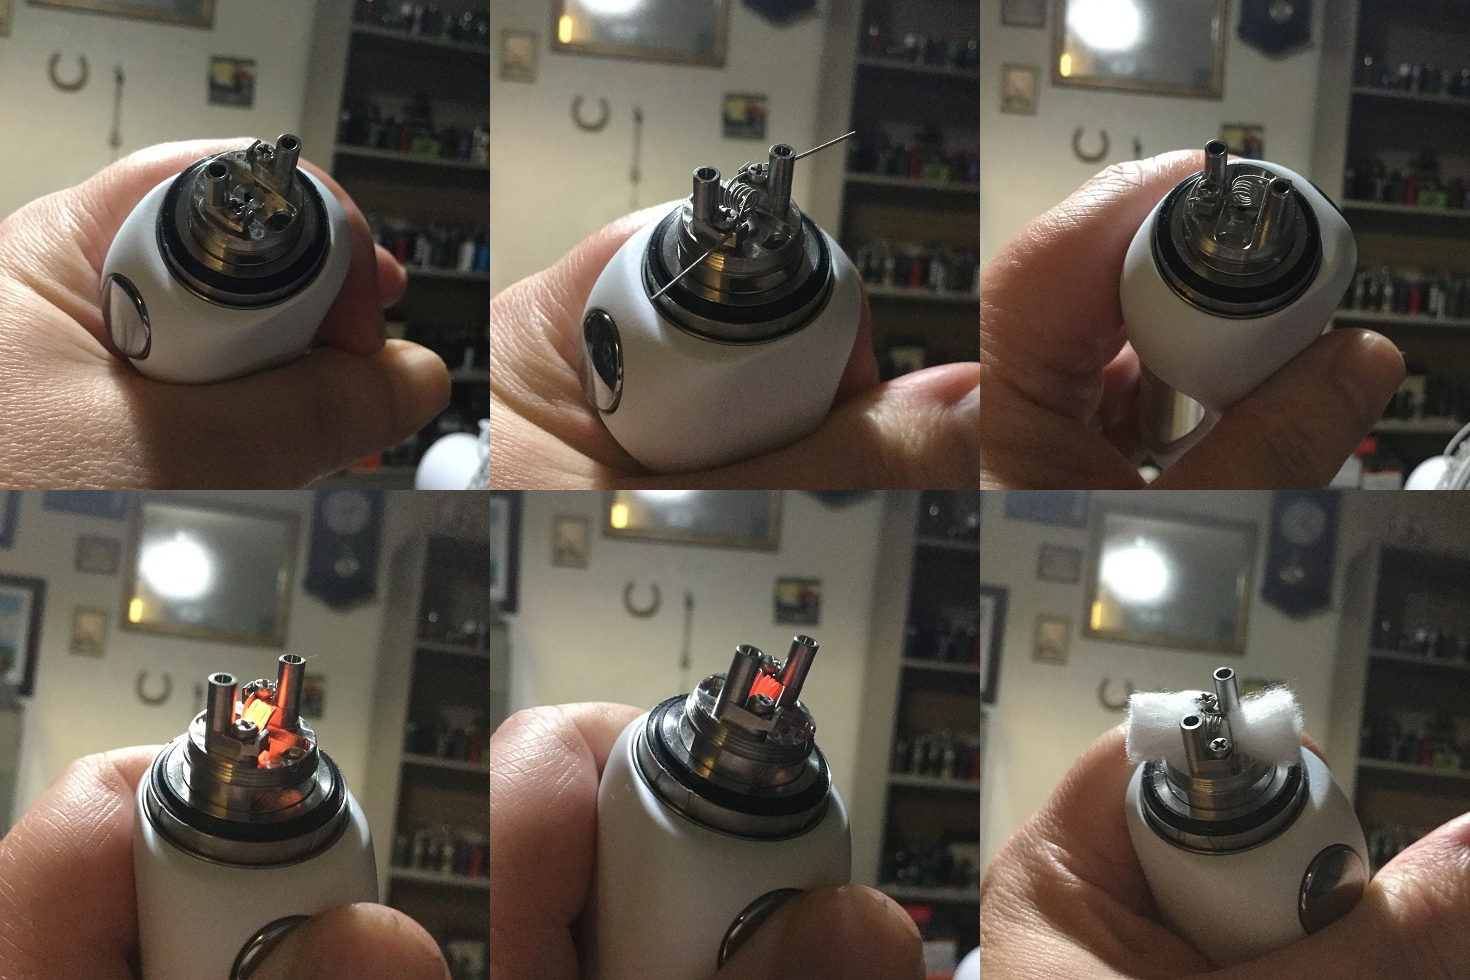
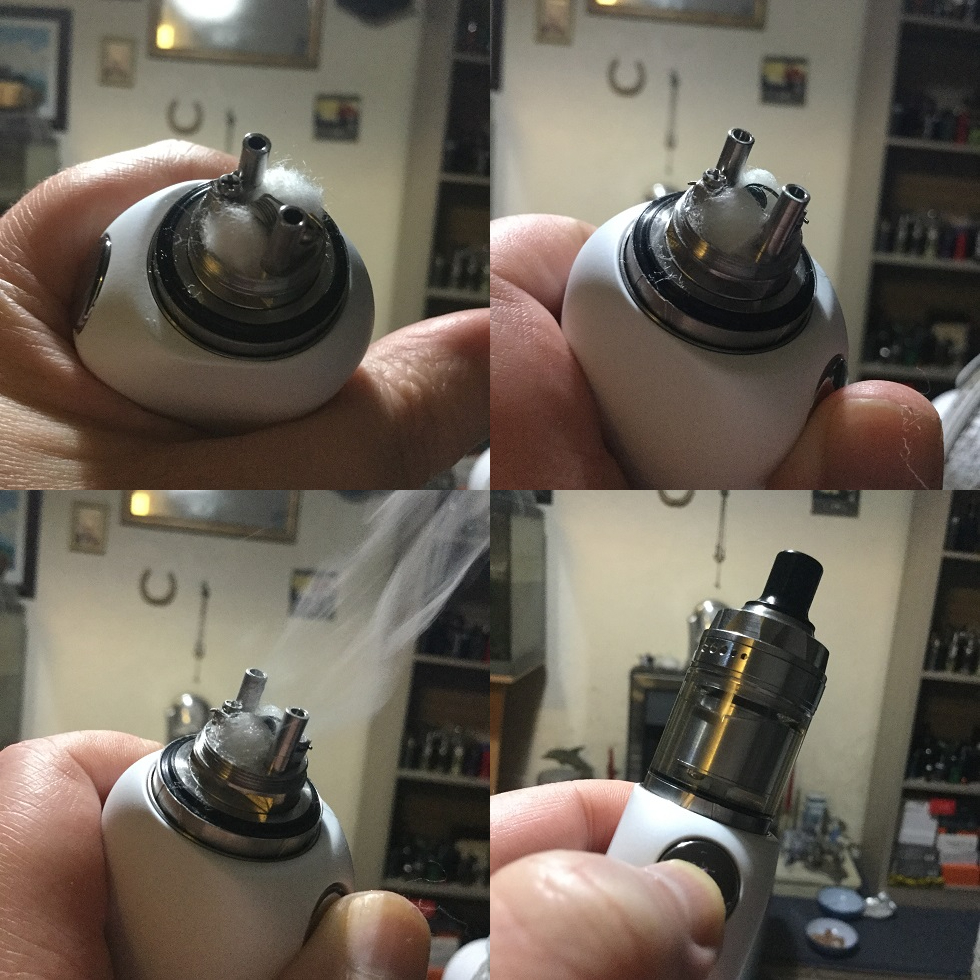
It's a GTA style deck so my cup of tea when it comes to wicking, simply cut your cotton ends bowtie style and poke down into the channels allowing gravity when the cotton gets saturated to do the rest. Just check your screws are still nice and tight remembering they are reversed threaded so you don't accidently loosen and prime the cotton before assembling the tank and filling!
___________________________________________________________________
How It Vapes? And Thoughts!
I will get my cons out of the way because although the INtake is a quality MTL RTA which also has the bonus of versatility it does have some cons in my opinion. The first is that drip tip which has an identity complex, i really wish a much narrower bore MTL drip tip was pre-installed and a second one suited for RDL was also included instead of the pre-installed half way house it comes with but at least it's a standard 510 fit so you can fit your own. Next is the reversed threaded post screws which even if they give any benefit (?) not worth the pain they bring!!
My only other cons relate to the inserts which are both fiddly to get screwed into position and obviously can't be swapped on the fly, i like the use of inserts but want them to be much easier to swap out. Anything else mentioned in this section which is negative is quite petty so not really cons but just things worth mentioning.
The INTake might not be a MTL RTA that offers a super tight draw but it goes tight enough to suit the vast majority of MTL vapers and gives a full range of draws which can be dialled in from tight through to loose using the inserts in collaboration with different single hole airflow control. I actually used the INtake with both the pre-installed 1.4mm insert and the smallest 1.0mm insert as well as using a 3.0ID Alien at 0.44ohms with no insert for a RDL vape!
The INtake isn't as quiet or silky smooth as let's say the Expro or Glaz Mini but it's smooth enough and certainly not over loud although it was slightly louder when using in RDL mode! The flavour is right up there giving any MTL offering a run for it's money and gives great flavour not just across the MTL board but also when using in RDL mode where i found it gave an equally impressive vape!
I do wonder if the series of holes used on the AFC for RDL would of made the RTA as quiet as in MTL mode if they were all 1.4mm instead of ascending sizes or even a slot instead of holes would of given even more versatility but that's all speculation!
All the threading and machining on the INtake is top notch and i love the bayonet fitting top-cap, finally 3.1ml capacity with the straight glass is good for a MTL tank and you also get the option of fitting the 4.6ml bubble glass which is huge in comparison to most MTL RTA's!

___________________________________________________________________
Likes
Very nice machining and Threading
Bayonet fitting top-cap
Generous fill ports
large capacity
Airflow Inserts
Adjustable AFC for both MTL & RDL
Tight to loose MTL draws plus RDL
Standard 510 drip tip fitting
Draw reasonably smooth
Draw reasonably quiet (a bit louder RDL)
Leak resistant top to bottom airflow design
Very easy build
Outstanding flavour (as good as any MTL RTA i have used)
Cons
Reversed threaded post screws
Half way house drip tip
Inserts a bit fiddly to get threading to catch
Inserts can't be swapped on the fly
I would once again like to thank Ella from Sourcemore for supplying the INtake MTL RTA for the purpose of this review, thanks for reading and stay safe!
https://www.sourcemore.com/augvape-intake-mtl-rta.html
$22.89 Augvape Intake MTL RTA
code:INMT
Disclaimer: I am not affiliated with Sourcemore or benefit in any way from the use of the above code but was asked if i would include it in my content!
___________________________________________________________________
https://www.sourcemore.com/augvape-intake-mtl-rta.html

Introduction
Augvape were founded in 2014 and from the off have been a manufacturer trying to think "outside the box" with many of their products. Augvape have also had a long term collaboration with Mike Vapes with their INtake series of Atomizers and here we have the latest, the INtake MTL RTA!
The INtake MTL RTA is a large capacity tank for MTL offering airflow control by utilising both airflow inserts and an adjustable airflow ring. The design offers an RDL option while not compromising it's MTL credentials and has a clever top to bottom airflow design. The leak resistant RTA has an easy to build single coil GTA style build deck (once getting your head around screws with reversed threading, booooo!!!), so let's see how it shapes up!
___________________________________________________________________
In The Box

Contents:
1 x Intake MTL RTA, 1.4mm air plug pre-installed
4 x Reverse thread screws
1 x Bubble Glass
2 x Clapton Coils
5 x O-rings
1 x User Manual
4 x Air plugs
1 x Warranty Card

___________________________________________________________________
Aesthetics
The INtake MTL RTA came in a simple cardboard box with outer cardboard sleeve and on opening everything included can be found in one layer. I received the Stainless Steel version, the options are Stainless Steel, Matte Gunmetal or Matte Black, so just the 3 options.
We have a narrow metal base section and much more substantial metal on show up top with a stepped top-cap with knurled designed and underneath the AFC ring. The INtake is very substantial for a MTL RTA with main aesthetic features as well as the knurled design being the two sets of descending airflow holes on the AFC and "INtake MTL" in fancy font on the outside wall of the chamber.
Moving to the base we have etched branding and safety stamps and a nicely protruding Gold plated 510 positive pin! Up top we have a shapely Delrin drip tip with both a shape and bore which gives the impression its confused whether it's for MTL or RDL and finally all the threading and machining is well beyond it's price point, so far, so good!

___________________________________________________________________
INtake MTL RTA Specs and Features:
Size: (D)24 x 54.3mm
Capacity: 3.1ml/w straight glass & 4.6ml/w bubble glass
MTL clapton coils:
Resistance: 0.8+0.05
Kanthal+Ni80
Top to bottom air flow
Top refilling with leak proof design
6 different sizes of bottom air hole
Restricted DL vape airhole setup
MTL vape airhole setup
Thread: 510
Colours: Stainless Steel, Matte Gunmetal, Matte Black

___________________________________________________________________
What You Receive?
As well as the INtake MTL RTA with 3.1ml capacity straight glass and Delrin "Jack of all trades" drip tip you also receive a bubble glass with 4.6ml capacity. You receive the usual paperwork which includes a user manual which is barely an information leaflet and finally a bag of goodies.
In the bag of goodies we have spare O-rings, reversed threaded post screws and a spare fill seal. We also receive 4 of the 5 airflow inserts as the 1.4mm is pre-installed.

Finally we receive 2 MTL clapton coils, 0.8ohm +/- 0.05 Kanthal+Ni80 2.5ID! But no cotton included, alternative drip-tip or famous Blue Screwdriver (devastated)!

___________________________________________________________________
It's Various Parts!
Starting up top we have a Delrin drip tip which can just pass for a MTL vape but is also suitable for a RDL and basically i just don't like it and feel it's a poor effort to save money rather than including 2 drip-tips, one suitable for each style! Next we have my favourite type of top-cap incorporating a bayonet fitting so just a quarter turn and it's off and again a quarter turn clockwise to secure! Also the knurled design gives really good drip and the 2 fill ports are very generous, no issues whatsoever!

The base section unscrews which is the deck unscrewing from the chamber and the glass can just be dislodged simply from the top sealing O-ring, when the tank is screwed together the glass is also sealed by a bottom O-ring fitted to the base. As well as the straight glass, this can be swapped for the included 4.6ml bubble glass! This leaves the fill ports plate, chimney and chamber section with double sealing and top airflow inlet system, this is all one piece but the AFC is removable.


Finally the bottom central airflow outlet on the deck can have one of five different sized bore airflow inserts installed, or it can be used without but more about that in the next section!
___________________________________________________________________
Airflow Inserts
Although the amount of airflow entering the RTA is controlled via the AFC ring we have different inserts that can be screwed into the outlet on the deck which is positioned directly underneath where your coil will be positioned.
The inserts have different sized bores which include the pre-installed 1.4mm insert. Also included are airflow inserts with the following bores, 1.0mm, 1.2mm, 1.6mm and 1.8mm. Alternatively if you are after getting a RDL draw you can use the RTA with no insert installed giving the bottom airflow outlet a 3.7mm bore!
I do like RTA's that use a combination of airflow inserts and an airflow control ring to dial in the draw you are after but a couple of cons with the INtake which are not deal breakers as once you know which insert you prefer it no longer is an issue. Firstly the inserts can't be swapped on the fly and secondly even with no build they are very fiddly to get the threading to catch and do need a decent screwdriver!

___________________________________________________________________
The Airflow
The INtake has a top to bottom airflow design which sees air entering through the top inlet/inlets and travelling down tubes to the base before entering the deck up through the bottom airflow outlet.
The airflow control ring has two rows of airflow holes which go from 1.8mm down to 1.0mm, the rows are not quite side by side but unlike most dual airflow designs are not on opposite sides and that's because this isn't dual airflow as only one of the two rows is in operation at any one time.
When you remove the AFC the concept becomes clearer as underneath where one row will operate we have a single 1.8mm airflow hole and then for when the other row comes into play an airflow slot. Also we have a small tab to the inside of the ring and a rail on the main airflow section allowing the airflow control ring to be adjusted while also giving it stoppers!

Moving the AFC as far as it will go clockwise the 1.0mm hole is open and then we can turn counter clockwise to adjust to either the 1.2mm, 1.4mm, 1.6mm or 1.8mm single hole open. While you are using a single hole the row of holes that operate the slot are closed but if you then carry on turning the row starts opening against the slot so you can have one hole, two holes, three holes, four holes or all 5 holes open. Of course the single hole is most suited for MTL while using the series of holes is more for a RDL but nothings set in stone as i have been surprised by some MTL draws i have had using one or two holes open on the slot. If i had any criticism it does seem aesthetics played too much of a part in the two rows of airflow holes on the AFC as surely performance wise it would of made more sense with the row of holes being adjusted against the slot to either just be a row of equally sized holes or even a slot that can be opened or closed down but it wouldn't have had the same symmetrical look!
Looking inside the chamber we have a double ceiling with the lower one being constructed from peek! On the deck next to each post we have towering tubes and again when looking inside the chamber at the lower ceiling we have 2 holes one for each of the tubes to slot into before the chamber can be screwed onto the deck.


The air comes through the AFC into the cavity between the chamber ceilings, it then travels down the tubes and underneath the deck, then up through the bottom outlet on the deck which will either have a 3.7mm bore or one of the airflow inserts installed!
___________________________________________________________________
The Deck And Build!
I have already covered the airflow inserts and tall tubes which takes the air from the top inlets down to underneath the deck, just to mention if you intend to use an insert you do need to install it before doing your build as they can't be swapped over on the fly.
Next to each tube we have a post which are at the diagonal to each other, each post has a top philips screw head which also act as your clamps fixing your leads down in position. To the outside of each screw on the top of each post we have a lip which stops your lead popping out while securing in position. You need your legs facing in opposite directions but before going any further first it needs mentioning the screws are reversed threaded so to tighten and loosen you turn them in the opposite direction to what you naturally would do normally. It does have arrows and the words "Lock" and "unlock" printed on the deck and i was also well aware of the reverse threading before even receiving the RTA but it's still like a "moth to a light bulb" and easier said than done to always remember to turn the screws the correct (or is it incorrect) way, whatever the reasoning a big con for me!

Apart from the screws being reversed threaded the build itself couldn't be much easier, just slip your leads under your screw heads next to the post lips and holding your coil over the airflow outlet fasten your screws down! You can then use a coiling rod or fit for purpose tool to improve the position of the coil and snip your access leads! Just pulse your coil giving it a strum to get rid of any hotspots then it's time for your wicking!

It's a GTA style deck so my cup of tea when it comes to wicking, simply cut your cotton ends bowtie style and poke down into the channels allowing gravity when the cotton gets saturated to do the rest. Just check your screws are still nice and tight remembering they are reversed threaded so you don't accidently loosen and prime the cotton before assembling the tank and filling!

___________________________________________________________________
How It Vapes? And Thoughts!
I will get my cons out of the way because although the INtake is a quality MTL RTA which also has the bonus of versatility it does have some cons in my opinion. The first is that drip tip which has an identity complex, i really wish a much narrower bore MTL drip tip was pre-installed and a second one suited for RDL was also included instead of the pre-installed half way house it comes with but at least it's a standard 510 fit so you can fit your own. Next is the reversed threaded post screws which even if they give any benefit (?) not worth the pain they bring!!
My only other cons relate to the inserts which are both fiddly to get screwed into position and obviously can't be swapped on the fly, i like the use of inserts but want them to be much easier to swap out. Anything else mentioned in this section which is negative is quite petty so not really cons but just things worth mentioning.
The INTake might not be a MTL RTA that offers a super tight draw but it goes tight enough to suit the vast majority of MTL vapers and gives a full range of draws which can be dialled in from tight through to loose using the inserts in collaboration with different single hole airflow control. I actually used the INtake with both the pre-installed 1.4mm insert and the smallest 1.0mm insert as well as using a 3.0ID Alien at 0.44ohms with no insert for a RDL vape!
The INtake isn't as quiet or silky smooth as let's say the Expro or Glaz Mini but it's smooth enough and certainly not over loud although it was slightly louder when using in RDL mode! The flavour is right up there giving any MTL offering a run for it's money and gives great flavour not just across the MTL board but also when using in RDL mode where i found it gave an equally impressive vape!
I do wonder if the series of holes used on the AFC for RDL would of made the RTA as quiet as in MTL mode if they were all 1.4mm instead of ascending sizes or even a slot instead of holes would of given even more versatility but that's all speculation!
All the threading and machining on the INtake is top notch and i love the bayonet fitting top-cap, finally 3.1ml capacity with the straight glass is good for a MTL tank and you also get the option of fitting the 4.6ml bubble glass which is huge in comparison to most MTL RTA's!

___________________________________________________________________
Likes
Very nice machining and Threading
Bayonet fitting top-cap
Generous fill ports
large capacity
Airflow Inserts
Adjustable AFC for both MTL & RDL
Tight to loose MTL draws plus RDL
Standard 510 drip tip fitting
Draw reasonably smooth
Draw reasonably quiet (a bit louder RDL)
Leak resistant top to bottom airflow design
Very easy build
Outstanding flavour (as good as any MTL RTA i have used)
Cons
Reversed threaded post screws
Half way house drip tip
Inserts a bit fiddly to get threading to catch
Inserts can't be swapped on the fly
I would once again like to thank Ella from Sourcemore for supplying the INtake MTL RTA for the purpose of this review, thanks for reading and stay safe!
https://www.sourcemore.com/augvape-intake-mtl-rta.html
$22.89 Augvape Intake MTL RTA
code:INMT
Disclaimer: I am not affiliated with Sourcemore or benefit in any way from the use of the above code but was asked if i would include it in my content!
___________________________________________________________________
Last edited:
 the
the


