Awesomely creative, well done. Do you have a few vent holes in there I have to ask?
Navigation
Install the app
How to install the app on iOS
Follow along with the video below to see how to install our site as a web app on your home screen.

Note: this_feature_currently_requires_accessing_site_using_safari
More options
You are using an out of date browser. It may not display this or other websites correctly.
You should upgrade or use an alternative browser.
You should upgrade or use an alternative browser.
The R50 Mech
- Thread starter Dassie
- Start date

So, it being a very long time since the last pay day and still some way off till the next one.. I woke up and decided to see what I could build using only what I could find at my local hardware store (as you know the itch never really goes away). And this is the result:
View attachment 19511
It is all copper, brass(contact screw) and some wire (for the spring) . 22mm Copper pipe to be precise. With a few couplings. The bit on the right is the spring for the bottom firing mechanism, the contact screw, and the spring I made from some wire I had lying around.. Coil building experience coming in handy. It has a plastic bit that goes against the battery with the spring, the screw screws in from the bottom and there is a bastardised spring loaded bit I use for the positive contact.
View attachment 19512
View attachment 19517
As I couldn't find the very hard to find M7 0.5 tap for the 510 connection, the connection is a hole just big enough for the atty's thread to make contact. This is not enough to hold it though so I made the little turrets at the top for grip. Of course this introduces the limitation that it will only work for 22mm atties. All mine are so no problem. Tested it with an Atlantis, Orchid and Plume Veil. All sweet.
View attachment 19516
I then used the old blow torch to discolour her a bit and I really like how she turned out. All steampunky. I dubbed her the Finite (cause she only works on 22s) SW22 (that's what it says on the pipe I used).
As for performance. It easily kicks the Magneto' ass! And I really like the magneto
All said, R50.
@Dassie i am not a big pipe mod fan but there is just something in this one that calls to the inner diesel mech
It really looks amazing mate @Andre, I ran out of day yesterday but was too excited when the thing worked to not say something, but yes, you are right of course, still needs a few holes. Will do that todayAwesomely creative, well done. Do you have a few vent holes in there I have to ask?
Thanks! Yeah I have a bit of a thing for the Mad Max type industrial looking stuff@Dassie i am not a big pipe mod fan but there is just something in this one that calls to the inner diesel mech
.Yea the industrial look works for me as wellThanks! Yeah I have a bit of a thing for the Mad Max type industrial looking stuff
Ok. For those that are interested in trying something like this, a little step by step (apologies that not every step is here but this is done in retrospect and some of the bits are stuck together now..).
It starts with a 22mm copper pipe (the plumbing type). A battery (18650) fits nicely but not too snug. Also, I used a few 22mm couplings. The little castle at the top is one of these. I grinded about 3/4 of it off and then shaped the turrets, also with a grinder. I had a heavy duty switch lying around and grinded that open to get the spring loaded copper pin out. It was housed in a 22mm disk which I had to file down carefully till it could be squeezed into the top. It rests quite nicely on the middle bit of the coupling which is slightly indented.

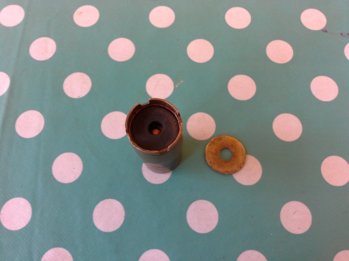
The rubber washer to the right is a 22mm washer which I "cut" to size using a piece of the pipe and a hammer:

One of these washers went in the top, over the spring loaded pin disk, like so:

The purpose of this is to give the auto's something to bite into. Works a charm. Next thing was the copper disk on top to provide the negative contact. In the absence of the right tap (soon to be remedied by @Gazzacpt 's generosity, ta again) the hole is just big enough for contact but so it doesn't hurt the threads on the atty' s bit. The copper disk is the bottom bit of a copper end cap that I grinded down till it fit snug.

The other washer goes in the bottom. As you can see, the brass contact in the bottom goes through the bottom cap, also an end cap and then I just tightened it with a nut. The brass bolt goes through the washer and gets another nut on the other side. This keeps it from falling out! And allows free movement which is also important. Might also mention that I cut the bottom washer to be very slightly off centre. This allows me to turn the bottom cap for a bit of a lock. So in one position it moves freely through the hole and in another there is enough friction to hinder firing.
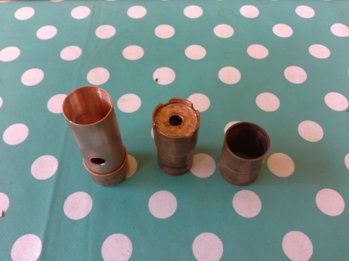
I made some rather big holes for battery vents which we all hope never happens but I also don't want a homemade grenade in my mouth. In retrospect I would have made them slightly smaller or put them through a collar (something I will do tomorrow) because the pipe is really quite thin and it makes the big holes (which I like as a part of my industrial theme) look a little unfinished.

So these are the finished bits which was then heated with a blowtorch and cooled in the pool a few times.
Just a last explanation. The mechanism works a little different from my other mods in that it actually pushes the battery up to make contact with the positive. I like the way it turned out for two reasons: it was easy to do and it gives me a very small firing action (bottom hardly moves) while being strong enough to stand easily without firing. It also doesn't fire accidentally. The action is deliberate.

And that was that. Apologies if I was a little light on details. It was fun and I will be doing more. Also, please excuse the polkadot background. I was not involved in selecting that..
Last thing - i haven't put this thing down since yesterday. She is a beast
It starts with a 22mm copper pipe (the plumbing type). A battery (18650) fits nicely but not too snug. Also, I used a few 22mm couplings. The little castle at the top is one of these. I grinded about 3/4 of it off and then shaped the turrets, also with a grinder. I had a heavy duty switch lying around and grinded that open to get the spring loaded copper pin out. It was housed in a 22mm disk which I had to file down carefully till it could be squeezed into the top. It rests quite nicely on the middle bit of the coupling which is slightly indented.
The rubber washer to the right is a 22mm washer which I "cut" to size using a piece of the pipe and a hammer:
One of these washers went in the top, over the spring loaded pin disk, like so:
The purpose of this is to give the auto's something to bite into. Works a charm. Next thing was the copper disk on top to provide the negative contact. In the absence of the right tap (soon to be remedied by @Gazzacpt 's generosity, ta again) the hole is just big enough for contact but so it doesn't hurt the threads on the atty' s bit. The copper disk is the bottom bit of a copper end cap that I grinded down till it fit snug.
The other washer goes in the bottom. As you can see, the brass contact in the bottom goes through the bottom cap, also an end cap and then I just tightened it with a nut. The brass bolt goes through the washer and gets another nut on the other side. This keeps it from falling out! And allows free movement which is also important. Might also mention that I cut the bottom washer to be very slightly off centre. This allows me to turn the bottom cap for a bit of a lock. So in one position it moves freely through the hole and in another there is enough friction to hinder firing.
I made some rather big holes for battery vents which we all hope never happens but I also don't want a homemade grenade in my mouth
. In retrospect I would have made them slightly smaller or put them through a collar (something I will do tomorrow) because the pipe is really quite thin and it makes the big holes (which I like as a part of my industrial theme) look a little unfinished.So these are the finished bits which was then heated with a blowtorch and cooled in the pool a few times.
Just a last explanation. The mechanism works a little different from my other mods in that it actually pushes the battery up to make contact with the positive. I like the way it turned out for two reasons: it was easy to do and it gives me a very small firing action (bottom hardly moves) while being strong enough to stand easily without firing. It also doesn't fire accidentally. The action is deliberate.
And that was that. Apologies if I was a little light on details. It was fun
and I will be doing more. Also, please excuse the polkadot background. I was not involved in selecting that..Last thing - i haven't put this thing down since yesterday. She is a beast
Attachments

Last edited:


Thanks. Always think that if you're going to do something, make it multi functional
Thanks. Really fun project. And a few lessons learned..beauty @Dassie somethign to be proud of
Im sure yes. And i can only imagine the satisfaction of vaping off your own creation..Thanks. Really fun project. And a few lessons learned..
You know what? It just tastes betterIm sure yes. And i can only imagine the satisfaction of vaping off your own creation..
Now for that double barrel jobby we discussed!Dude, how impressive is that.
We have a new mech builder in da house.
50 buck well spent looks pretty neat.
Yeah, it was worth a try50 buck well spent looks pretty neat.


Similar threads
- Replies
- 5
- Views
- 712
- Replies
- 7
- Views
- 558
- Replies
- 5
- Views
- 1K
