After purchasing this RTA and after 1 week of use, the dreaded leaking issue began. Like most users, I tried different wicking methods, moving the coils away from the center and tightening the 510 gold plated screw. The leak persisted no matter what I did. Leaving the tank on mean't risking a mod covered in juice during the course of a day.
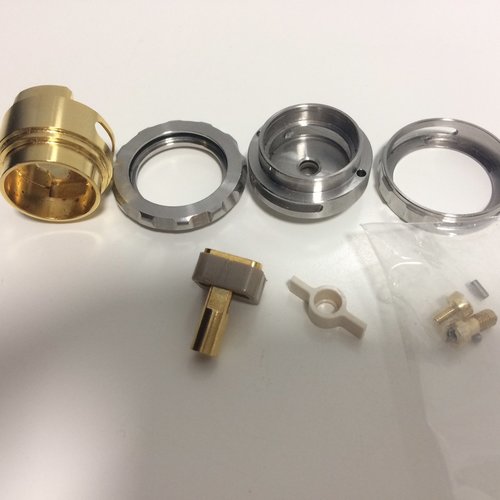
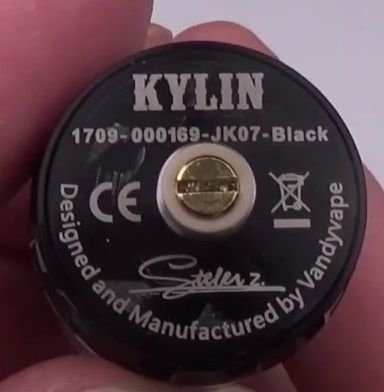
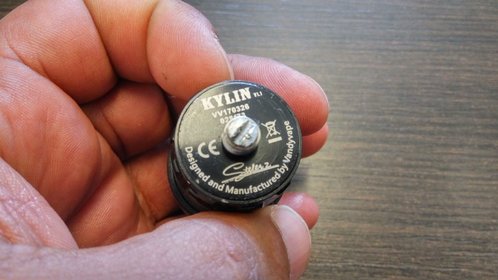
Tightening the screw was the worst mistake ever. The darn thing snapped. The particular version of the Kylin which I have had 2 screws on the 510 assembly. The inner screw holds the positive pin assembly whilst the surface screw makes contact with the 510 mod. Now the RTA was completely unusable.
Mmmm, I thought that this could still be fixed. I removed the entire gold plated screw completely which now could no longer be salvaged. Searched through my junk box and could not find a suitable screw. So I decided just to make one to fit the Kylin.
Fortunately, the threading on the Kylin 510 is based on metric measurements. I used a 3mm diameter cheese head screw. Did a test fit and it worked out okay with the exception of the length.
Check out this youtube vid on how to cut the screw easily to the required length using a cheap wire stripper crimping tool:
Basically, I measured the total length of the original 510 2pc screw assembly and trimmed the replacement screw accordingly. To prevent any leaking from the 510 screw connection, I used heat shrink to cover the screw with just 2 threads being visible to easily fit onto the positive post. I also used a spare o-ring which I had lying around in my junk box for extra protection against any leaks from the 510 pin.
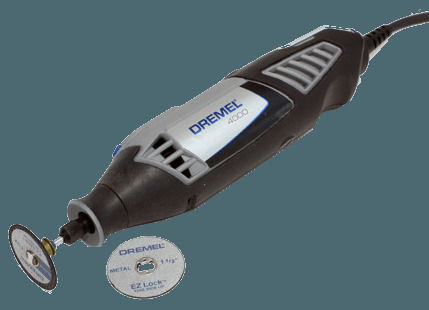
Ok, with this being done, now came the challenge. Getting the tank to fit onto a mod was a problem due to the screw head thickness. I used a dremel tool and a cutting/grinding attachment to flatten the screw head down a bit.
It took some trial and error to get the fit right. I had to grind down the screw, remove it then do a test fit until I found the best height of the screw. After this process, I used the dremel tool once again to physically cut a slot on the head for a flat screwdriver.
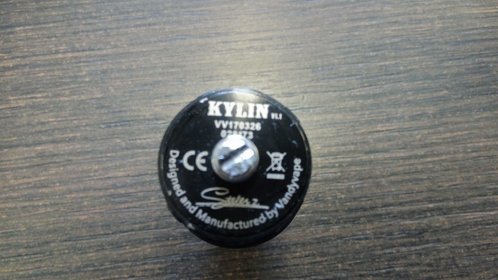
Some advice, try and use a brass screw if you have one lying around. The steel screw I have works fine though but I am sure the brass type would have better conductivity and will be more resistant to abuse. Now I have a usable RTA once again!
Only thing left now to do is fix the Kylin leaking issue.
PS: I might have a fix for the leaking issue. I am running some tests to make sure the leak is permanently sorted out. Watch this space...details and pics will follow soon!
Tightening the screw was the worst mistake ever. The darn thing snapped. The particular version of the Kylin which I have had 2 screws on the 510 assembly. The inner screw holds the positive pin assembly whilst the surface screw makes contact with the 510 mod. Now the RTA was completely unusable.
Mmmm, I thought that this could still be fixed. I removed the entire gold plated screw completely which now could no longer be salvaged. Searched through my junk box and could not find a suitable screw. So I decided just to make one to fit the Kylin.
Fortunately, the threading on the Kylin 510 is based on metric measurements. I used a 3mm diameter cheese head screw. Did a test fit and it worked out okay with the exception of the length.
Check out this youtube vid on how to cut the screw easily to the required length using a cheap wire stripper crimping tool:
Basically, I measured the total length of the original 510 2pc screw assembly and trimmed the replacement screw accordingly. To prevent any leaking from the 510 screw connection, I used heat shrink to cover the screw with just 2 threads being visible to easily fit onto the positive post. I also used a spare o-ring which I had lying around in my junk box for extra protection against any leaks from the 510 pin.
Ok, with this being done, now came the challenge. Getting the tank to fit onto a mod was a problem due to the screw head thickness. I used a dremel tool and a cutting/grinding attachment to flatten the screw head down a bit.
It took some trial and error to get the fit right. I had to grind down the screw, remove it then do a test fit until I found the best height of the screw. After this process, I used the dremel tool once again to physically cut a slot on the head for a flat screwdriver.
Some advice, try and use a brass screw if you have one lying around. The steel screw I have works fine though but I am sure the brass type would have better conductivity and will be more resistant to abuse. Now I have a usable RTA once again!
Only thing left now to do is fix the Kylin leaking issue.
PS: I might have a fix for the leaking issue. I am running some tests to make sure the leak is permanently sorted out. Watch this space...details and pics will follow soon!


")