Navigation
Install the app
How to install the app on iOS
Follow along with the video below to see how to install our site as a web app on your home screen.

Note: this_feature_currently_requires_accessing_site_using_safari
More options
You are using an out of date browser. It may not display this or other websites correctly.
You should upgrade or use an alternative browser.
You should upgrade or use an alternative browser.
Flat Top Reo Grand
- Thread starter Genosmate
- Start date
Now that is something different. Awesome job!Here is what I'll go with for the door I think
View attachment 24976
Sent from my iPhone using Tapatalk
Stunning - what did you do?Here is what I'll go with for the door I think
View attachment 24976
Hi AndreStunning - what did you do?
I'm a big fan of the Patina work that @Necris does and I sent him by PM a photo of a door I'd seen.
He told me that the process involves applying Alcohol Ink and using a top coat to finish it.
Then @Rob Fisher sent me a link to using Alcohol Ink and setting fire to it.
I just played around with applying the ink and setting fire to it at various stages.Finally came up with a mixture of techniques to get something like I was looking for.
Finishing is a problem as it seems that anything solvent based just wipes off the ink (I've been playing with CA glue and it will not work for this) so I used some liquid plastic (which I was sure would contain some solvent) and it seems to work.
Heres what I got so far,not 100% happy but I like it nonetheless.
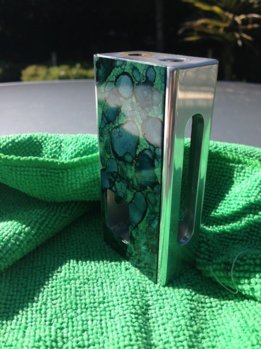
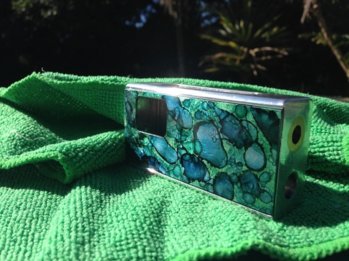
Absolutely beautiful.stunning
Hi Andre
I'm a big fan of the Patina work that @Necris does and I sent him by PM a photo of a door I'd seen.
He told me that the process involves applying Alcohol Ink and using a top coat to finish it.
Then @Rob Fisher sent me a link to using Alcohol Ink and setting fire to it.
I just played around with applying the ink and setting fire to it at various stages.Finally came up with a mixture of techniques to get something like I was looking for.
Finishing is a problem as it seems that anything solvent based just wipes off the ink (I've been playing with CA glue and it will not work for this) so I used some liquid plastic (which I was sure would contain some solvent) and it seems to work.
Heres what I got so far,not 100% happy but I like it nonetheless.
View attachment 25109 View attachment 25110
Absolutely stunning!!!
Send while vaping on the Reo mini Thor
Managed to get this finished at last (maybe a final polish),because there is no 510 connector the pin in the atty has been modified but all the existing Reo firing mechanism is retained.It squonks really easy with no leaks.
I'd like to build vertical coils with ceramic wick but no matter how much I try or how much I follow @Andre instructions I just can't! So the Dremel master gave me the advice on a micro coil and his beloved Rayon and thats whats in the Odin.
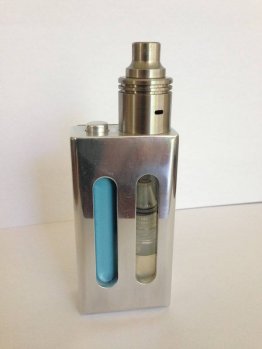
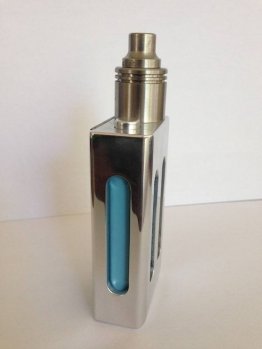
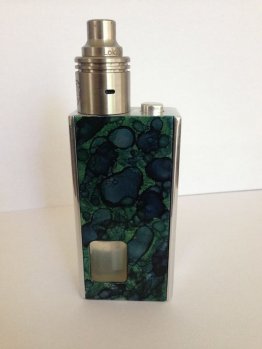
I'd like to build vertical coils with ceramic wick but no matter how much I try or how much I follow @Andre instructions I just can't! So the Dremel master gave me the advice on a micro coil and his beloved Rayon and thats whats in the Odin.


Managed to get this finished at last (maybe a final polish),because there is no 510 connector the pin in the atty has been modified but all the existing Reo firing mechanism is retained.It squonks really easy with no leaks.
I'd like to build vertical coils with ceramic wick but no matter how much I try or how much I follow @Andre instructions I just can't! So the Dremel master gave me the advice on a micro coil and his beloved Rayon and thats whats in the Odin.
View attachment 26303 View attachment 26305 View attachment 26306
Now that is a sweet ride @Genosmate! Beautiful John! Simply awesome and once again a one of a kind!
It looks stunning @Genosmate!
Amazing work there @GenosmateManaged to get this finished at last (maybe a final polish),because there is no 510 connector the pin in the atty has been modified but all the existing Reo firing mechanism is retained.It squonks really easy with no leaks.
I'd like to build vertical coils with ceramic wick but no matter how much I try or how much I follow @Andre instructions I just can't! So the Dremel master gave me the advice on a micro coil and his beloved Rayon and thats whats in the Odin.
View attachment 26303 View attachment 26305 View attachment 26306
Awesome stuff dude. Is there going to be a "how to" sometime? 
I could try if you'd like,but don't expect it to be too technical because most of what I do is done by feel/eye as my lathe is Imperial and my Mill is metric so its a case of trial and errorAwesome stuff dude. Is there going to be a "how to" sometime?
Rough overview with tools used and things to watch out for is good enough 
Ok Here goes;Rough overview with tools used and things to watch out for is good enough
The Reo started out as a black wrinkled at some stage but the paint had been stripped from the outside.
First off I cut the new hole for the button with a 3/8 inch Slot Drill (I use a mix of Imperial and Metric because that what I have)then I drilled the 510 connector out because I didn't have a big enough Slot Drill (12mm),I used a much slower speed to drill it out than I would for milling,I think the older ones (what I had here) are brass.
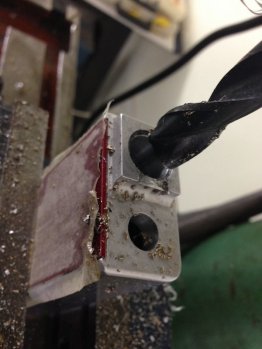
Next I milled of the 'Turret' using an End Mill,you could use a Fly Cutter or a Rose Cutter but theres no real need.
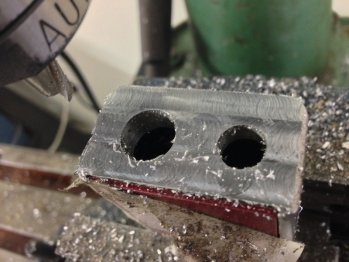
I played with an idea to mill pockets not slots but decided on slots,milled with a 3/8 inch slot drill
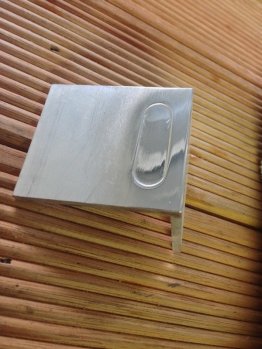
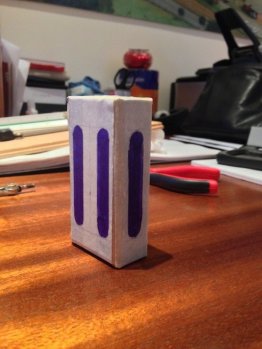
After its milled it just a load of hand finishing using wet sanding,keep the paper rinsed off well,start at about 120 grit and work all through the grits,I go to 2000 grit.Tape the wet/dry to a block and move the work over the paper as opposed to doing it free hand.
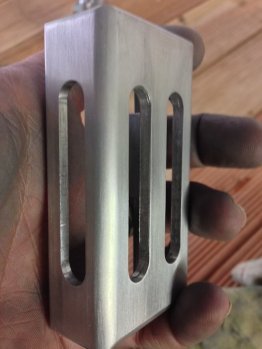
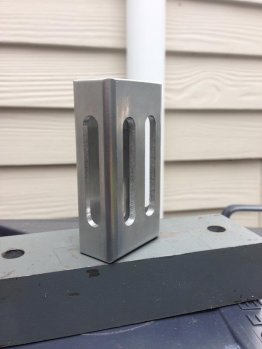
Next I polish,first on a hard sisal wheel with brown compound then a stitched mop with brown compound,then a loose mop fold mop with blue compound,then a loose fold with white compound and finally a loose fold with just Maizena.It's important to remove the compound residue before moving to another wheel,I use Maizena and a Micro Fibre cloth for this,

Last edited:
Part Two ;
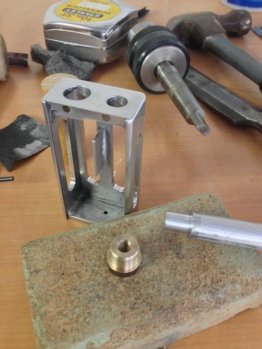
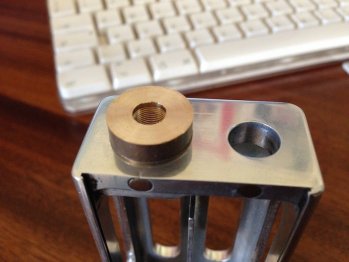
Next I machined a brass bush and threaded it,I don't have the knowledge to make this bush with press fit tolerances so I did the best I could,put the bush in the freezer overnight and the mod in the oven at 100 degrees C for and hour and pushed the bush into the mod using a Sash Clamp.Next I milled off the top of the bush so it was flush.
The button is turned from 12mm Aluminium Rod (polished as per the mod) and the insulator is from 10mm Delrin,theres a little 'knobbie' on the Derin which fits into a hole drilled in the bottom of the bush to help locate it,then its bonded and finished.
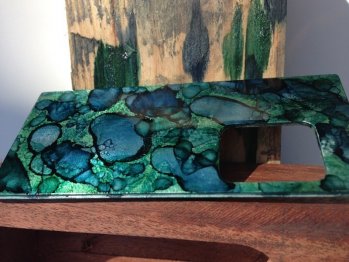
The door I finished with Alcohol Ink some of which is set alight immediately after applying.The finish is tricky because anything with a solvent simply takes the ink right off.I used a liquid plastic.
As there is no 510 connector,the atty's 510 pin has been replaced with a replica which protrudes 12mm from the bottom of the atty,I've slightly modified the Reo firing leaf so I can use it and the bottle squonks straight into the atty,no leaks and works very well.
I may well look at shaving my other Reo's but I'd like to maybe use a 510.
Any questions just ask
Next I machined a brass bush and threaded it,I don't have the knowledge to make this bush with press fit tolerances so I did the best I could,put the bush in the freezer overnight and the mod in the oven at 100 degrees C for and hour and pushed the bush into the mod using a Sash Clamp.Next I milled off the top of the bush so it was flush.


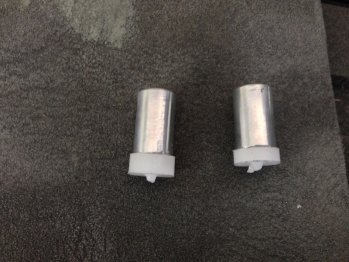
The button is turned from 12mm Aluminium Rod (polished as per the mod) and the insulator is from 10mm Delrin,theres a little 'knobbie' on the Derin which fits into a hole drilled in the bottom of the bush to help locate it,then its bonded and finished.

The door I finished with Alcohol Ink some of which is set alight immediately after applying.The finish is tricky because anything with a solvent simply takes the ink right off.I used a liquid plastic.

As there is no 510 connector,the atty's 510 pin has been replaced with a replica which protrudes 12mm from the bottom of the atty,I've slightly modified the Reo firing leaf so I can use it and the bottle squonks straight into the atty,no leaks and works very well.
I may well look at shaving my other Reo's but I'd like to maybe use a 510.
Any questions just ask
Wow!!! Truly amazing work!!! Well done!!Part Two ;
Next I machined a brass bush and threaded it,I don't have the knowledge to make this bush with press fit tolerances so I did the best I could,put the bush in the freezer overnight and the mod in the oven at 100 degrees C for and hour and pushed the bush into the mod using a Sash Clamp.Next I milled off the top of the bush so it was flush.
View attachment 26326 View attachment 26327
The button is turned from 12mm Aluminium Rod (polished as per the mod) and the insulator is from 10mm Delrin,theres a little 'knobbie' on the Derin which fits into a hole drilled in the bottom of the bush to help locate it,then its bonded and finished.
View attachment 26328
The door I finished with Alcohol Ink some of which is set alight immediately after applying.The finish is tricky because anything with a solvent simply takes the ink right off.I used a liquid plastic.
View attachment 26329
As there is no 510 connector,the atty's 510 pin has been replaced with a replica which protrudes 12mm from the bottom of the atty,I've slightly modified the Reo firing leaf so I can use it and the bottle squonks straight into the atty,no leaks and works very well.
I may well look at shaving my other Reo's but I'd like to maybe use a 510.
Any questions just ask
Amazing, thanks for the blow by blow. Loads of work that went into your masterpiece.
Wow @Genosmate
Amazing
Cant believe how much effort you have put in
Must make for a very satisfying unique feeling when you vape on her
Amazing
Cant believe how much effort you have put in
Must make for a very satisfying unique feeling when you vape on her
I really loved reading this thread, thanks for the pictures and the detailed description @Genosmate.
Message sent via tapatalk
Message sent via tapatalk
Thanks @Silver ,yes it nice when things work out how you want them.I would love the vape on this mod even more if I could just come right with the coiling and ceramic wick.Wow @Genosmate
Amazing
Cant believe how much effort you have put in
Must make for a very satisfying unique feeling when you vape on her
Thanks Johan.Oh and I was using the English "Knobbie"
Thanks Johan.Oh and I was using the English "Knobbie"
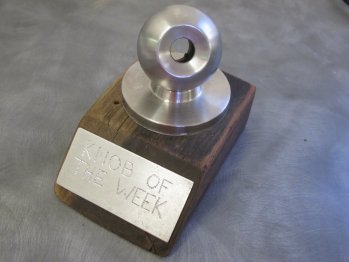
For that you must get this award then
I dodn't say that I could sppel!For that you must get this award thenPS: just one lesson in English; its "knobby" not "knobbie"
First a Reo Badge then a DIY award and now this,I wonder what I'll get awarded next
Similar threads
- Replies
- 3
- Views
- 439
- Replies
- 0
- Views
- 285
- Replies
- 0
- Views
- 1K
- Replies
- 3
- Views
- 2K


