
@John, I have one of those 220v cabinet fans, how would you regulate the speed though?
some kind of 220 volt POT or else a voltage converter and POT?
Follow along with the video below to see how to install our site as a web app on your home screen.

Note: this_feature_currently_requires_accessing_site_using_safari
@John, I have one of those 220v cabinet fans, how would you regulate the speed though?
simple rheostat/potentiometer should do it.
cheap n nasty im sure u could get away with a 220v light dimmer.
not sure if the fans will be happy with reducing voltage though

Very cool thanks for this. Anyone know where to get a stir bar?Build Your Own Stir Plate
Author: Forrest Whitesides Issue: Jul/Aug 2007
A stir plate will keep your yeast in suspension while you are raising them in your yeast starter . . . and we've got instructions on how to make two different stir plates, one from old computer parts you may have lying around.
If you ask experienced brewers for advice on improving your beer, one of the things they are most likely to say is, “Make a yeast starter!” There are a ton of good reasons to make a yeast starter and a good guide for getting started can be found in the March-April 2002 issue of Brew Your Own. One easy way to improve your yeast starter is to use a magnetic stir plate and stir bar during the fermentation of your starter. A constantly-stirred yeast starter will yield a higher cell count than an unstirred starter. Commercially available stir plates start out at about $80 for a small unit and go up from there. But, with a little ingenuity and some spare parts, you can make one yourself for much less.
Project Overview
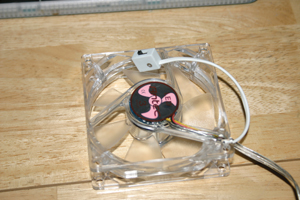
The heart of the project is a strong neodymium magnet (more commonly known as a rare earth magnet) affixed to an 80mm 12-volt DC fan typically used in desktop computers. You’ll also need some type of power supply, which will depend on which type of enclosure you choose, some nuts and bolts and washers and a suitable enclosure to house the whole project. For this article, two enclosure options are demonstrated: a wooden cigar box and an old external hard drive case.
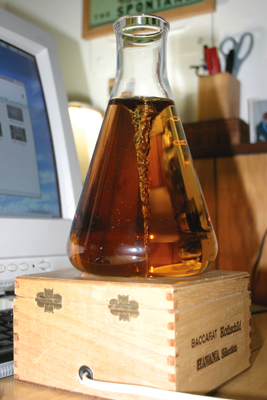
Keep in mind that you’ll also need a flask and a magnetic stir bar in order to use your new stir plate.
Choosing a Fan
An inexpensive PC case fan from your local electronics retailer will work just fine, as will any case fan you can pull out of any old PC that might be sitting around your house. Garage sales are an excellent source for old PCs, and one PC will provide you with multiple fans and a hard drive from which you can pull a great magnet for use in this project.
Any 12-volt DC fan will work, but some offer more features than others. Radio Shack, for instance, sells a barebones fan with just a lead wire and ground wire. This type of configuration is very easy to work with, but offers no rotational speed control. On the other end of the spectrum, computer parts maker Antec offers a nice case fan with an integrated three-speed selector switch, giving you a no-fuss method of controlling the rotational speed. It also has built-in colored LED lights, which doesn’t help your yeast, but does look cool. The Antec fans are available at major electronics retailers, like CompUSA or Best Buy, and also are available from online vendors like New Egg.
Of course, you can always wire in a potentiometer for fine-grained control of the more simple fans, or you can use a multi-voltage power supply.
The two stir plates described in this project use 80mm fans and are ideal for 1-L flasks. If you plan to use a 2-L or larger flask for your starters, consider using a 92mm fan and a larger enclosure, although 80mm will still work. The same project instructions apply, regardless of the size of the fan.
Although a strong magnet, a 12-volt DC motor (a fan, in this case) and a power supply are all critical to making a suitable stir plate, the options for enclosures are limited only by your imagination. Feel free to use this article as merely a starting point for creating your own design.
Power Supply
If you plan on building your stir plate in an external hard drive enclosure, skip this section, as the power supply is integrated into the case.
For those of you aiming for an old-school wooden look, you will need to power your fan with a 12-volt wall-adapter type power supply. You may very well already have one or more of these devices around the house as they are common sources of power for small electronic devices. A 9-volt power supply will also work, although it will make the fan spin slower than a 12-volt adapter.
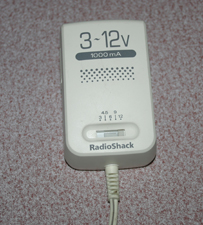
You can also use a multi-voltage power supply sold as a universal model to power many types of devices. These cost a bit more, but they allow for stepped control of fan rotation speed via selectable output voltage.
Whatever model you choose, you’ll need to cut off the round adapter plug (the end that plugs into an electronic device) and strip back the wire an inch or so in preparation for splicing it to the fan’s lead and ground wires.
Sourcing Magnets
There are many places you can get an appropriate magnet for this project, including taking them from old or broken hard drives or ordering them from scientific supply shops.
To remove a magnet from a hard drive, you will likely need a size T8 Torx screwdriver, a Philips-head screwdriver, a flathead screwdriver and a pair of needlenose pliers. Use the Torx screwdriver to remove the screws around the edges of the cover plate. A center screw is often covered with a sticker. Pry the case open with the flathead screwdriver to expose the platter and accuator arm. The magnet is located on the arm, often held in place with Philips screws. Hard drives don’t all look the same inside, so you may have to improvise a bit to find and extract your magnet.
Preparing the Fan
No matter which enclosure you use, preparing the fan for use as a stir plate motor is the same. Center the magnet on the fan’s hub (the central round surface to which the fan blades are attached). The magnet will be attracted to the metal coils inside the fan housing, which will hold it in place temporarily.
Holding the fan in your hand, give it a spin with your finger to check how well the magnet is balanced. If you feel some wobble, adjust the position of the magnet on the hub. When you have the magnet positioned properly, mark the edges with a felt pen and remove the magnet.
Now apply a small amount of multi-surface adhesive — I recommend Gorilla Glue — to the fan hub and reposition the magnet as marked. Allow the glue to dry as per the manufacturer’s instructions, usually 12 to 24 hours, before installing it in your enclosure.
Balance is Critical
The balance of the stir plate is very important. One of the advantages of using common PC case fans, however, is that they have relatively low torque. Your stir plate may wobble a fair bit with nothing on top of it (especially a light-weight cigar box), but test it with a full flask before you start worrying. Consider that the liquid in a full 1-L flask weighs 1.0 kg (2.2 lbs.) and a 2-L flask would be, obviously, double that (plus the weight of the flask itself). In my tests, a two thirds full 1-L flask is sufficient to dampen all vibration and wobbling.
Also, because of the weight of the case and integrated power supply, external hard drive cases tend to have less problems with a poorly-balanced fan and magnet. If you want to use a cigar box, getting the fan balanced is the most important step in the whole project. The cigar box model I built vibrates quite a bit with no load, but with a 1-L starter on top, it didn’t move a single millimeter over an 18-hour period of constant use.
Wooden Enclosure
Parts List
Wooden cigar box (or equivalent)
80mm 12-volt DC fan
12-volt AC/DC wall adapter
Rare earth magnet
#6-32 x 2” machine screws
#6-32 machine screw nuts
#6 metal washers
1⁄4” flat neoprene washers
1⁄4” inside-diameter rubber grommet
Plastic wire connectors
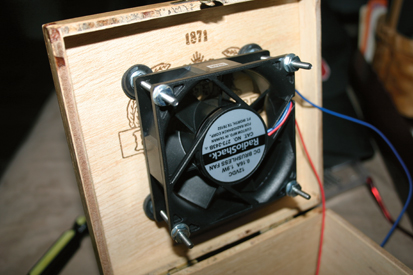
Wood is classy looking, and there are some very nice readily available enclosures at your local smoke shop: cigar boxes! Many shops sell them for a few dollars each and some give them away. Not only are they cheap, but cigar boxes are very strong and, more importantly, very thin, which allows the full power of the magnet to be used. Once you’ve got your boxed picked out, it’s time to drill some holes. (Note: For the cigar box stir plate, I used a simple fan from Radio Shack.)
Line up your fan flat in the center of the top of the cigar box lid and use a felt-tip pen to mark a dot for each of the four holes in the fan casing. If you can’t find a pen small enough to get through the hole, you can also ink the end of a cotton swab and use that to make the four dots. Now drill four 13⁄64” holes on the dots. Since the sheet metal screws have a tapered head, countersink the four holes with a 7⁄32” bit to allow the screws to sit perfectly flush in the lid. Also drill a 1⁄4” hole near the bottom of the rear panel and fit the hole with a rubber grommet. You may also want to drill some holes in the enclosure to allow the motor to have some fresh air, so that the mechanical heat from the fan motor can be dissipated.
Open the lid, fit four screws through the holes and put a neoprene washer (to help with vibration dampening) and then a metal washer over each screw. Guide the four holes in the fan casing onto the screws and push the fan flush against the washers. Give the blades a spin with your finger to make sure the magnet clears the lid and the fan can spin freely. If it does not spin freely, remove the fan from the screws and add additional washers to put more space between the lid and the fan. Add a final metal washer after the fan and finish off with a nut for each screw.
Make sure that the power supply is unplugged before proceeding. Now pull the wires of the power supply through the grommeted hole in the back of the cigar box. Use a pair of wire connectors to splice together the two lead wires and two ground wires. (You can use a voltmeter to differentiate lead from ground, or you can just use trial and error). Plug the power supply into the wall to verify that the wiring is correct. As an additional touch, you can cut a piece of plexiglass to fit the lid of the cigar box to protect the wood and electronics from liquids.
Crack open your favorite liquid yeast and get started with a starter on your new stir plate!
Hard Drive Case
Parts List
External hard drive case
80mm 12-volt DC fan
Rare earth magnet
#6-32 x 2” machine screws
#6-32 machine screw nuts
#6 metal washers
Plastic wire connectors (optional)
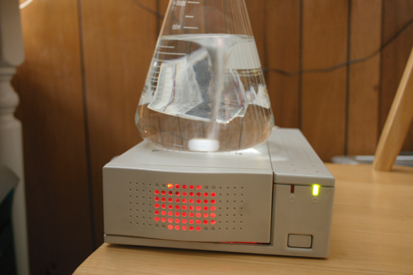
An external hard drive case makes an ideal starting point for a stir plate for several reasons. It has the appropriate power supply already built in, most fans connect to the power supply with a standard 4-pin connector (called a Molex connector) that just snaps in place and they generally have an off/on toggle switch built in. Some drive cases also have a small fan to expel heat from the case, a feature that will help keep your starter from fermenting too hot.
External hard drive cases are inexpensive (without a drive in them). Some models are available for less than $30 from major electronics retailers and online PC parts vendors. I got three older external cases (complete with broken drives) for free from a friend who works in the IT industry. For this project, I highly recommend a fan that has the standard 4-pin power connector for ease of construction.
If you’re starting out with a new drive case, the inside should be nice and clean. The only thing you’ll likely want to do is remove the hard drive data cable (it looks like a wide plastic ribbon) to make some space inside. On some models, the cable just unplugs from the internal circuit board, and on others you’ll have to cut it off with scissors or a knife.
If you’re using an old case, be sure to remove the hard drive and data cable to give you some room to work. It’ll probably need some dusting as well.
As with the cigar box project, line up the fan on the center of the top of the case and mark the four holes with a felt pen or an inked cotton swab. Drill the holes first with a 3⁄16” bit and then countersink with a 7⁄32” bit. Follow the same directions as described above in the cigar box project to mount the fan in the case.
However, if the case you are using has low interior clearance, you can use a strong adhesive like Gorilla Glue to mount the fan to the inside top of the case instead of using screws. Just be sure to use a few washers as spacers to make sure the fan and magnet have enough clearance to spin freely.
To power the fan, connect it to the drive case’s built-in 4-pin power connector and you’re done. If you are using a fan with only a hot and ground wire, you’ll need to snip off the case’s 4-pin plug and strip the wires about an inch. The four wires are: yellow (12-volt), black (ground), black (ground), red (5-volt).
Connect the yellow wire (12-volt) and the adjacent black wire (ground) to the fan and terminate the other two wires with cap connectors. This is easy to do, but for the money (about $8), I recommend going with a fan that has the Molex connector so you can avoid the procedure altogether.
Plug the drive case into a wall outlet, turn on the power and you’re ready to make a starter!
Fine Tuning
Magnetic stir bars can often be finicky. Even with commercial-grade stir plates, it is sometimes difficult to get them to spin properly. One of the easiest ways to get your stir plate operating smoothly is to use either a multi-voltage power supply or a fan with built-in speed selector. (The fancy fan is a much cheaper than the fancy power supply.) Start the stir bar off at a lower speed and then increase the speed when it is smoothly spinning. Starting off at too high or too low rotational speed often makes the bar jitter and dance, but not spin. The more options you have on regulating the speed of the rotation of the fan and magnet, the easier it will be to get good results from your starter.
Forrest Whitesides would like to thank his good friends Rob Coker (who advised on wiring and power supplies) and Jim Kimball (who donated hard drives and fans) for making this project much easier than it could have been.
Very cool thanks for this. Anyone know where to get a stir bar?
")
That depends,does he owe u moneyHey man, are you Necris from Think bike? Used to ride a Hyosung but now you have a beamer?
You can get them here - http://www.thebeerkeg.co.za/catalog/fermentation-measurement/magnetic-stir-bar-30mm.htmlVery cool thanks for this. Anyone know where to get a stir bar?
Build Your Own Stir Plate
Author: Forrest Whitesides Issue: Jul/Aug 2007
A stir plate will keep your yeast in suspension while you are raising them in your yeast starter . . . and we've got instructions on how to make two different stir plates, one from old computer parts you may have lying around.
If you ask experienced brewers for advice on improving your beer, one of the things they are most likely to say is, “Make a yeast starter!” There are a ton of good reasons to make a yeast starter and a good guide for getting started can be found in the March-April 2002 issue of Brew Your Own. One easy way to improve your yeast starter is to use a magnetic stir plate and stir bar during the fermentation of your starter. A constantly-stirred yeast starter will yield a higher cell count than an unstirred starter. Commercially available stir plates start out at about $80 for a small unit and go up from there. But, with a little ingenuity and some spare parts, you can make one yourself for much less.
Project Overview
The heart of the project is a strong neodymium magnet (more commonly known as a rare earth magnet) affixed to an 80mm 12-volt DC fan typically used in desktop computers. You’ll also need some type of power supply, which will depend on which type of enclosure you choose, some nuts and bolts and washers and a suitable enclosure to house the whole project. For this article, two enclosure options are demonstrated: a wooden cigar box and an old external hard drive case.
Keep in mind that you’ll also need a flask and a magnetic stir bar in order to use your new stir plate.
Choosing a Fan
An inexpensive PC case fan from your local electronics retailer will work just fine, as will any case fan you can pull out of any old PC that might be sitting around your house. Garage sales are an excellent source for old PCs, and one PC will provide you with multiple fans and a hard drive from which you can pull a great magnet for use in this project.
Any 12-volt DC fan will work, but some offer more features than others. Radio Shack, for instance, sells a barebones fan with just a lead wire and ground wire. This type of configuration is very easy to work with, but offers no rotational speed control. On the other end of the spectrum, computer parts maker Antec offers a nice case fan with an integrated three-speed selector switch, giving you a no-fuss method of controlling the rotational speed. It also has built-in colored LED lights, which doesn’t help your yeast, but does look cool. The Antec fans are available at major electronics retailers, like CompUSA or Best Buy, and also are available from online vendors like New Egg.
Of course, you can always wire in a potentiometer for fine-grained control of the more simple fans, or you can use a multi-voltage power supply.
The two stir plates described in this project use 80mm fans and are ideal for 1-L flasks. If you plan to use a 2-L or larger flask for your starters, consider using a 92mm fan and a larger enclosure, although 80mm will still work. The same project instructions apply, regardless of the size of the fan.
Although a strong magnet, a 12-volt DC motor (a fan, in this case) and a power supply are all critical to making a suitable stir plate, the options for enclosures are limited only by your imagination. Feel free to use this article as merely a starting point for creating your own design.
Power Supply
If you plan on building your stir plate in an external hard drive enclosure, skip this section, as the power supply is integrated into the case.
For those of you aiming for an old-school wooden look, you will need to power your fan with a 12-volt wall-adapter type power supply. You may very well already have one or more of these devices around the house as they are common sources of power for small electronic devices. A 9-volt power supply will also work, although it will make the fan spin slower than a 12-volt adapter.
You can also use a multi-voltage power supply sold as a universal model to power many types of devices. These cost a bit more, but they allow for stepped control of fan rotation speed via selectable output voltage.
Whatever model you choose, you’ll need to cut off the round adapter plug (the end that plugs into an electronic device) and strip back the wire an inch or so in preparation for splicing it to the fan’s lead and ground wires.
Sourcing Magnets
There are many places you can get an appropriate magnet for this project, including taking them from old or broken hard drives or ordering them from scientific supply shops.
To remove a magnet from a hard drive, you will likely need a size T8 Torx screwdriver, a Philips-head screwdriver, a flathead screwdriver and a pair of needlenose pliers. Use the Torx screwdriver to remove the screws around the edges of the cover plate. A center screw is often covered with a sticker. Pry the case open with the flathead screwdriver to expose the platter and accuator arm. The magnet is located on the arm, often held in place with Philips screws. Hard drives don’t all look the same inside, so you may have to improvise a bit to find and extract your magnet.
Preparing the Fan
No matter which enclosure you use, preparing the fan for use as a stir plate motor is the same. Center the magnet on the fan’s hub (the central round surface to which the fan blades are attached). The magnet will be attracted to the metal coils inside the fan housing, which will hold it in place temporarily.
Holding the fan in your hand, give it a spin with your finger to check how well the magnet is balanced. If you feel some wobble, adjust the position of the magnet on the hub. When you have the magnet positioned properly, mark the edges with a felt pen and remove the magnet.
Now apply a small amount of multi-surface adhesive — I recommend Gorilla Glue — to the fan hub and reposition the magnet as marked. Allow the glue to dry as per the manufacturer’s instructions, usually 12 to 24 hours, before installing it in your enclosure.
Balance is Critical
The balance of the stir plate is very important. One of the advantages of using common PC case fans, however, is that they have relatively low torque. Your stir plate may wobble a fair bit with nothing on top of it (especially a light-weight cigar box), but test it with a full flask before you start worrying. Consider that the liquid in a full 1-L flask weighs 1.0 kg (2.2 lbs.) and a 2-L flask would be, obviously, double that (plus the weight of the flask itself). In my tests, a two thirds full 1-L flask is sufficient to dampen all vibration and wobbling.
Also, because of the weight of the case and integrated power supply, external hard drive cases tend to have less problems with a poorly-balanced fan and magnet. If you want to use a cigar box, getting the fan balanced is the most important step in the whole project. The cigar box model I built vibrates quite a bit with no load, but with a 1-L starter on top, it didn’t move a single millimeter over an 18-hour period of constant use.
Wooden Enclosure
Parts List
Wooden cigar box (or equivalent)
80mm 12-volt DC fan
12-volt AC/DC wall adapter
Rare earth magnet
#6-32 x 2” machine screws
#6-32 machine screw nuts
#6 metal washers
1⁄4” flat neoprene washers
1⁄4” inside-diameter rubber grommet
Plastic wire connectors
Wood is classy looking, and there are some very nice readily available enclosures at your local smoke shop: cigar boxes! Many shops sell them for a few dollars each and some give them away. Not only are they cheap, but cigar boxes are very strong and, more importantly, very thin, which allows the full power of the magnet to be used. Once you’ve got your boxed picked out, it’s time to drill some holes. (Note: For the cigar box stir plate, I used a simple fan from Radio Shack.)
Line up your fan flat in the center of the top of the cigar box lid and use a felt-tip pen to mark a dot for each of the four holes in the fan casing. If you can’t find a pen small enough to get through the hole, you can also ink the end of a cotton swab and use that to make the four dots. Now drill four 13⁄64” holes on the dots. Since the sheet metal screws have a tapered head, countersink the four holes with a 7⁄32” bit to allow the screws to sit perfectly flush in the lid. Also drill a 1⁄4” hole near the bottom of the rear panel and fit the hole with a rubber grommet. You may also want to drill some holes in the enclosure to allow the motor to have some fresh air, so that the mechanical heat from the fan motor can be dissipated.
Open the lid, fit four screws through the holes and put a neoprene washer (to help with vibration dampening) and then a metal washer over each screw. Guide the four holes in the fan casing onto the screws and push the fan flush against the washers. Give the blades a spin with your finger to make sure the magnet clears the lid and the fan can spin freely. If it does not spin freely, remove the fan from the screws and add additional washers to put more space between the lid and the fan. Add a final metal washer after the fan and finish off with a nut for each screw.
Make sure that the power supply is unplugged before proceeding. Now pull the wires of the power supply through the grommeted hole in the back of the cigar box. Use a pair of wire connectors to splice together the two lead wires and two ground wires. (You can use a voltmeter to differentiate lead from ground, or you can just use trial and error). Plug the power supply into the wall to verify that the wiring is correct. As an additional touch, you can cut a piece of plexiglass to fit the lid of the cigar box to protect the wood and electronics from liquids.
Crack open your favorite liquid yeast and get started with a starter on your new stir plate!
Hard Drive Case
Parts List
External hard drive case
80mm 12-volt DC fan
Rare earth magnet
#6-32 x 2” machine screws
#6-32 machine screw nuts
#6 metal washers
Plastic wire connectors (optional)
An external hard drive case makes an ideal starting point for a stir plate for several reasons. It has the appropriate power supply already built in, most fans connect to the power supply with a standard 4-pin connector (called a Molex connector) that just snaps in place and they generally have an off/on toggle switch built in. Some drive cases also have a small fan to expel heat from the case, a feature that will help keep your starter from fermenting too hot.
External hard drive cases are inexpensive (without a drive in them). Some models are available for less than $30 from major electronics retailers and online PC parts vendors. I got three older external cases (complete with broken drives) for free from a friend who works in the IT industry. For this project, I highly recommend a fan that has the standard 4-pin power connector for ease of construction.
If you’re starting out with a new drive case, the inside should be nice and clean. The only thing you’ll likely want to do is remove the hard drive data cable (it looks like a wide plastic ribbon) to make some space inside. On some models, the cable just unplugs from the internal circuit board, and on others you’ll have to cut it off with scissors or a knife.
If you’re using an old case, be sure to remove the hard drive and data cable to give you some room to work. It’ll probably need some dusting as well.
As with the cigar box project, line up the fan on the center of the top of the case and mark the four holes with a felt pen or an inked cotton swab. Drill the holes first with a 3⁄16” bit and then countersink with a 7⁄32” bit. Follow the same directions as described above in the cigar box project to mount the fan in the case.
However, if the case you are using has low interior clearance, you can use a strong adhesive like Gorilla Glue to mount the fan to the inside top of the case instead of using screws. Just be sure to use a few washers as spacers to make sure the fan and magnet have enough clearance to spin freely.
To power the fan, connect it to the drive case’s built-in 4-pin power connector and you’re done. If you are using a fan with only a hot and ground wire, you’ll need to snip off the case’s 4-pin plug and strip the wires about an inch. The four wires are: yellow (12-volt), black (ground), black (ground), red (5-volt).
Connect the yellow wire (12-volt) and the adjacent black wire (ground) to the fan and terminate the other two wires with cap connectors. This is easy to do, but for the money (about $8), I recommend going with a fan that has the Molex connector so you can avoid the procedure altogether.
Plug the drive case into a wall outlet, turn on the power and you’re ready to make a starter!
Fine Tuning
Magnetic stir bars can often be finicky. Even with commercial-grade stir plates, it is sometimes difficult to get them to spin properly. One of the easiest ways to get your stir plate operating smoothly is to use either a multi-voltage power supply or a fan with built-in speed selector. (The fancy fan is a much cheaper than the fancy power supply.) Start the stir bar off at a lower speed and then increase the speed when it is smoothly spinning. Starting off at too high or too low rotational speed often makes the bar jitter and dance, but not spin. The more options you have on regulating the speed of the rotation of the fan and magnet, the easier it will be to get good results from your starter.
Forrest Whitesides would like to thank his good friends Rob Coker (who advised on wiring and power supplies) and Jim Kimball (who donated hard drives and fans) for making this project much easier than it could have been.
This is easy and cheap to make, however - I want to build one that is more robust and built with purpose-built components. I found a cool one here. I might try something like this soon.
I like the hotplate idea, any idea where I could find one?I know you get USB powered hot plates that are supposed to keep your coffee warm, if that would maybe help with the heating idea. Maybe something similar to an electric blanket to cover the flask would be easiest to incorporate without interfering with the stirring device?

