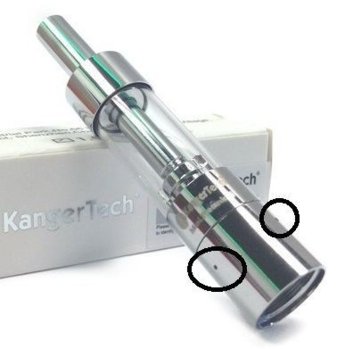
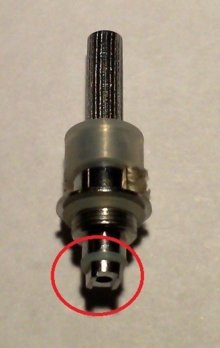
Ok, so I finished a tank on the MPT3 with the 0.9 ohm coil and opened airholes last night and everything was perfect. No burns, no dry hits. Really diggin it. FYI, I drilled the bottom 3 holes out, but there is still a restriction because of the airflow through the coil opening. Still much beter than it was. Also gives the coil a bit more air to run cooler.
Navigation
Install the app
How to install the app on iOS
Follow along with the video below to see how to install our site as a web app on your home screen.

Note: this_feature_currently_requires_accessing_site_using_safari
More options
You are using an out of date browser. It may not display this or other websites correctly.
You should upgrade or use an alternative browser.
You should upgrade or use an alternative browser.
Show us your Builds - User Made Tank Coils (Protanks, Nautilus Etc.)
- Thread starter devdev
- Start date
Ok, so I finished a tank on the MPT3 with the 0.9 ohm coil and opened airholes last night and everything was perfect. No burns, no dry hits. Really diggin it. FYI, I drilled the bottom 3 holes out, but there is still a restriction because of the airflow through the coil opening. Still much beter than it was. Also gives the coil a bit more air to run cooler.
Glad you've sorted the MPT3 - to what size did you drill the air holes?
open them all to 1mm, but the main feed to the coil still stays the same.
Like this:
3 holes drilled out to 1mm
View attachment 13607
But this is still the restricting factor.
View attachment 13608
Atleast now I know I'm giving the coil maximum flow.
Thanks for a proper explanatory answer, highly appreciated.
Altyd 'n plesier Johan!Thanks for a proper explanatory answer, highly appreciated.
So I had to rebuild the coil for my MPT3 (using a old style dual coil, the one that came installed in the MPT3) - decided to share the experience 
Coil specs:
Single coild, 30G Kanthal, 5 wraps, 2.5mm ID - came out to 1.7 Ohm (a bit higher than I expected, but works quite nice actually).
Here goes...
The prep - the removed coil from previous build was 2.2 Ohm (cotton wick)
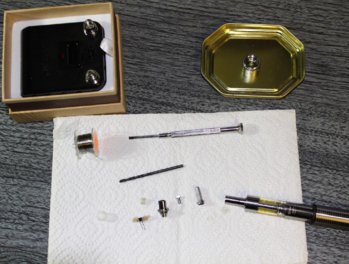
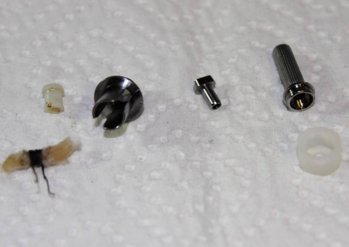
I noticed that the gromet had a bit of scarring, but it was still good to go
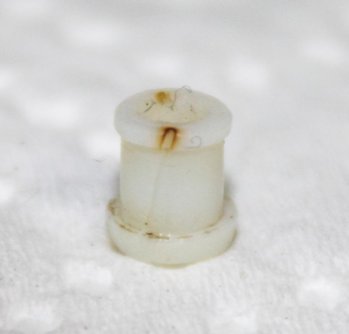
The coil - initial wrap and after some heating and squeezing to get it nice and tight (I could have done better though, but I got impatient)
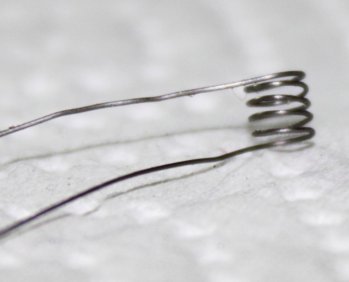
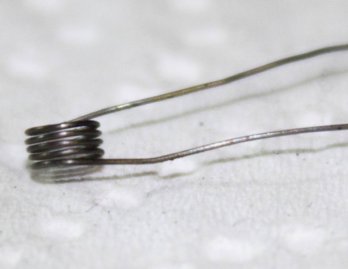
Wicking it with organic cotton, and placing it in the cup (I find this the easiest way to keep everything in place)
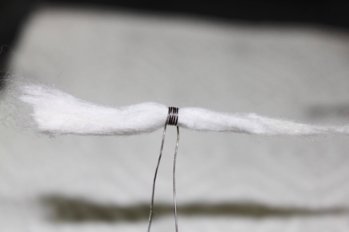
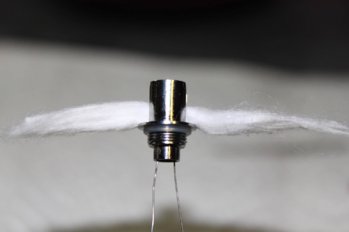
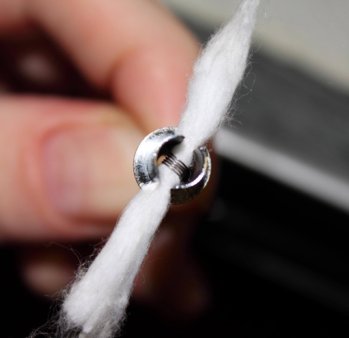
Making sure everything is aligned while bending the legs and inserting the gromet + pin
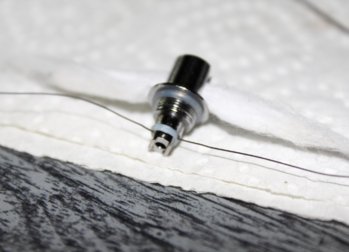
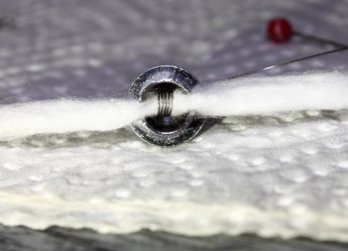
Tweaked the position a bit with a needle and then testing the resistance
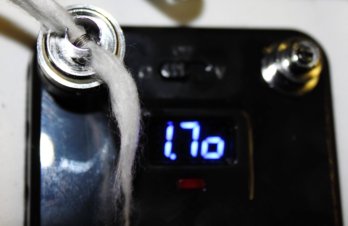
Now just priming the wick with some juice, then re-assembling it
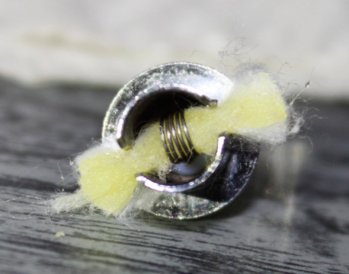
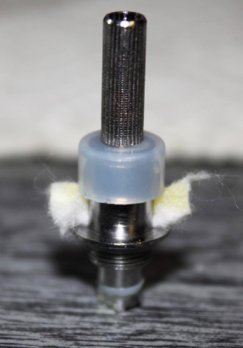
And finally screwing it back into the MPT3 base (tucking the wicks inside so it doesn't interfere with the threading), filling the tank and she's ready to vape - watching the bubbles as the cotton drinks up the juice (the level dips quite a bit since I did not prime the wick as much as I could have).
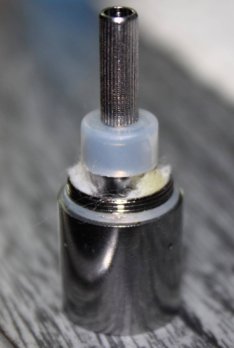
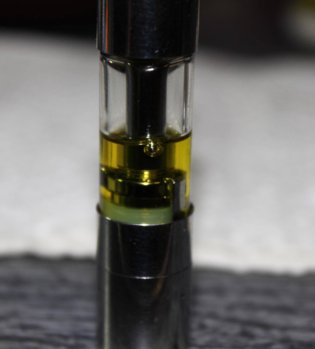
Gives a really nice vape, decent flavour and good vapour production.
Final thoughts:
Not as much fun as building for an RDB/RBA but really not bad if you have some of these old style dual coils (the new ones are a pain to build with, IMHO). If you have some of those lying around keep them safe, soon I expect they will be very hard (impossible?) to find. Clearly the new style coils were an attempt by the manufacturers to prevent what I just did here because (at least to me) the new style coils don't vape at all better than these ones - and they give more problems too.
Bonus features:
So i've built up a small "coil graveyard" and thought I'd share that too
WARNING: this is rated PG-13 (VG-87)
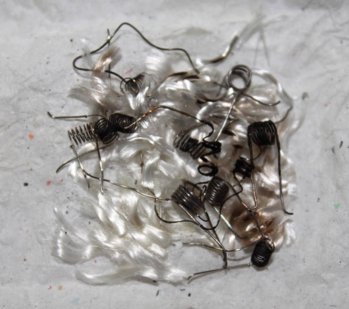
Coil specs:
Single coild, 30G Kanthal, 5 wraps, 2.5mm ID - came out to 1.7 Ohm (a bit higher than I expected, but works quite nice actually).
Here goes...
The prep - the removed coil from previous build was 2.2 Ohm (cotton wick)


I noticed that the gromet had a bit of scarring, but it was still good to go

The coil - initial wrap and after some heating and squeezing to get it nice and tight (I could have done better though, but I got impatient)


Wicking it with organic cotton, and placing it in the cup (I find this the easiest way to keep everything in place)


Making sure everything is aligned while bending the legs and inserting the gromet + pin


Tweaked the position a bit with a needle and then testing the resistance


Now just priming the wick with some juice, then re-assembling it


And finally screwing it back into the MPT3 base (tucking the wicks inside so it doesn't interfere with the threading), filling the tank and she's ready to vape - watching the bubbles as the cotton drinks up the juice (the level dips quite a bit since I did not prime the wick as much as I could have).


Gives a really nice vape, decent flavour and good vapour production.
Final thoughts:
Not as much fun as building for an RDB/RBA but really not bad if you have some of these old style dual coils (the new ones are a pain to build with, IMHO). If you have some of those lying around keep them safe, soon I expect they will be very hard (impossible?) to find. Clearly the new style coils were an attempt by the manufacturers to prevent what I just did here because (at least to me) the new style coils don't vape at all better than these ones - and they give more problems too.
Bonus features:
So i've built up a small "coil graveyard" and thought I'd share that too
WARNING: this is rated PG-13 (VG-87)

Awesome post @free3dom ! Thanks for all the pics and steps. Someone will find this very helpful for sure!So I had to rebuild the coil for my MPT3 (using a old style dual coil, the one that came installed in the MPT3) - decided to share the experience
Coil specs:
Single coild, 30G Kanthal, 5 wraps, 2.5mm ID - came out to 1.7 Ohm (a bit higher than I expected, but works quite nice actually).
Here goes...
The prep - the removed coil from previous build was 2.2 Ohm (cotton wick)
View attachment 13908 View attachment 13909
I noticed that the gromet had a bit of scarring, but it was still good to go
View attachment 13910
The coil - initial wrap and after some heating and squeezing to get it nice and tight (I could have done better though, but I got impatient)
View attachment 13911 View attachment 13912
Wicking it with organic cotton, and placing it in the cup (I find this the easiest way to keep everything in place)
View attachment 13913 View attachment 13914
Making sure everything is aligned while bending the legs and inserting the gromet + pin
View attachment 13915 View attachment 13916
Tweaked the position a bit with a needle and then testing the resistance
View attachment 13917 View attachment 13918
Now just priming the wick with some juice, then re-assembling it
View attachment 13919 View attachment 13920
And finally screwing it back into the MPT3 base (tucking the wicks inside so it doesn't interfere with the threading), filling the tank and she's ready to vape - watching the bubbles as the cotton drinks up the juice (the level dips quite a bit since I did not prime the wick as much as I could have).
View attachment 13921 View attachment 13922
Gives a really nice vape, decent flavour and good vapour production.
Final thoughts:
Not as much fun as building for an RDB/RBA but really not bad if you have some of these old style dual coils (the new ones are a pain to build with, IMHO). If you have some of those lying around keep them safe, soon I expect they will be very hard (impossible?) to find. Clearly the new style coils were an attempt by the manufacturers to prevent what I just did here because (at least to me) the new style coils don't vape at all better than these ones - and they give more problems too.
Bonus features:
So i've built up a small "coil graveyard" and thought I'd share that too
WARNING: this is rated PG-13 (VG-87)
View attachment 13925
Last edited:
Great step-by-step tutorial, thanks for taking the time to put this together, great photos tooSo I had to rebuild the coil for my MPT3 (using a old style dual coil, the one that came installed in the MPT3) - decided to share the experience
Coil specs:
Single coild, 30G Kanthal, 5 wraps, 2.5mm ID - came out to 1.7 Ohm (a bit higher than I expected, but works quite nice actually).
Here goes...
The prep - the removed coil from previous build was 2.2 Ohm (cotton wick)
View attachment 13908 View attachment 13909
I noticed that the gromet had a bit of scarring, but it was still good to go
View attachment 13910
The coil - initial wrap and after some heating and squeezing to get it nice and tight (I could have done better though, but I got impatient)
View attachment 13911 View attachment 13912
Wicking it with organic cotton, and placing it in the cup (I find this the easiest way to keep everything in place)
View attachment 13913 View attachment 13914
Making sure everything is aligned while bending the legs and inserting the gromet + pin
View attachment 13915 View attachment 13916
Tweaked the position a bit with a needle and then testing the resistance
View attachment 13917 View attachment 13918
Now just priming the wick with some juice, then re-assembling it
View attachment 13919 View attachment 13920
And finally screwing it back into the MPT3 base (tucking the wicks inside so it doesn't interfere with the threading), filling the tank and she's ready to vape - watching the bubbles as the cotton drinks up the juice (the level dips quite a bit since I did not prime the wick as much as I could have).
View attachment 13921 View attachment 13922
Gives a really nice vape, decent flavour and good vapour production.
Final thoughts:
Not as much fun as building for an RDB/RBA but really not bad if you have some of these old style dual coils (the new ones are a pain to build with, IMHO). If you have some of those lying around keep them safe, soon I expect they will be very hard (impossible?) to find. Clearly the new style coils were an attempt by the manufacturers to prevent what I just did here because (at least to me) the new style coils don't vape at all better than these ones - and they give more problems too.
Bonus features:
So i've built up a small "coil graveyard" and thought I'd share that too
WARNING: this is rated PG-13 (VG-87)
View attachment 13925
I'm happy to share...hopefully it'll help someone - I've gotten my fair share of help from other posts on this forum, so paying it forward 
I did it that way the first couple of times and almost went mad trying to keep everything in place. Then I tried doing it with a smaller drill bit (one that fits the side channels of the cup) but the coil was still moving around too much. So finally I've settled on the above technique and it has been much easier to keep everything in place - with the added bonus of not having to struggle getting the wick through once the coil is installed
that an awesome tip right there- to insert the wick (cotton) before placing the coil into the cup
i usually install the coil, put in grommet and everything, then do the wick last
I did it that way the first couple of times and almost went mad trying to keep everything in place. Then I tried doing it with a smaller drill bit (one that fits the side channels of the cup) but the coil was still moving around too much. So finally I've settled on the above technique and it has been much easier to keep everything in place - with the added bonus of not having to struggle getting the wick through once the coil is installed
Nice tutorial, thank you.
I just made one with 30g and 6 wraps and it came to 2.0 ohms.
I wanted to get to around 1,6, so this helps
I just made one with 30g and 6 wraps and it came to 2.0 ohms.
I wanted to get to around 1,6, so this helps
Nice tutorial, thank you.
I just made one with 30g and 6 wraps and it came to 2.0 ohms.
I wanted to get to around 1,6, so this helps
Seems we both overshot a bit...I was actually aiming for around 1.4 - seems we both need to lose a wrap
"Does this wrap make my coil look fat?"
Seems we both overshot a bit...I was actually aiming for around 1.4 - seems we both need to lose a wrap
"Does this wrap make my coil look fat?"
I had 28g before, which got to lower ohms with lots of wraps.
But there was a slight delay when firing up, which irritated me. So for EVOD coils I'm going to stick to 30g.
4 wraps sounds too little but that must be how to get to 1,4 - 1,6.
if you doing 4 wraps around a 2mm drill bit, you will get it to around 1ohm if im not mistakenI had 28g before, which got to lower ohms with lots of wraps.
But there was a slight delay when firing up, which irritated me. So for EVOD coils I'm going to stick to 30g.
4 wraps sounds too little but that must be how to get to 1,4 - 1,6.
I had 28g before, which got to lower ohms with lots of wraps.
But there was a slight delay when firing up, which irritated me. So for EVOD coils I'm going to stick to 30g.
4 wraps sounds too little but that must be how to get to 1,4 - 1,6.
I'm a bit concerned with that as well.
Maybe spacing it out a bit more (i.e. not doing a micro coil) would help give it more wick exposure.
You are right (according to my calculator). Thanks a lotif you doing 4 wraps around a 2mm drill bit, you will get it to around 1ohm if im not mistaken
I've been using 2.5mm ID, and it seems that 5 wraps around 2mm would be perfect for me @ 1.3 ohms

awesome!!You are right (according to my calculator). Thanks a lot
I've been using 2.5mm ID, and it seems that 5 wraps around 2mm would be perfect for me @ 1.3 ohms
Thanks @free3dom thanks to your post i managed to rebuild my mpt3 coils and its amazing!!!
http://www.ecigssa.co.za/threads/su...pt2-pt3-nautilus-etc.1613/page-14#post-136121
I wicked with ekowool and coiled with 28g kanthal, 10 wraps @ 1.6ohm
http://www.ecigssa.co.za/threads/su...pt2-pt3-nautilus-etc.1613/page-14#post-136121
I wicked with ekowool and coiled with 28g kanthal, 10 wraps @ 1.6ohm
Thanks @free3dom thanks to your post i managed to rebuild my mpt3 coils and its amazing!!!
http://www.ecigssa.co.za/threads/su...pt2-pt3-nautilus-etc.1613/page-14#post-136121
I wicked with ekowool and coiled with 28g kanthal, 10 wraps @ 1.6ohm
Glad it was helpful
It really does vape so much better with a rebuilt coil, I can't even imagine going back to commercial ones
So a guy, or girl, walks into a vape store, or goes online to find their very first vaping device. They are told the coil in this device is supposed to last 2-3 weeks, when in actual fact the bugger usually doesn't make it past the first week. If it does, you are lucky, if not, it is put down to 'user error'.
Now this is all very well for making large amounts of cash off those poor schmucks by selling pre-made coils from Mr lee Wong Dong in China, week after week, but lets suppose that poor guy or girl works as a waiter or is a student and has saved up money for 2 months, foregoing all other pleasures in order to buy their 'starter kit' from their preferred supplier. Only to find that their coil, which they have budgeted to last 2-3 weeks breaks, gets gunked up or is a dud. Now, this dude or duddett goes directly back to smoking those disgusting stinkies. They do not even make it to the level of an RDA, RBA etc etc.
Thankfully the coils are getting better but this was a real sore point for me and I would feel really bad for these poor souls. It is also advisable to know what you are doing before attempting to rebuild a 'factory line' made coil as it could be 'dangerous'.
I have thus made it my mission to find every factory made coil and show folks how to rebuild them in order to provide a longer lasting vape and keep folks away from the stinkies. There are so many ways to skin a cat, not that I would skin any cat, unless their fur was going to provide some sort of miracle wicking material, and yes I have tried it, cat fur does not work, but I did not skin the cat to get the fur, I collected it. Anyways, that is a whole other post.
Rebuild of The Nautilus Mini BVC Coil (NOT THE RIPTRIPPER METHOD) Much bigger vapor clouds, no flooding, no dry hits, Not a BVC Coil
1)Drill out the 2 holes on the side of the coil to 1.5mm. Use only the 2 holes that go directly through. the other 2 holes come up against a sleeve inside the coil chamber.

2)Plug the two other holes with some tightly packed cotton, we will not be needing these. Make your coil, using 26 gauge kanthal, do 9 wraps around a 1.4mm drill bit. Then insert the long ends through the top of the coil. Pull your coil down to the bottom of the chamber while holding on to the pigtail leads until you can see the inner coil diameter line up with the circumference of your previously drilled holes.
Before inserting the bottom ends of the bvc chamber, push a 1.3mm drill bit through the holes you previously drilled, while making sure to line it up with the center of your coil that is now inside the chamber.

This would be the view from the top:

3) Once you have seated the coil, insert the rubber grommit at the bottom of the chamber and then insert the pin, this will secure your coil in place(can be seen in 2nd picture).
Thread some cotton through the lined up hole of the inner coil and the drilled holes, making sure to not leave any gaps between the drilled hole wall and the cotton. On a side note, I like the cotton to not be too thick so as to impede juice flow, but also not too thin so that juice comes flooding in through your drilled holes.

4)Wet the cotton and give her a twirl around the coil post:

5)Reasemble the Aspire Mini and prepare for the most awesome vape ever. Flavor is amazing, but what got me the most was the amount of clouds that came forth from this device. Even better than the standard BVC coil, and I surmise this is due to the large chamber within the coil and the fact the 1.4mm thickness of the coil within the chamber allows for more air flow than would be common in a standard BVC coil. Totally amazed at the outcome.

You are now ready to vape and live free once again and it doesn't cost you an arm and a leg. The coil worked out to 0.9 ohms and using 15 watts pushed so much cloud out I had to open the yacht hatch to get some air in.
Now this is all very well for making large amounts of cash off those poor schmucks by selling pre-made coils from Mr lee Wong Dong in China, week after week, but lets suppose that poor guy or girl works as a waiter or is a student and has saved up money for 2 months, foregoing all other pleasures in order to buy their 'starter kit' from their preferred supplier. Only to find that their coil, which they have budgeted to last 2-3 weeks breaks, gets gunked up or is a dud. Now, this dude or duddett goes directly back to smoking those disgusting stinkies. They do not even make it to the level of an RDA, RBA etc etc.
Thankfully the coils are getting better but this was a real sore point for me and I would feel really bad for these poor souls. It is also advisable to know what you are doing before attempting to rebuild a 'factory line' made coil as it could be 'dangerous'.
I have thus made it my mission to find every factory made coil and show folks how to rebuild them in order to provide a longer lasting vape and keep folks away from the stinkies. There are so many ways to skin a cat, not that I would skin any cat, unless their fur was going to provide some sort of miracle wicking material, and yes I have tried it, cat fur does not work, but I did not skin the cat to get the fur, I collected it. Anyways, that is a whole other post.
Rebuild of The Nautilus Mini BVC Coil (NOT THE RIPTRIPPER METHOD) Much bigger vapor clouds, no flooding, no dry hits, Not a BVC Coil
1)Drill out the 2 holes on the side of the coil to 1.5mm. Use only the 2 holes that go directly through. the other 2 holes come up against a sleeve inside the coil chamber.

2)Plug the two other holes with some tightly packed cotton, we will not be needing these. Make your coil, using 26 gauge kanthal, do 9 wraps around a 1.4mm drill bit. Then insert the long ends through the top of the coil. Pull your coil down to the bottom of the chamber while holding on to the pigtail leads until you can see the inner coil diameter line up with the circumference of your previously drilled holes.
Before inserting the bottom ends of the bvc chamber, push a 1.3mm drill bit through the holes you previously drilled, while making sure to line it up with the center of your coil that is now inside the chamber.

This would be the view from the top:

3) Once you have seated the coil, insert the rubber grommit at the bottom of the chamber and then insert the pin, this will secure your coil in place(can be seen in 2nd picture).
Thread some cotton through the lined up hole of the inner coil and the drilled holes, making sure to not leave any gaps between the drilled hole wall and the cotton. On a side note, I like the cotton to not be too thick so as to impede juice flow, but also not too thin so that juice comes flooding in through your drilled holes.

4)Wet the cotton and give her a twirl around the coil post:

5)Reasemble the Aspire Mini and prepare for the most awesome vape ever. Flavor is amazing, but what got me the most was the amount of clouds that came forth from this device. Even better than the standard BVC coil, and I surmise this is due to the large chamber within the coil and the fact the 1.4mm thickness of the coil within the chamber allows for more air flow than would be common in a standard BVC coil. Totally amazed at the outcome.

You are now ready to vape and live free once again and it doesn't cost you an arm and a leg. The coil worked out to 0.9 ohms and using 15 watts pushed so much cloud out I had to open the yacht hatch to get some air in.
Will give it a go Chop! Thanks bro!So a guy, or girl, walks into a vape store, or goes online to find their very first vaping device. They are told the coil in this device is supposed to last 2-3 weeks, when in actual fact the bugger usually doesn't make it past the first week. If it does, you are lucky, if not, it is put down to 'user error'.
Now this is all very well for making large amounts of cash off those poor schmucks by selling pre-made coils from Mr lee Wong Dong in China, week after week, but lets suppose that poor guy or girl works as a waiter or is a student and has saved up money for 2 months, foregoing all other pleasures in order to buy their 'starter kit' from their preferred supplier. Only to find that their coil, which they have budgeted to last 2-3 weeks breaks, gets gunked up or is a dud. Now, this dude or duddett goes directly back to smoking those disgusting stinkies. They do not even make it to the level of an RDA, RBA etc etc.
Thankfully the coils are getting better but this was a real sore point for me and I would feel really bad for these poor souls. It is also advisable to know what you are doing before attempting to rebuild a 'factory line' made coil as it could be 'dangerous'.
I have thus made it my mission to find every factory made coil and show folks how to rebuild them in order to provide a longer lasting vape and keep folks away from the stinkies. There are so many ways to skin a cat, not that I would skin any cat, unless their fur was going to provide some sort of miracle wicking material, and yes I have tried it, cat fur does not work, but I did not skin the cat to get the fur, I collected it. Anyways, that is a whole other post.
Rebuild of The Nautilus Mini BVC Coil (NOT THE RIPTRIPPER METHOD) Much bigger vapor clouds, no flooding, no dry hits, Not a BVC Coil
1)Drill out the 2 holes on the side of the coil to 1.5mm. Use only the 2 holes that go directly through. the other 2 holes come up against a sleeve inside the coil chamber.

2)Plug the two other holes with some tightly packed cotton, we will not be needing these. Make your coil, using 26 gauge kanthal, do 9 wraps around a 1.4mm drill bit. Then insert the long ends through the top of the coil. Pull your coil down to the bottom of the chamber while holding on to the pigtail leads until you can see the inner coil diameter line up with the circumference of your previously drilled holes.
Before inserting the bottom ends of the bvc chamber, push a 1.3mm drill bit through the holes you previously drilled, while making sure to line it up with the center of your coil that is now inside the chamber.

This would be the view from the top:

3) Once you have seated the coil, insert the rubber grommit at the bottom of the chamber and then insert the pin, this will secure your coil in place(can be seen in 2nd picture).
Thread some cotton through the lined up hole of the inner coil and the drilled holes, making sure to not leave any gaps between the drilled hole wall and the cotton. On a side note, I like the cotton to not be too thick so as to impede juice flow, but also not too thin so that juice comes flooding in through your drilled holes.

4)Wet the cotton and give her a twirl around the coil post:

5)Reasemble the Aspire Mini and prepare for the most awesome vape ever. Flavor is amazing, but what got me the most was the amount of clouds that came forth from this device. Even better than the standard BVC coil, and I surmise this is due to the large chamber within the coil and the fact the 1.4mm thickness of the coil within the chamber allows for more air flow than would be common in a standard BVC coil. Totally amazed at the outcome.

You are now ready to vape and live free once again and it doesn't cost you an arm and a leg. The coil worked out to 0.9 ohms and using 15 watts pushed so much cloud out I had to open the yacht hatch to get some air in.
Alright... so I managed to do this thing and have a 1.5ohm coil running in my tank, but I'm getting serious dry hits all the time. I've wicked it up 3 times now and all 3 times have started off great, but then gone bad after about 5 or 6 puffs... I suspect I have too much cotton in there, but I also don't want the tank to flood, so it's a very tight balancing act.
Alright... so I managed to do this thing and have a 1.5ohm coil running in my tank, but I'm getting serious dry hits all the time. I've wicked it up 3 times now and all 3 times have started off great, but then gone bad after about 5 or 6 puffs... I suspect I have too much cotton in there, but I also don't want the tank to flood, so it's a very tight balancing act.
Make sure to wet your wick before you put it into the tank. Don't worry about flooding too much, as long as those other 2 holes are plugged you will be good.
Ok, so I didn't figure out why the it wasn't wicking properly ( I tried more cotton, less cotton, twisting the cotton, leaving it untwisted and fluffing the cotton) but what did eventually manage to work was after wicking the coil, sliding a pin through the cotton and coil and making a small channel for the juice to flow in (i.e. making a small hole in the cotton). After saturating the cotton I then went in with the pin again to re-open the small hole on either side and presto! everything is working like a charm!
Similar threads
- Replies
- 2
- Views
- 2K
- Replies
- 3
- Views
- 503
- Replies
- 5
- Views
- 2K
- Replies
- 2
- Views
- 2K


